Tag Archive: Easy

Maple Hazelnut Granola

Maple Hazelnut Granola

It’s been a while since I’ve posted a recipe for granola. That’s mostly because I’ve been reluctant to pay $7 for a bag of gluten-free rolled oats at the grocery store near me. But this week I finally caved in because I’d missed a bowl of hot, soft oatmeal in the morning and chewy, crunchy granola on my yogurt.

I love the subtle flavor of maple syrup; when I sweeten my yogurt I usually choose maple syrup over honey. It’s even better with a little cinnamon and vanilla mixed in to remind you of warm french toast. This granola is great over some maple yogurt but also by the handful.

Maple Hazelnut Granola Sample

This granola isn’t too sweet on its own. If you prefer a sweeter granola, increase the maple syrup to 1/2 cup. You can also add some chocolate chips once the granola has cooled for a fun flavor.

Maple Hazelnut Granola

Prep time: 10 minutes

Cook time: 20 minutes

Ingredients(Makes about 3 1/2 cups):

  • 2 1/2 cup rolled oats
  • 1/3 cup maple syrup
  • 2 Tablespoons cooking oil
  • 1 teaspoon vanilla extract
  • 1/2 teaspoon cinnamon
  • 1/4 teaspoon salt
  • 1/2 cup hazelnuts
  • 1/2 cup raisins

Maple Hazelnut Granola Yield

Method:

  1. Preheat your oven to 350 degrees.
  2. In a large bowl, mix together the oats, syrup, oil, vanilla, cinnamon and salt thoroughly.
  3. Lay the oats out on a non-stick baking tray in a thin layer.
  4. Bake for 20-25 minutes until the oats are toasted but not burnt.
  5. Remove the granola from the oven and let the oats cool.
  6. Once cool, toss the oats with the hazelnuts and raisins until thoroughly mixed.
  7. Store in an air-tight container at room temperature when not eating.

Maple Hazelnut Granola Serving

Easy Nutella Brownies

Easy Nutella Brownies

A lot of the time when it comes to food blogging there’s usually a pressure to make everything homemade. Homemade cake. Homemade frosting. Homemade powdered sugar. Homemade butter. Everything.

This recipe has just about nothing homemade. If you want to make your own Nutella and brownies from scratch that’s fine; invite me over when you do. But if you’re in a rush or just alone on a Friday night and feel like making brownies this is probably a better choice because it’s more convenient and you can eat Nutella off of a spoon while you’re waiting for the brownies to cook.

Easy Nutella Brownies Nutella

You can use any brownie mix for this recipe as long as it’s for an 8 x 8 baking pan. I used the gluten-free kind pictured below and they came out delicious. Ignore the suggested egg and oil mix-ins and use the amounts listed below.

Easy Nutella Brownies

Prep time: 10 minutes

Cook time: 25 minutes

Ingredients(Makes one 8 x 8 pan):

  • 1 16oz brownie mix
  • 1 egg
  • 1/2 cup Nutella
  • 1/4 cup cooking oil
  • 1/4 cup water

Easy Nutella Brownies Ingredients

Method:

  1. Preheat your oven to 350 degrees.
  2. In a large bowl, combine all of the ingredients and mix well. If the batter is too thick, add an extra 1/4 cup of water to thin it to a brownie batter consistency.
  3. Grease an 8 x 8 baking pan.
  4. Pour the batter into the pan and spread it into an even layer.
  5. Bake for 25-30 minutes until the center of the brownies has set.
  6. Remove from the oven and let the brownies cool before cutting.

Easy Nutella Brownies Frosted

Frosting choice should be obvious.

Balsamic Herb Oven Fries

Balsamic Herb Oven Fries

When I think about the foods I eat most often, potatoes climb that list far too high. Potatoes are almost always my side dish of choice; there’s just so much you can do with them.

Personally I’m a fan of any potato that’s roasted. These aren’t quite your traditional french fries; they’re more accurately roasted potatoes in your classic french fry shape. The balsamic vinegar and herbs add a unique flavor that puts these a step ahead of any fries you can get at a restaurant.

Balsamic Herb Oven Fries Tray

You don’t need to go very heavy at all on the wet ingredients and they bake off fairly quickly in the oven. If you don’t have herbes de Provence, make a mix of your favorite savory herbs and use that instead.

Balsamic Herb Oven Fries

Prep time: 10 minutes

Cook time: 45 minutes

Ingredients(Makes about 4 servings):

  • 1lb Russet potatoes, scrubbed and washed
  • 2 Tablespoons balsamic vinegar
  • 2 Tablespoons extra virgin olive oil
  • 1 Tablespoon herbes de Provence
  • 1 teaspoon salt
  • 1/2 teaspoon black pepper

Balsamic Herb Oven Fries Done

Method:

  1. Preheat your oven to 350 degrees.
  2. Slice the potatoes into 1/2-inch thick fries lengthwise.
  3. Toss the fries with the oil, vinegar, herbs and seasonings
  4. Lay the fries out in a single layer on a non-stick baking tray
  5. Roast the fries for 45 minutes to an hour until the ends brown.
  6. Remove the fries from the oven and serve hot.

Balsamic Herb Oven Fries Serving

With some tangy ketchup of course.

Cape Cod Trail Mix

Cape Cod Trail Mix

New England doesn’t have a standard cuisine but it certainly could. Between the apple cider doughnuts, glazed Dunkin Donut’s munchkins with jimmies and Boston cream pies there’s a lot to love(mostly carbs).

And then there’s this trail mix. You won’t find the typical gang of peanuts and raisins; instead we have cashews and almonds with dried cranberries. White chocolate instead of milk chocolate adds a sweetness to match the tartness of the berries. The flavors are simple but purely addictive, especially paired with some local apples and Vermont cheddar slices.

Cape Cod Trail Mix Yield

You could use raw almonds but I think roasted just have such a better flavor and texture. Similarly you could use raw cashews but I think you need something salted in the recipe to add a balance to the sweet.

Cape Cod Trail Mix

Prep time: 5 minutes

Cook time: 0 minutes

Ingredients(Makes about 3 1/2 cups)

  • 1 cup roasted, salted cashews
  • 1 cup roasted almonds
  • 3/4 cup craisins
  • 1/2 cup white chocolate chunks

Method:

  1. In a large bowl, combine and mix all of the ingredients together.
  2. Keep in an air-tight container at room temperature when not eating.

Cape Cod Trail Mix Serving

All that’s missing is a bag of Cape Cod potato chips—never the baked or reduced salt kind.

3 Favorite Dips

The funny thing about being a food blogger is that you make recipes for 4 or 8 or 12 and sometimes end up eating them all by yourself. That’s not a problem when the recipe’s good at least.

All of these dips I can say I’ve eaten half to entire portions of(not in one sitting… usually) and yet I keep making them again and again. They tend to get a lot of hits from Pinterest or Facebook because of how quick and easy they are—two things I always look for in recipes, too—so I thought I’d share them again because you can never have too much of a good thing.

fruity-peanut-butter-yogurt-dip-yield

Fruity Peanut Butter Yogurt Dip—Is it yogurt? Is it a spread? It’s somewhere in between; it’s a dip and a tasty one at that. But my favorite thing about this recipe isn’t how easy it is. It’s how many different ways you can make it. I’ve had this with strawberry yogurt, vanilla yogurt, and plain yogurt with nutella and each time it comes out equally good. But as fun as it is as a dip it’s usually always better with a spoon so keep that in mind.

Mar-2nd-044

Peanut Butter Chocolate Chip Dessert Hummus—Out of all the times I’ve put beans into a dessert, this is probably the weirdest but also the tastiest. The texture and flavor is a lot like raw cookie dough except without all of the flour, refined sugars, and raw eggs. I’ve been obsessed lately with using this in place of peanut butter in pb&j sandwiches; if you’ve never tried something like this you’d be surprised how much you’ll love it.

Vegetarian-Buffalo-Chicken-Dip1

Vegetarian Buffalo Chicken Dip—Finally something savory. I made this dip for Superbowl Sunday and have wanted to make it every weekend since. It’s creamy, spicy, and a little tangy all at once. If you’re a new vegetarian or still love eating meat you won’t know the chicken is gone at all. The next day put the leftovers into some warm tortillas and you’ll have a whole new meal.

Enjoy! I hope you’ll find one you like.

Gluten-Free Chobani Pancakes

Gluten-Free Chobani Pancakes

Pancakes are always a good breakfast choice. I’ve never found a recipe though where the first one or two comes out as good as the last; mine are always misshapen and burnt. But by the 3rd pancake the pan is seasoned and magic starts happening and they come out the perfect color and texture every time. Maybe that’s just a feature of pancake recipes in general.

This recipe uses almond flour, which gives it a slightly nutty flavor. I prefer using almond flour here to most other gluten-free flours because it doesn’t have a strange flavor when you taste the raw batter(and somehow that always ends up happening). Besides that there’s just Greek yogurt and eggs; it couldn’t be much simpler.

Gluten-Free Chobani Pancakes Flavors

Chobani sent me their newest flavors to taste and play around with in the kitchen: banana, pear, raspberry chocolate chunk and pineapple with caramel bits. I really couldn’t pick one that I preferred over the others; they were all amazing. I made this recipe with the raspberry chocolate chunk and it had a hint of those flavors. I could imagine that any of these would be good in the pancakes. It all depends what you’re in the mood for!

Gluten-Free Chobani Pancakes

Prep time: 5 minutes

Cook time: 5 minutes

Ingredients(Makes 1 serving):

  • 1/2 cup almond flour
  • 4oz flavored Chobani greek style yogurt
  • 1 egg
  • 1/4 teaspoon baking soda

Gluten-Free Chobani Pancakes Ingredient

Method:

  1. Heat a frying pan over low-medium heat with a little oil or non-stick cooking spray.
  2. In a medium-sized bowl, beat together all of the ingredients until mixed.
  3. Pour 1/4 cup of batter into the center of the pan. Cook for about 30 seconds until the bottom is set and bubbles come through the center.
  4. Flip the pancake and cook the other side until it’s cooked through. Remove from the pan.
  5. Continue cooking until all of the batter is used up.
  6. Serve hot with butter and maple syrup.

Gluten-Free Chobani Pancakes Eaten

I would definitely recommend doubling or tripling the recipe for a crowd. You can substitute any nut flour for almond flour in a pinch but not coconut flour since that’s something different entirely.

Nutella Yogurt Dip

Nutella Yogurt Dip

Nutella is one of those foods that I think everyone likes. Maybe it’s not for everyone, but it has 17 million fans on Facebook so it must feel pretty loved. I’m sure all those birthday notifications must be a bitch.

Two years ago I shared a fruity peanut butter yogurt dip recipe and since then it’s been pinned on Pinterest almost 190,000 times; who knew there were even that many Pinterest users? I’ve seen countless reviews and variations of it and this is another one to add to the list.

Nutella Yogurt Dip Nutella

Nutella isn’t exactly a health food but that doesn’t mean you have to pass up on this delicious dip. There are plenty of all-natural varieties of chocolate hazelnut spreads out there and you can even make your own. If you’re using a brand that’s less sugar-laden you might want to add a touch more honey.

Nutella Yogurt Dip

Prep time: 5 minutes

Cook time: 0 minutes

Ingredients(Makes 1 cup):

  • 1/2 cup Nutella
  • 1/2 cup plain low-fat yogurt
  • 1 1/2 Tablespoons honey(optional)

Method:

  1. Combine all of the ingredients in a bowl and mix well.
  2. Store in the refrigerator when not eating.

Nutella Yogurt Dip Fruit

Serve on fruit, graham crackers, and fingers.

Chocolate Chip Cookie Bark

Chocolate Chip Cookie Bark

Whoever decided Cookies N’ Cream would get so much attention? There are Cookies N’ Cream ice creams, milk shakes, chocolate bars, granola bars—everything–Cookies N’ Cream.

I’m a bigger fan of the classic chocolate chip cookie; there’s nothing that you shouldn’t be able to do with a chocolate chip cookie. With chocolate, brown sugar, butter, and vanilla, there aren’t any other flavors you could ask for.

This bark, like most others, is simple to make but always a huge hit. Anyone who likes the taste of a chocolate chip cookie won’t be able to pass it up.

Chocolate Chip Cookie Bark Cookies

For this recipe you don’t want to use your grandmother’s fresh-out-of-the-oven chocolate chip cookies but instead something from the store shelf like Chips Ahoy! or Lucy’s that’s crunchy and won’t get stale in the bark.

Chocolate Chip Cookie Bark

Prep time: 15 minutes

Cook time: 0 minutes

Ingredients(Makes 16-20 servings):

  • 8.5 ounces white chocolate OR 1 cup white chocolate chips
  • 1/4 cup chocolate chips
  • 5 chocolate chip cookies, broken into pieces

Chocolate Chip Cookie Bark Yield

Method:

  1. Melt the white chocolate chips in a microwave or over a double boiler.
  2. Spread the melted chocolate out onto non-stick wax paper in a thin layer.
  3. Spread the broken chocolate chip cookie pieces out on top and then the chocolate chips so that they evenly cover the bark.
  4. Lightly press the toppings into the bark.
  5. Refrigerate or freeze the bark for 20-30 minutes until it has solidified. Break the bark into equal-sized pieces to serve.
  6. Keep refrigerated when not eating.

Dark Chocolate Peppermint Bark

Dark Chocolate Peppermint Bark

I love minty things. Mints, candy canes, mint chocolate—any and all of it makes a perfect after-dinner treat. It’s almost as good as brushing your teeth. Well… almost…

As soon as the stores started selling candy canes I bought the ingredients to make this. It’s not hard and all yet impressive enough to give to friends and family.

Dark Chocolate Peppermint Bark Broken

This is hardly a recipe. It’s just 3 ingredients and nearly impossible to screw up(don’t burn the chocolate) but still makes a thoughtful gift. If you want to vary things up, use white chocolate instead of dark.

Dark Chocolate Peppermint Bark

Prep time: 10 minutes

Cook time: 0 minutes

Ingredients(Makes about 16 servings):

  • 10oz dark chocolate, chopped OR 1 1/4 cups bittersweet chocolate chips
  • 1/2 teaspoon peppermint extract
  • 4 candy canes, crushed

Dark Chocolate Peppermint Bark Yield

Method:

  1. Melt the chocolate in a microwave or over a double boiler.
  2. Once the chocolate is melted, mix in the peppermint extract until the chocolate is smooth.
  3. Pour the chocolate onto a sheet of wax or parchment paper. Spread it out into a thin layer.
  4. Sprinkle the crushed candy canes on top of the chocolate and press it in lightly.
  5. Refrigerate the bark for 20-30 minutes to let it harden.
  6. Break the bark into 15-20 uneven pieces. Keep refrigerated before ready to serve.

Dark Chocolate Peppermint Bark Serving

‘Tis the season.

Avocado Sour Cream Chip Dip

Kettle Brand Chips asked 14 bloggers to create a recipe of their favorite holiday dip. My favorite holiday dip is guacamole; I could eat it with a spoon. But too much guacamole can be overpowering on the taste buds, especially at parties when you lose track of how much chips and dip you’ve eaten. Sour cream, on the other hand, has that smooth and clean flavor that lets you dip and dip and dip. I don’t usually like to do sponsored posts, but Kettle Brand Chips is a company I can really get behind. They’re dedicated to using natural ingredients without GMOs and their chips are gluten-free, too. They’re also just delicious; have you tried their Salt & Fresh Ground Pepper flavor? Incredible.

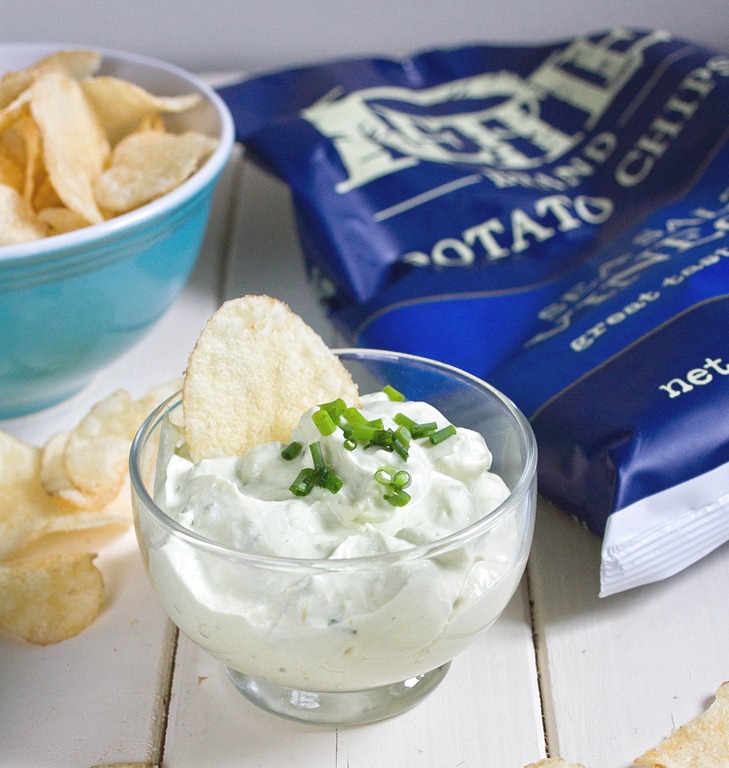
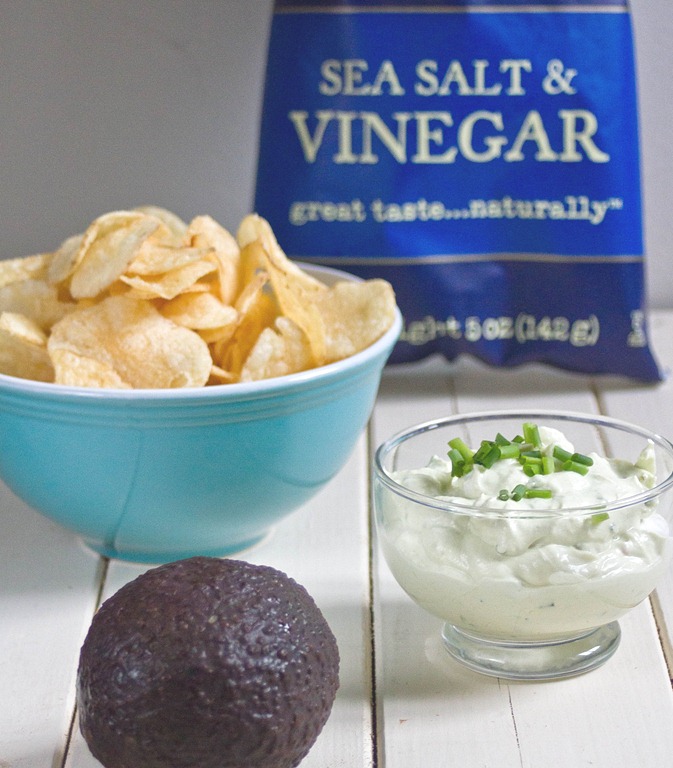
For this recipe I’ve added avocado to a fairly simple sour cream dip. It’s no hassle at all to throw together. The avocado adds a light green color and a rich texture. Even though they’re similar, using both onion powder and fresh chives helps to add layers to the flavor of the dip. I paired this with my favorite flavor of chip, Sea Salt and Vinegar. I think it goes perfectly with the tart flavor of vinegar because the chip lends flavor to the dip while the dip cools the chip down. It would also be incredibly good with any spicy flavor like Jalapeno or Spicy Thai™–anything with a strong saltiness to it. Since there’s very little acidity and seasoning in the dip itself, it’s important to use a chip that will bring that to the table. At the end of this post there’s also a giveaway so be sure to read through!

Avocado Sour Cream Chip Dip

Prep time: 10 minutes

Cook time: 0 minutes

Ingredients(Makes about 8 servings):

  • 1 ripe medium avocado, peeled and pitted
  • 3/4 cup sour cream or low-fat sour cream
  • ½ teaspoon onion powder
  • ½ teaspoon salt
  • 3 Tablespoons freshly chopped chives

Method:

  1. In a food processor(or however you’d like to do it), puree the avocado until it’s completely smooth.
  2. Fold together the avocado puree, sour cream, onion powder, salt, and 2 ½ Tablespoons of chopped chives.
  3. Transfer the dip to a serving bowl and garnish with the remaining chives.
  4. Serve with Kettle Brand Chips and veggie crudités

Now it’s your turn to tell me, What is Your favorite holiday dip? Respond to this question with your answer using one of the methods below and you could win a $100 Visa Gift Card!

Rules:

  • No duplicate comments.
  • This giveaway is open to US Residents age 18 or older.
  • Winners will be selected via random draw, and will be notified by e-mail. You have 72 hours to respond otherwise a new winner will be selected.
  • This sweepstakes runs from 11/13-12/31.
  • You may receive (2) total entries by selecting from the following entry methods:

a) Leave a comment answering what’s your favorite holiday dip?

b) Tweet a public message about this promotion including exactly the following unique term in your tweet message: “#SweepstakesEntry” Leave the URL to that tweet in a comment on this post

c) Blog about this promotion, including a disclosure that you are receiving a sweepstakes entry in exchange for writing the blog post, and leave the URL to that post in a comment on this post

d) For those with no Twitter or blog, read the official rules to learn about an alternate form of entry.

The Official Rules are available here.

Be sure to visit the Kettle Brand Chips page on BlogHer.com where you can read other bloggers’ reviews and find more chances to win! Good luck!