Category Archives: Side Dish

How To Cook Nachos At Home

How To Cook Nachos At Home

Happy seis de Mayo!

Nachos are my favorite bad food. You can get them anywhere(and I have), especially anywhere worth going. After a few drinks there’s nothing else I’d rather have–not even Reese’s cup brownies.

Making them at home, though, has never been as simple as it out to be. You can’t put them in the microwave or the chips get soggy. I’ve literally set a pan on fire in the oven not understanding how a burner works. Bad bad bad.

Skillet Nachos

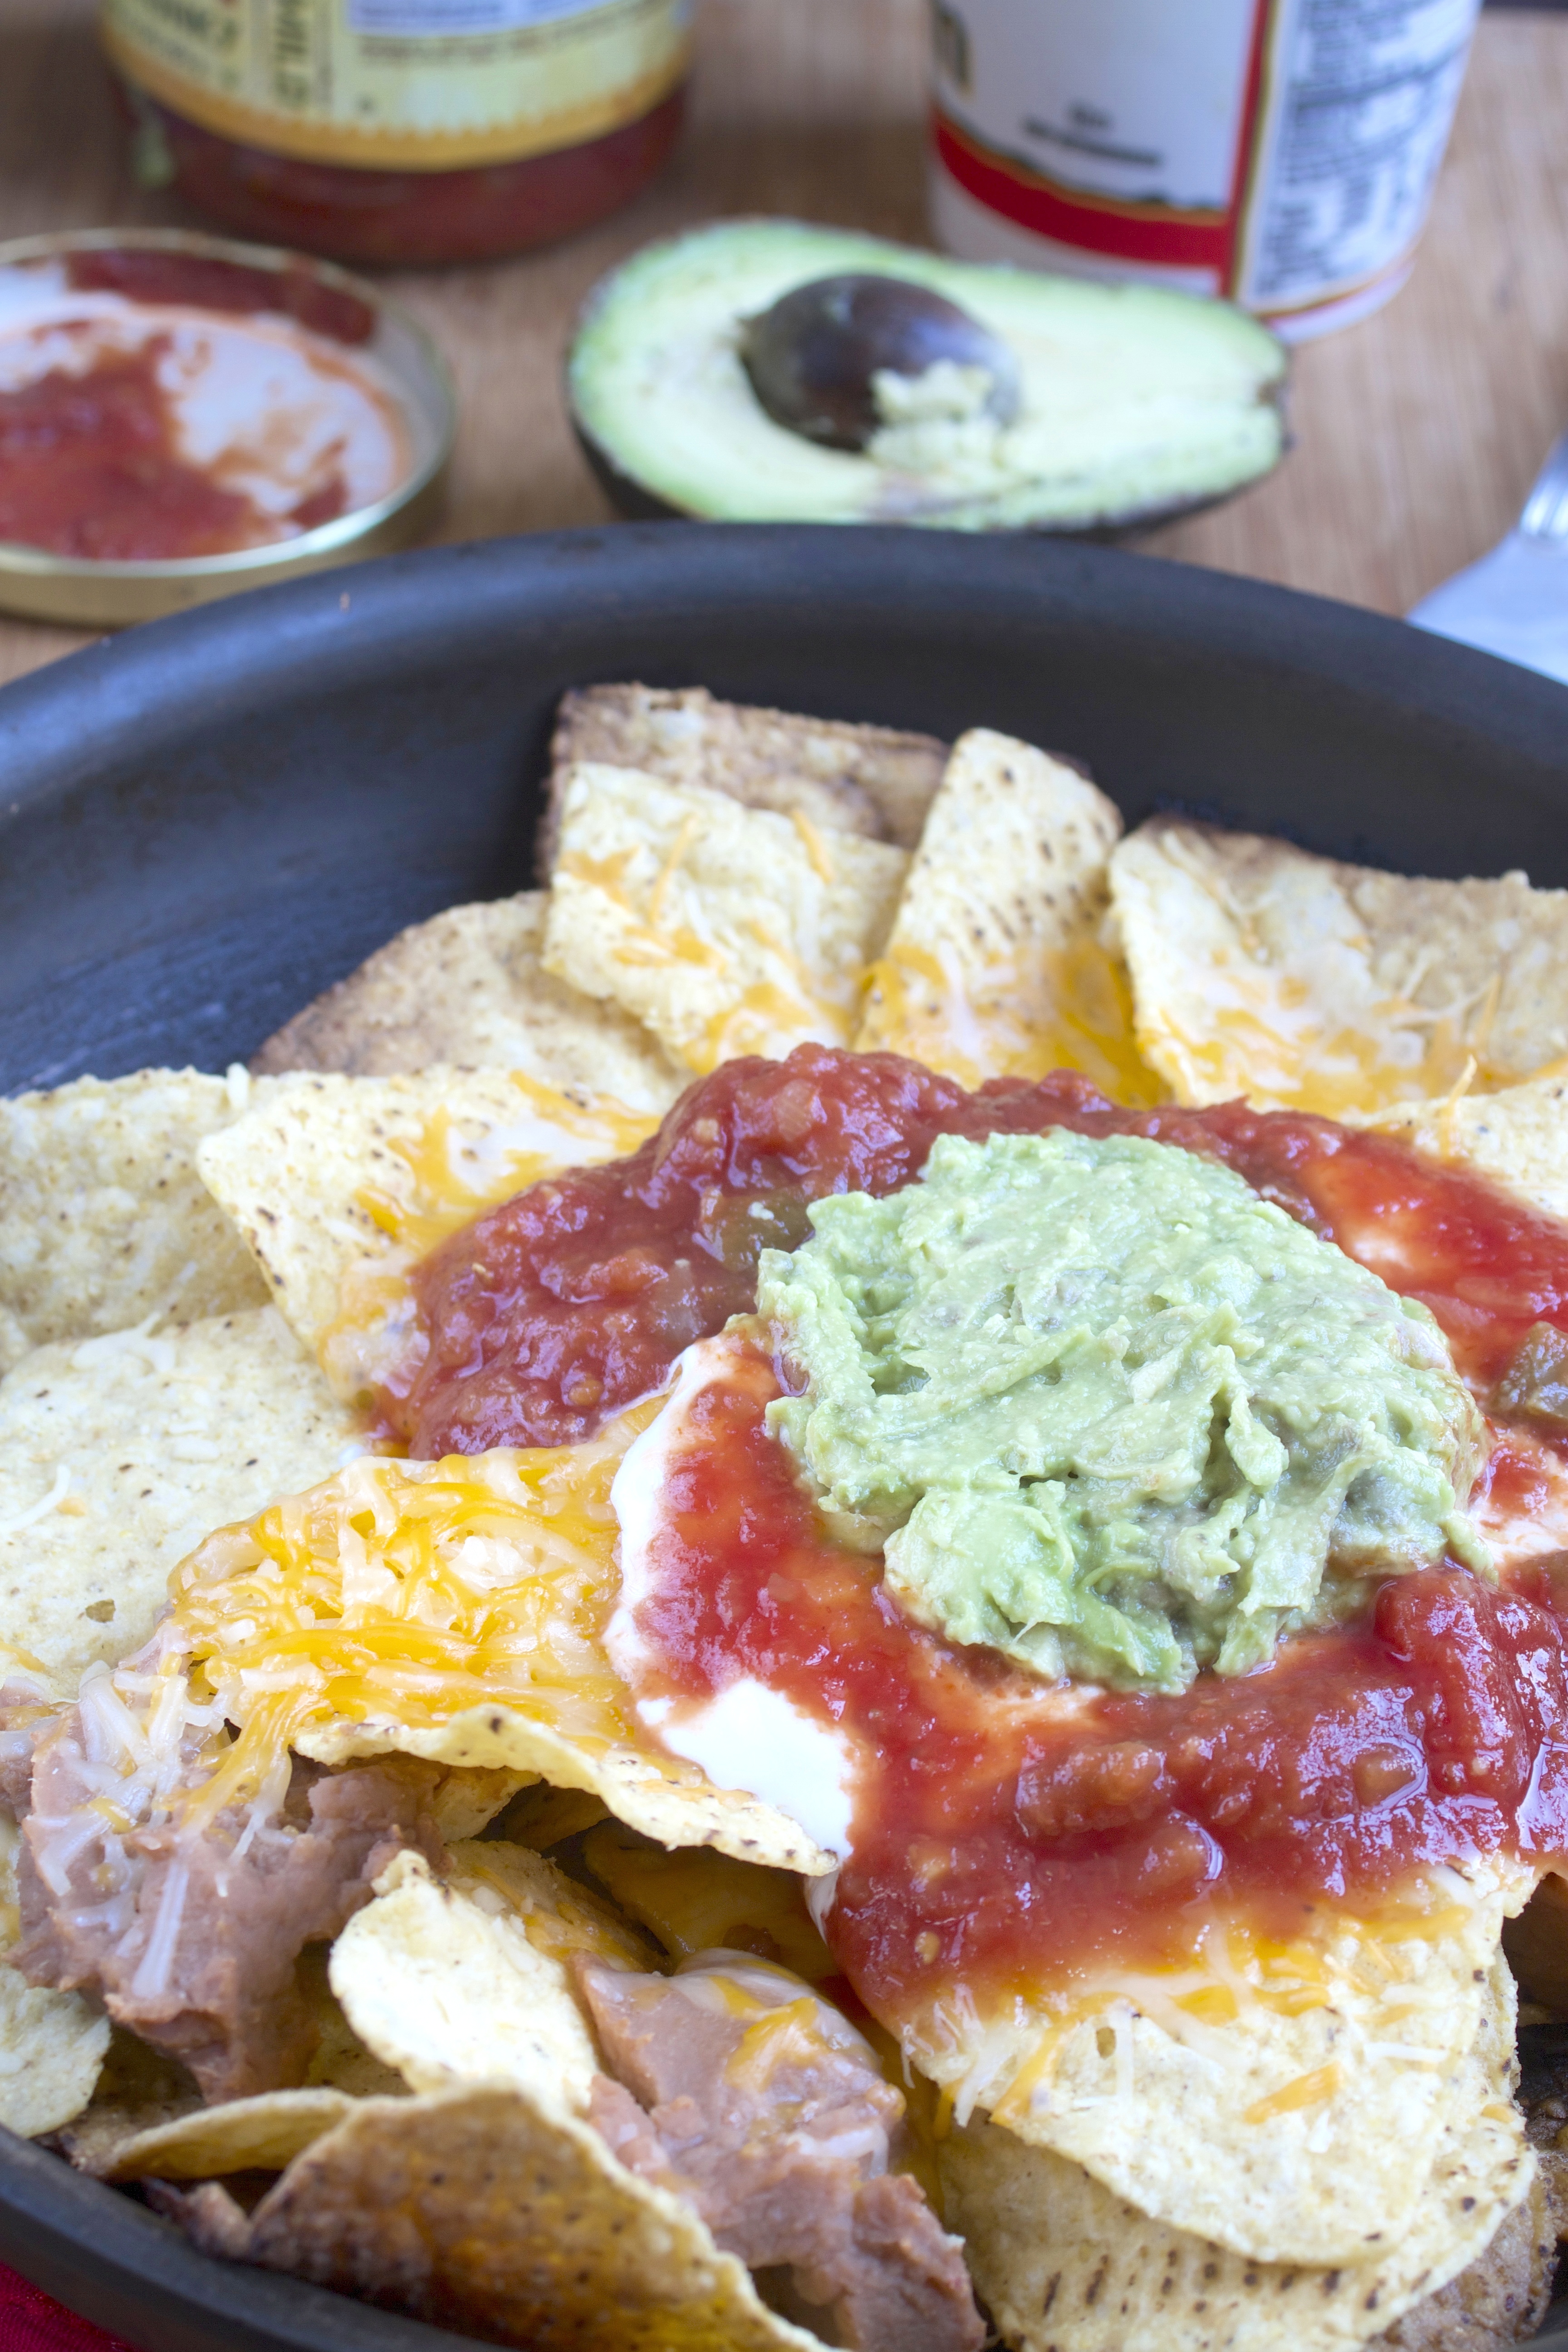
These are the most satisfying nachos I’ve made at home. They’re warm and melty on top while the chips stay hot and crisp–not soggy. It’s easy to make and you can eat it from the pan so you don’t have to dirty dishes. What could be better?

Skillet Nachos

Prep time: 5 minutes

Cook time: 5 minutes

  • 1-2 Tablespoons oil
  • 4 handfuls of tortilla chips
  • 1/2 cup refried beans
  • 1/2 cup shredded cheese*
  • 1/4 cup salsa
  • 1/4 cup sour cream
  • 1/4 cup guacamole

*Make sure to use a cheese that melts well since you don’t want this on the burner for too long. Avoid processed shredded cheeses with lots of added ingredients and stabilizers.

Method:

  1. Rub a pan with a cover with oil to make sure the tortillas won’t stick or burn.
  2. Add the chips into the pan. Add the beans and cheese around on top evenly.
  3. Turn the burner onto a medium heat and cover immediately with a pan cover.
  4. Cook for 1-2 minutes until the cheese has melted and remove from the burner immediately.
  5. Add the salsa, sour cream, and guacamole and enjoy.

Savory Garlic Green Beans

IMG_6519

A lot of the time I’m asked if this is purely a dessert blog. It’s not, but I can see where the confusion comes from between brownies and bark and cookies.

Desserts are just easier to photograph. You don’t have to worry about them cooling too much. You can even wait a whole day before cutting a slice. But spend 10 minutes photographing green beans and all you’re left with are mediocre pictures and cold vegetables.

You’ll only get one mediocre picture from this blog post, but a darn good recipe. If you like vegetables—or even if you don’t—using garlic and shallots and just the right amount of salt makes these greens addictive.

Savory Garlic Green Beans

Prep time: 10 minutes

Cook time: 5 minutes

Ingredients(Makes 2-3 servings):

  • 3 Tablespoons olive oil
  • 1/2 shallot, diced
  • 2 cloves garlic, chopped finely
  • 1lb fresh green beans, end chopped
  • 1/2 teaspoon salt

Method:

  1. Heat 2 tablespoons of oil in a pan over medium heat.
  2. Add in the shallots and garlic and cook until they begin to brown.
  3. Add in the rest of the oil and the green beans. Sauté moving constantly so that the green beans cook on all sides.
  4. Season with salt and toss before removing from the pan. Serve while hot.

Buffalo Cream Cheese Chex Dip + Giveaway

IMG_6509

I love being challenged to make recipes with a few ingredients(a la Chopped). I think it’s easier than starting with a blank canvas. Chex & General Mills challenged me to make something with Chex cereal and Frank’s hot sauce—an odd combination for sure. But immediately I had an idea and I’m happy it turned out so well.

This recipe’s a twist on a savory cheese ball and my vegetarian buffalo chicken dip. The last time I had that dip was for the Super Bowl; I think this one’s going to be the winner for college basketball and any other party I go to this month. It’s just as tasty but a little simpler because there’s no baking involved—perfect for bringing to a party where you won’t be able to heat anything up.

IMG_6510

I debated which Chex cereal to suggest making this with. Using rice or corn makes it gluten-free, but some people might prefer wheat. I would recommend matching it to whatever cracker you’re serving with this. If they’re corn-based, go with corn, wheat-based go with wheat, etc.

Buffalo Cream Cheese Chex Dip

Prep time: 10 minutes

Cook time: 0 minutes

Ingredients(Serves about 8-10 people):

  • 1 8oz block of cream cheese, room temperature
  • 1/2 cup cannellini beans
  • 1 cup shredded Mexican cheese blend
  • 1/4 cup Frank’s RedHot buffalo wing hot sauce
  • 2/3 cup crushed rice, corn, or wheat Chex cereal
  • Chips and vegetables for dipping

Method:

  1. Combine the cream cheese, cannellini beans, shredded cheese, hot sauce, and 1/4 cup + 1 Tablespoon crushed Chex cereal in a large bowl.
  2. Using a potato masher, forcefully mix all of the ingredients until it forms a smooth, even-colored dip.
  3. Using your hands and a clean, non-stick surface, form the dip into a ball.
  4. Lightly bread the outside of the cheese ball with with the remaining Chex cereal.
  5. Serve at room temperature with tortilla chips and vegetables to dip.

Chex-Franks

Giveaway:

Want to make your own? You can get the same inspiration I did to make this pictured above. Just do one or multiple entries as listed below and I’ll pick a winner at 11:59pm on Sunday, March 9th.

Good luck!

5 Vegetarian Super Bowl Dip Recipes

This weekend might be the biggest weekend for football, but it’s also the biggest weekend for dips. As a vegetarian I usually live off of nachos whenever I’m at a party or sports bar. I could never get tired of spicy salsa and creamy guacamole, but making your own dips always tastes better than buying a pre-packaged one from the store. Here are 5 recipes to satisfy the vegetarians and meat-lovers alike at your party who just want to dip on in.

Vegetarian-Buffalo-Chicken-Dip_thumb

Vegetarian Buffalo Chicken Dip

Prep time: 10 minutes

Cook time: 25 minutes

Ingredients(Serves 8-12 people):

  • 8oz cream cheese
  • 1/2 cup hot sauce
  • 8oz shredded cheddar or Mexican-blend cheese, divided
  • 1 15oz can white beans, rinsed and drained

Method:

  1. Preheat your oven to 350 degrees.
  2. In a large bowl, beat together the hot sauce, cream cheese, and 6 ounces(about 1 1/2 cups) of shredded until mixed.
  3. Fold in the beans, adding a little bit of water if necessary until fully incorporated.
  4. Scoop the dip into an oven-safe bowl and spread out the remaining cheese on top to cover it.
  5. Bake for 20-25 minutes until the cheese begins to brown and the center is hot.
  6. Remove from the oven and serve hot with crudité and nachos.

Roasted Red Pepper Hummus

Prep time: 5 minutes

Cook time: 20 minutes

Ingredients(Serves 6 people):

  • 2 cups chickpeas
  • 1 roasted red pepper with the skin peeled
  • 1/4 cup tahini
  • 2 Tablespoons neutral oil
  • 1 Tablespoon white vinegar
  • 1/2 teaspoon salt
  • 1 1/2 Tablespoons sugar

Method:

  1. For the roasted pepper, heat an oven to 425 degrees.
  2. Cut the pit out of the pepper and lay it on a baking tray.
  3. Brush the pepper with olive oil and roast it for 15-20 minutes until the skin starts to blister away. Let the pepper cool before trying to peel off the skin.
  4. Add all of the ingredients into a food processor and blend until the hummus is completely smooth.
  5. Move into a bowl to serve or store in the refrigerator in a sealed container for up to a week.

Firecracker-Guacamole-dip_thumb

Firecracker Guacamole

Prep time: 15 minutes

Cook time: 0 minutes

Ingredients(Serves 6 people):

  • 3 ripe medium-sized avocadoes
  • 1 small tomato
  • 1/2 yellow onion
  • 1 habanero pepper
  • 1/2 Tablespoon lemon or lime juice
  • 1/2 teaspoon salt
  • 2 Tablespoons chopped cilantro(optional)

Method:

  1. Peel and mash your avocadoes together in a large bowl.
  2. Carefully dice the onion, tomato, and pepper. Add the tomato and pepper in with the avocado reserving the onion.
  3. Heat a large pan over medium with a little water in the bottom. Quickly sauté the onion in the water for a couple minutes until the diced onions are semi-translucent. Remove from the heat and add in with the avocado.
  4. Add in your citrus and salt and cilantro if using and mix all of the ingredients together.
  5. Serve at room temperature. Store in the refrigerator for up to a day.

Avocado Sour Cream Dip

Prep time: 10 minutes

Cook time: 0 minutes

Ingredients(Makes about 8 servings):

  • 1 ripe medium avocado, peeled and pitted
  • 3/4 cup sour cream or low-fat sour cream
  • ½ teaspoon onion powder
  • ½ teaspoon salt
  • 3 Tablespoons freshly chopped chives

Method:

  1. In a food processor(or however you’d like to do it), puree the avocado until it’s completely smooth.
  2. Fold together the avocado puree, sour cream, onion powder, salt, and 2 ½ Tablespoons of chopped chives.
  3. Transfer the dip to a serving bowl and garnish with the remaining chives.
  4. Serve with Kettle Brand Chips and veggie crudités

IMG_6340_thumb

Creamy Avocado Onion Dip

Prep time: 10 minutes

Cook time: 1 minute

Ingredients(Serves about 4 people):

  • 1 medium-sized avocado
  • 2 Tablespoons plain 0% Stonyfield Greek
  • 1/2 teaspoon salt
  • 1 Tablespoons olive oil
  • 2 Tablespoons minced onions
  • 1/2 teaspoon onion powder

Method:

  1. Pit and seed the avocado and put the meet in a small mixing bowl.
  2. Mash the avocado with a fork until it’s smooth and uniform in color.
  3. Add in the Stonyfield Greek, salt, and olive oil and mix.
  4. In a small pan, heat some cooking oil and sauté the minced onions quickly until they turn brown(this shouldn’t take more than 30 seconds). Keep the pan moving so that they don’t burn.
  5. Add the onions and onion powder to the dip and mix until smooth.
  6. Transfer the dip to a serving bowl and serve with chips and crudités.


Savory Cinnamon Rice and Chickpeas

Nov 9th 019

I love cinnamon in just about any dessert this time of year, or sprinkled on top of coffee or into yogurt. But it’s not used as much in savory dishes as it should be.

Just a little bit of cinnamon and nutmeg make simple rice into a perfect seasonally spiced rice pilaf. You’ll be surprised how much this rice smells like a snickerdoodle cookie but tastes earthy and subtle.

If you want to take this recipe to the next level, roast the chickpeas while the rice is cooking to add a chewier texture and garnish the dish with salted pumpkin or sunflower seeds on top of extra sour cream.

Nov 9th 018

Savory Cinnamon Rice and Chickpeas

Prep time: 10 minutes

Cook time: 45 minutes

Ingredients:

  • 2 cups uncooked brown rice
  • 3 1/2 cups vegetable stock
  • 1 teaspoon dried tarragon
  • 1/2 teaspoon cinnamon
  • 1/4 teaspoon nutmeg
  • 1/4 teaspoon paprika
  • 1 Tablespoon honey
  • 1 Tablespoon sour cream or butter
  • 2 15oz cans chickpeas, drained and rinsed

Method:

  1. In a rice cooker or over the stove, combine the brown rice and vegetable stock and boil until the rice has cooked.
  2. add the rest of the ingredients in with the cooked rice and mix well.
  3. Season with extra salt and pepper to taste and serve hot.

Low-Fat Butternut Squash Casserole

October 13th 013

Stonyfield recently asked their Clean Plate Club members to help them with their latest challenge to squash pesticides out of diets with healthy squash recipes. All of Stonyfield’s yogurts are organic with no GMO or pesticides in the ingredients

Truthfully I don’t buy organic as much as I should, especially organic fruits or vegetables whose skin I usually eat. Living near an organic-only grocery store has gotten me into the habit of buying more organic. Maybe going all organic all the time can be unreasonable in today’s lifestyle, but focusing on making small changes every time you go to the grocery store makes it easy.

October 13th 002

Using greek yogurt in this casserole makes the dish a little lighter but just as creamy and adds a slight tang to the flavor. Use whatever your favorite herbs are whether that’s basil, rosemary, dill or a mix.

Low-Fat Butternut Squash Casserole

Prep time: 15 minutes

Cook time: 90 minutes

Ingredients(Makes 8 servings):

  • 2 medium-sized organic butternut squashes
  • 1 6oz container plain Stonyfield Greek
  • 6 Tablespoons butter
  • 1 Tablespoon dried herbs
  • 3/4 teaspoon salt
  • 1/2 teaspoon pepper
  • 2 ounces herbed goat cheese(optional)

Method:

  1. Preheat your oven to 375 degrees
  2. Prepare the squashes by removing the skin, stem, and seeds or roasting them whole and waiting to do this.
  3. Roast the squash for 45 minutes to an hour until it is soft and easy to poke with a fork.
  4. Move the squash to a big bowl. Add in the rest of the ingredients and mix until it forms an even batter.
  5. Pour the squash puree into a casserole dish. Level out the top.
  6. Bake for 30 to 45 minutes until a light crust forms and the squash is baked through.
  7. Remove from the oven and serve hot. Top with goat cheese or fresh herbs if desired.

Gluten-Free Cornbread

gluten-free cornbread

There are two kinds of cornbread. There’s the dry, stale, bland kind and then there’s the sweet, buttery, melt-in-your-mouth kind. This one is thankfully the latter.

I’ve been wanting to make(and eat) cornbread for a while now. Trader Joe’s recently added their own brand of gluten-free all-purpose flour to their shelves I’ve been meaning to try and this was the perfect way to kill two birds with one stone.

The bread came out sweet and slightly savory—better with a pat of butter. Even with the gluten-free flour it doesn’t crumble until it hits your tongue. 

gluten-free cornbread overhead

Adding a little bit of cinnamon and paprika gives the bread a subtle savory smokiness to it. If you want more of a dessert, omit the paprika and double the amount of cinnamon. You could also simply substitute all-purpose flour for the gluten-free all-purpose flour if gluten sensitivities aren’t an issue.

Gluten-Free Cornbread

Prep time: 10 minutes

Cook time: 30 minutes

Ingredients(Makes 9 squares):

  • 1 1/2 cup corn meal
  • 1 cup gluten-free all-purpose flour
  • 1/4 cup sugar
  • 1/2 teaspoon baking soda
  • 1/4 teaspoon salt
  • 3 eggs
  • 3/4 cup milk
  • 1 stick butter, melted
  • 1/4 teaspoon cinnamon
  • 1/8 teaspoon paprika

gluten-free cornbread yield

Method:

  1. Preheat your oven to 350 degrees.
  2. In a large bowl, mix together the corn meal, flour, sugar, baking soda and salt.
  3. Crack the eggs into the ingredients and add the milk and begin whisking.
  4. Slowly add the melted butter in as you’re whisking.
  5. Add in the cinnamon and paprika and beat until the batter is uniform.
  6. Grease an 8 x 8 pan and pour the batter in.
  7. Bake for 30 minutes until the bread has set.
  8. Remove from the oven and let cool slightly before cutting. Serve with butter and honey.

How To Make Perfect Home Fries

How To Make Perfect Home Fries

Well cooked home fries are one of my favorite foods. I always look for them on a menu when I’m out to eat(clearly I only choose very classy places that would serve home fries at 6pm); they beat plain old french fries any day.

Years of cooking these spuds have taught me that home fries are all about two things: Seasoning and cooking time. Salt, herbs, and onions all make for a really taste treat once the flavors are absorbed into the home fries. You also can’t rush perfection. The best way to get a golden, crispy outside and a soft starchy inside is to cook these low and slow, giving each side a chance to sizzle on the bottom of the pan.

How To Make Perfect Home Fries Cooking

You’ll definitely want to double or even triple the recipe if you’re cooking for a crowd because these’ll fly off the plate. Season them to taste as always; you can add any number of herbs and spices to make them spicy, garlicky, or even slightly sweet.

How To Make Perfect Home Fries

Prep time:  10 minutes

Cook time: 15 minutes

Ingredients:

  • 2 par-cooked medium Russet potatoes*
  • 2 Tablespoons chopped onion
  • 3 Tablespoons olive oil, divided
  • 1/2 teaspoon salt
  • Couple sprigs of rosemary
  • 1/4 teaspoon pepper

*I usually bake mine for 40 minutes, let them cool, and then keep them in the refrigerator to have on hand whenever I want to make these. You can also par-cook them in the microwave or by boiling them as long as they’re firm enough to slice when done.

How To Make Perfect Home Fries Potatoes

Method:

  1. Heat 1 Tablespoon of oil in a frying pan. Add in the onions and sauté them until they become translucent.
  2. Dice the potatoes into small bites, about 1/2-inch squares. Leave the skins on for a rustic look and texture.
  3. Add the potatoes into the pan with the onions along with the remaining 2 Tablespoons of oil and salt.
  4. Cook on medium heat, tossing the pan every couple of minutes to flip the potatoes. Cook for 10-15 minutes until most of the sides look browned and crispy and the oil has been soaked up.
  5. Finish by seasoning with pepper.
  6. Serve hot.

How To Make Perfect Home Fries Overhead 

Roasted Balsamic Brussels Sprouts

Roasted Balsamic Brussels Sprouts

At some point recently I could feel myself becoming one of those vegetarians who doesn’t actually eat enough vegetables. Its not that I don’t like them—I love them. I’ll order them off of a menu any chance I get. But more often than not I cook for myself, and by cook I mean make oatmeal, open a yogurt container, scramble eggs or microwave a potato.

That’s definitely a habit I need to change. I never regret buying and cooking vegetables when I do, especially not these sprouts. Anything is delicious with some good olive oil and vinegar. I thought I was making a lot at the time but this hardly lasted me two meals.

Roasted Balsamic Brussels Sprouts On Plate

If you want to make this fancy, you can add some other roasting vegetables into the mix with the brussels sprouts. These would especially be good with some julienned onions and diced potatoes(the kind not made in a microwave).

Roasted Balsamic Brussels Sprouts

Prep time: 10 minutes

Cook time: 25 minutes

Ingredients:

  • 1lb brussels sprouts, washed and cut
  • 2 Tablespoons olive oil
  • 2 Tablespoons balsamic vinegar
  • 1 teaspoon salt
  • 1/2 teaspoon black pepper

Roasted Balsamic Brussels Sprouts Prep

Method:

  1. Preheat your oven to 375 degrees.
  2. Make sure all of your brussels sprouts are clean and trimmed.
  3. In a large bowl, toss together all of the ingredients.
  4. Spread the sprouts out on a roasting pan.
  5. Roast for 20-30 minutes until the sprouts are cooked and the edges begin to crisp.
  6. Remove from the oven and serve hot.

Roasted Balsamic Brussels Sprouts Finished

Balsamic Herb Oven Fries

Balsamic Herb Oven Fries

When I think about the foods I eat most often, potatoes climb that list far too high. Potatoes are almost always my side dish of choice; there’s just so much you can do with them.

Personally I’m a fan of any potato that’s roasted. These aren’t quite your traditional french fries; they’re more accurately roasted potatoes in your classic french fry shape. The balsamic vinegar and herbs add a unique flavor that puts these a step ahead of any fries you can get at a restaurant.

Balsamic Herb Oven Fries Tray

You don’t need to go very heavy at all on the wet ingredients and they bake off fairly quickly in the oven. If you don’t have herbes de Provence, make a mix of your favorite savory herbs and use that instead.

Balsamic Herb Oven Fries

Prep time: 10 minutes

Cook time: 45 minutes

Ingredients(Makes about 4 servings):

  • 1lb Russet potatoes, scrubbed and washed
  • 2 Tablespoons balsamic vinegar
  • 2 Tablespoons extra virgin olive oil
  • 1 Tablespoon herbes de Provence
  • 1 teaspoon salt
  • 1/2 teaspoon black pepper

Balsamic Herb Oven Fries Done

Method:

  1. Preheat your oven to 350 degrees.
  2. Slice the potatoes into 1/2-inch thick fries lengthwise.
  3. Toss the fries with the oil, vinegar, herbs and seasonings
  4. Lay the fries out in a single layer on a non-stick baking tray
  5. Roast the fries for 45 minutes to an hour until the ends brown.
  6. Remove the fries from the oven and serve hot.

Balsamic Herb Oven Fries Serving

With some tangy ketchup of course.