Tag Archive: Breakfast

Cumin-Spiced Red Beans

Taco Flavored Beans

Homemade breakfast on the weekend is a usually my reward for 5 days of quick, processed breakfasts eaten at a desk or sometimes standing up. Melted cheese, runny yolks, and lots of flavor are a must.

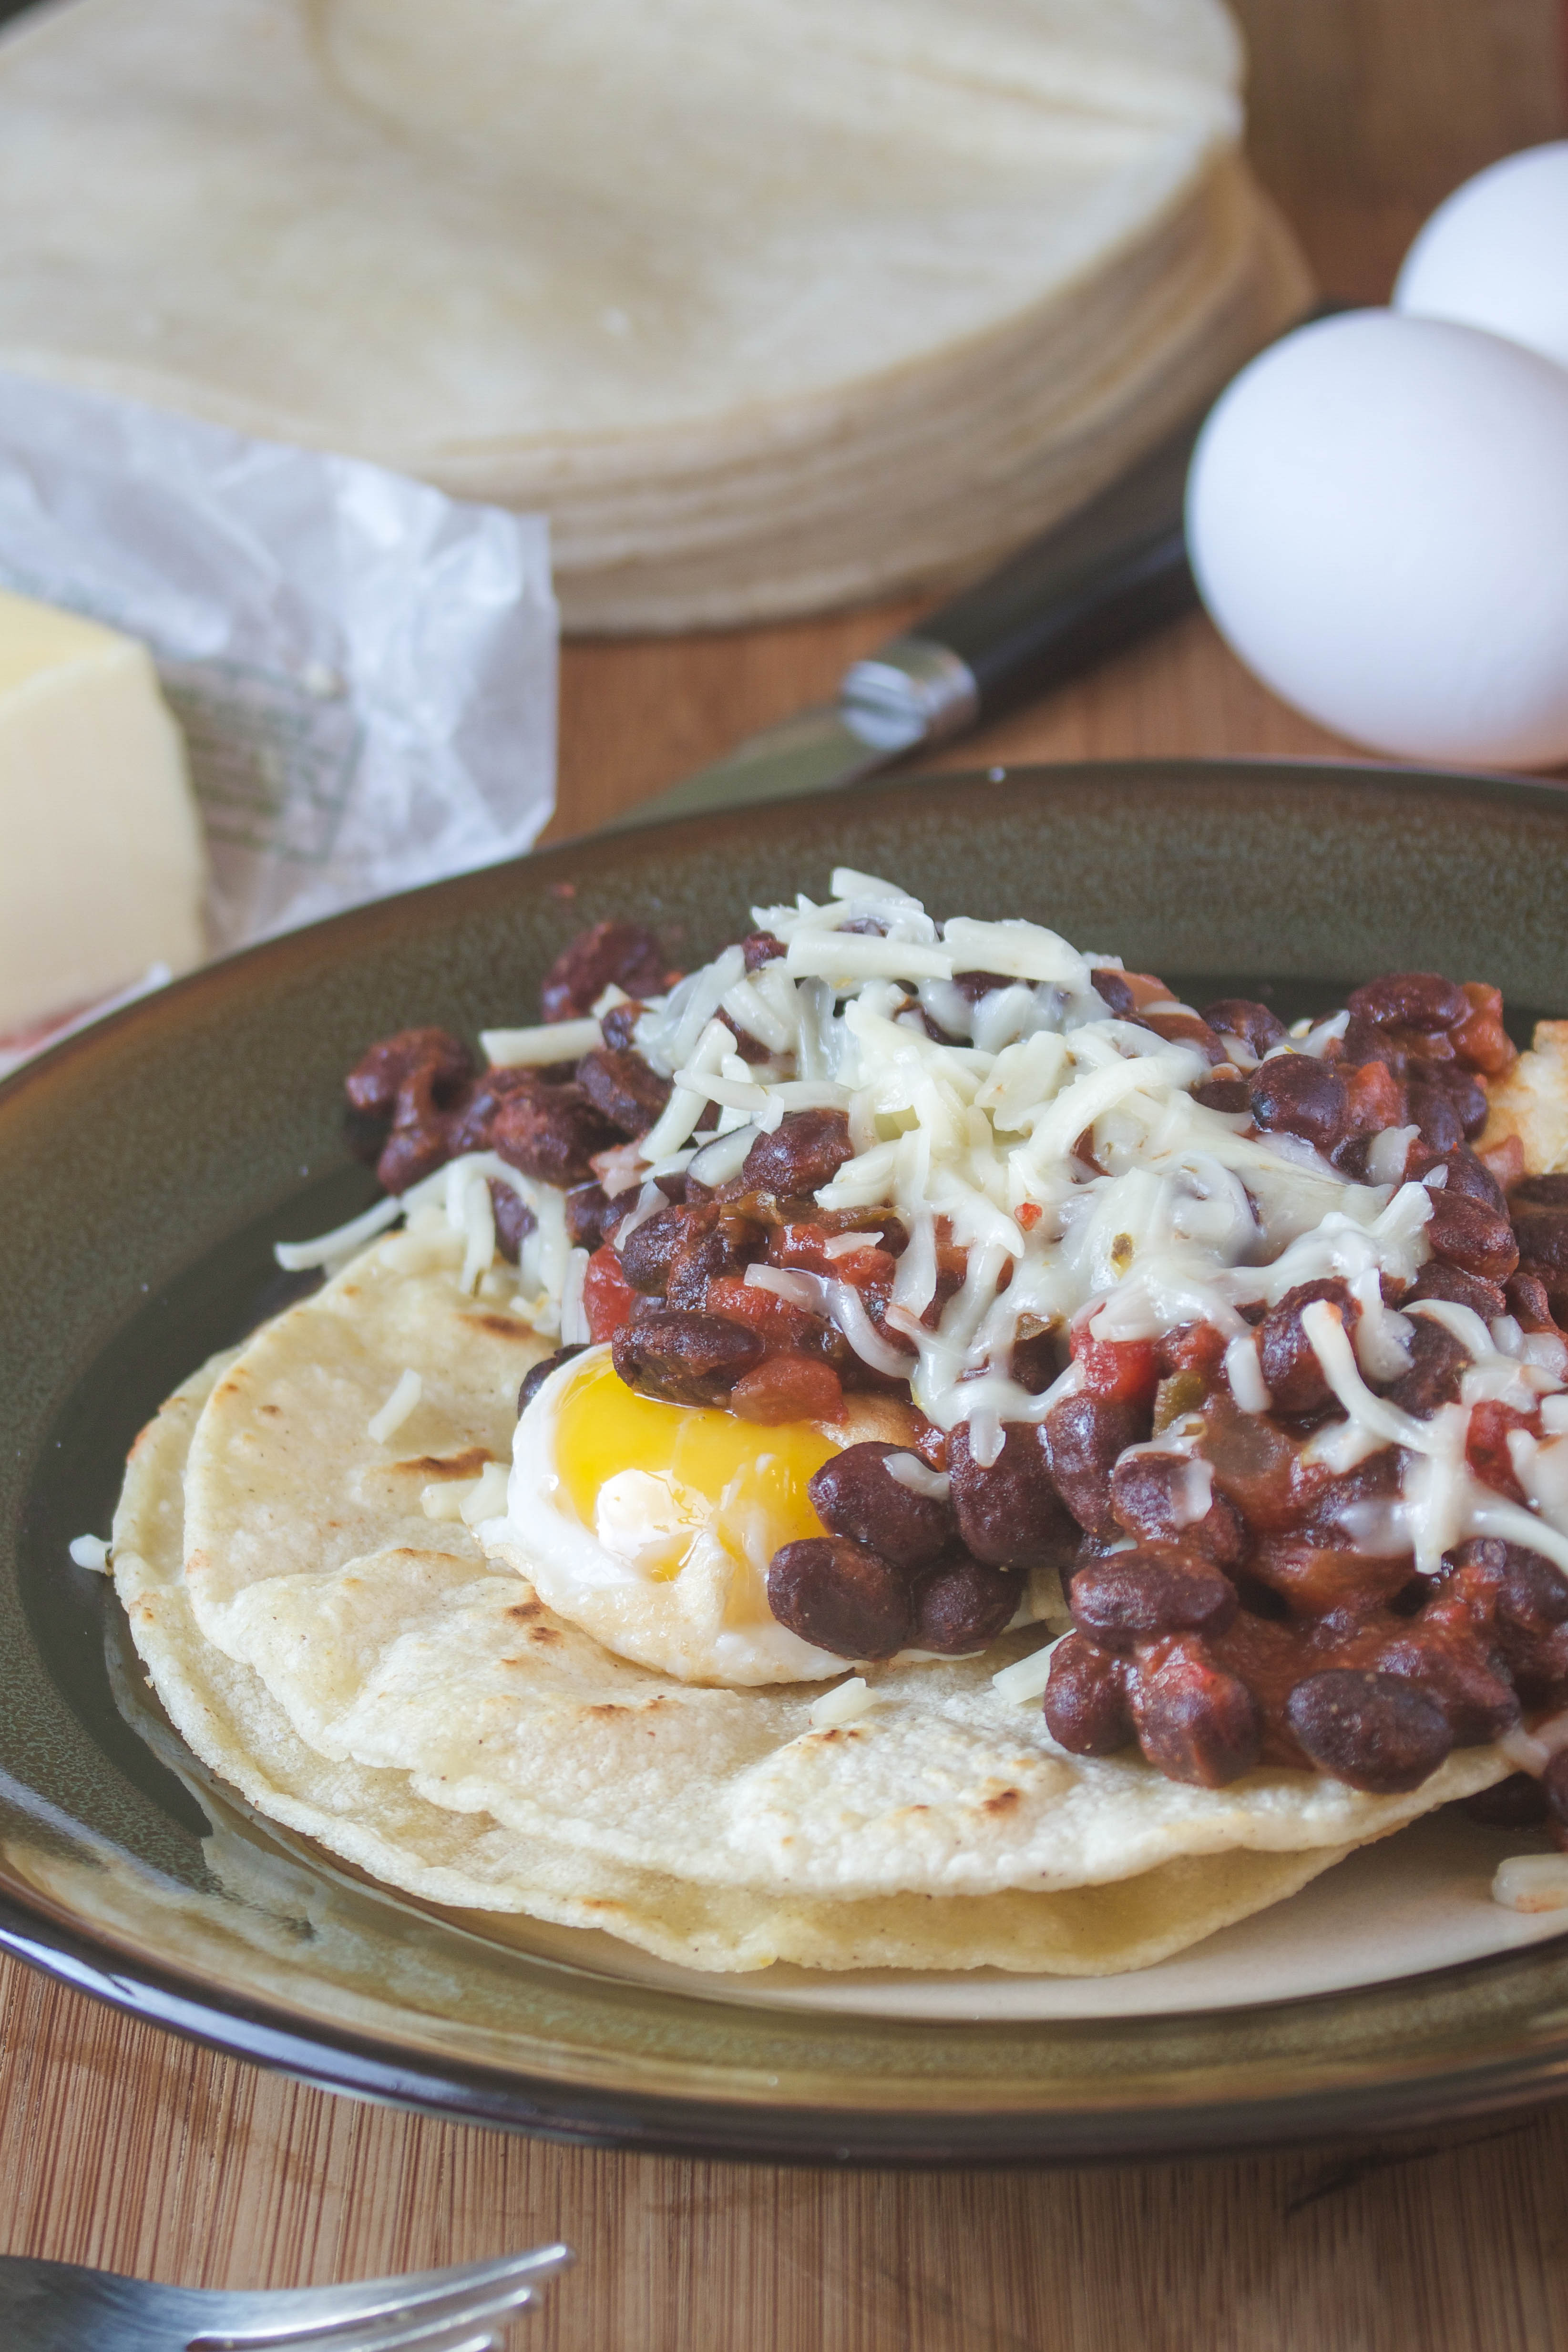
One of my favorite things to make is lightly-fried corn tortillas filled with this spicy bean mixture. It’s just the right balance of salt, spice, and richness to start off the day topped with some pepper jack or parmesan cheese. You can serve it next to rice or scrambled eggs for a more protein-filled plate. Use either mild, medium, or hot salsa to adjust the heat.

Cumin-Spiced Red Beans

Prep time: 5 minutes

Cook time: 5 minutes

Ingredients(Makes 2 servings):

  • 1 cup black beans, drained
  • 1/2 cup salsa 
  • 1 1/2 Tablespoons butter
  • 3/4 teaspoon cumin

Method:

  1. Heat up the beans and salsa in a pan over a burner set to medium.
  2. Stir the beans and salsa along with the cumin as it comes to a boil. Keep stirring until most of the liquid boils off and the mixture is thick.
  3. Add in the butter and continue stirring until it melts. Once the butter’s melted completely, turn off the heat and mix for a minute over the stove as it cools.
  4. Serve hot with shredded or shaved cheese on top.

Vegan PB & J Smoothie

Vegan PB & J Smoothie

I somehow have become a morning exerciser. The first day of waking up, rolling out of bed, and putting on gym shorts instead of a pot of coffee was rough. The second was just as rough. But every day since it’s gotten a little easier.

After working out I’ve been more inclined to make a smoothie than bowl of oatmeal or anything else. It’s quick and easy to drink when getting ready for work. I’ve been trying different mixes to keep things interesting every time and this one is a winner.

It has the classic flavor of the inside of a PB & J, just in liquid form. It’s perfectly sweet and even packs some greens in it, too, if you opt in for the spinach(which you won’t be able to see or taste fully blended–I promise). 

IMG_7064_2

If you’re not a fan of peanut butter or just don’t have any lying around try making this with almond butter or even coconut butter.      

Vegan PB & J Smoothie

Prep time: 5 minutes

Cook time: 0 minutes

Ingredients(Makes 1 meal serving or 2 snack servings):

  • 1 medium banana

  • 1/2 cup frozen mixed berries

  • 1/3 cup frozen spinach

  • 2 Tablespoons peanut butter

  • 1/2 cup water

Method:

  1. Add all of the ingredients to a high-power blender. 

  2. Pulse briefly and then blend until the ingredients make a creamy smoothie. Add water if necessary to make smooth and creamy.

  3. Pour into a tall glass and drink cold. 

Breakfast Paleo Mug Cake

Paleo Chocolate Mug Cake

I’m a boring breakfast person. I like to eat the same thing every day until I get tired of it and find something new. For the past couple of months these have been my breakfasts. It’s fast, easy, and chocolate-flavored so it’s easy to love.

This has been one of my most popular recipes. I still have people commenting on the original post who’ve made it and loved it, and that’s a good feeling. The ingredients are fairly common and cheap, so even if you’re skeptical I’d say give it a try. It always tastes better with peanut butter or Nutella slathered on top so if you’re still not convinced I’d say try that.  

Paleo Chocolate Mug Cake

I’ve never tried any variations but I’ve had readers mention this recipe works just as well with sweet potato puree, butternut squash, and applesauce. You can also mix in other ingredients like chopped walnuts, chocolate chips, or raisins(well, maybe not raisins).

Paleo Mug Cake

Prep time: 5 minutes

Cook time: 3 minutes

Ingredients(Makes 1 cake):

  • 1 small ripe banana
  • 1 1/2 Tablespoons almond butter(or any nut butter)
  • 1 egg
  • 2 heaping Tablespoons cocoa powder

Method:

  1. With a fork, mash the banana into a smooth puree.
  2. Mix the almond butter, egg, cocoa powder into the banana puree until it forms an even batter.
  3. Fold in any mix-ins into the batter that you’d like. Otherwise, pour the batter into a mug or other microwave safe container. Be sure to only fill the container up to 2/3rds the way because it will expand in the microwave.
  4. Microwave on high for 2 and 1/2 minutes until the center is set. Carefully remove the mug from the microwave and enjoy hot, cold, or at room temperature.

4 Egg-Filled Easter Brunch Recipes

4 Egg-Filled Easter Brunch Recipes

Easter doesn’t make a lot of sense when you think about it. There’s a bunny but bunnies don’t lay eggs, so why are you searching for them? And where does the candy come in?

Assuming you’re not having plastic eggs filled with dollar bills and chocolate candies, you might want to have something a little more satisfying. Maybe for a brunch crowd–maybe for just yourself. Here are 4 of my favorite egg-cellent(I’m already sorry I made that pun) brunch recipes for you. 

For something traditional…

Easy Broccoli Frittata Serving

Easy Broccoli Frittata is a great way to feed a crowd something healthy and satisfying. I’m a big fan of frittatas for breakfast or dinner. Even as just one person, they’re good to make on the weekend and heat up through the week. Add some potatoes or toast and you’re golden.

For just two(or one—no judging)…

Mushroom and Herb Cheese Omelette

I’d never make omelettes for a crowd because they’re hard to keep warm while the rest cook, and if you have other distractions going on in the kitchen they’re a nightmare. But a Mushroom and Herb Cheese Omelette is satisfying and just the right amount of food for one or two people and goes great with just about any side. 

For something spicy…

Thai Deviled Eggs

Thai Deviled Eggs have just the right amount of flavor and kick mixed with tradition to please just about anyone. I assumed I didn’t like deviled eggs until I toughened up and tried some. Hopefully the peanut butter and kick of these will get a few deviled egg nay-sayers to bite. 

For something sweet…

Gluten Free Chobani Pancakes

Chobani Pancakes may not be egg-filled but the egg helps to make almond flour and greek yogurt into a delicious, hearty, and gluten-free breakfast. It’s a much better option than the white flour pre-made pancake mixes. And at the end of the day who doesn’t like pancakes for brunch?

Happy Easter!

Gluten-Free Brown Sugar & Cinnamon Oatmeal

Gluten-Free Brown Sugar & Cinnamon Oatmeal

Breakfast is always my laziest meal of the day. More often than not I won’t spend more than 5 minutes getting it ready and spend another 5 eating it.

When I had to go without a microwave for a couple weeks last month it forced me out of my instant-microwaved oatmeal rut. Even still most mornings I spent 5 minutes cooking plain oatmeal while throwing on shoes and packing lunch. But some mornings I played around and made more delicious bowls using flavors and spices.

If you grew up enjoying Quakers instant oatmeal pouches, then you’ll love this. The taste and feel is the same, but making it yourself adds a special satisfaction and makes the whole bowl more hearty. You can use instant oats instead of thick-cut, just reduce the water accordingly and cook for less time.

Gluten-Free Brown Sugar & Cinnamon Oatmeal Ingredients

  Gluten-Free Brown Sugar & Cinnamon Oatmeal

Prep time: 5 minutes

Cook time: 10 minutes

Ingredients(Makes 1 serving):

  • 1/2 cup thick-cut gluten-free rolled oats
  • 2 heaping Tablespoons dark brown sugar
  • 1/4 teaspoon cinnamon
  • pinch of salt
  • 2/3 cup water
  • 1/2 Tablespoon butter
  • Brown sugar for garnish

Method:

  1. Combine the oats, sugar, cinnamon, salt, and water in a pot and stir gently.
  2. Bring the water to a slight boil. Stir constantly so that the bottom doesn’t burn.
  3. Keep stirring until the oats are cooked and stick will stick to your spoon.
  4. Add in the butter and stir until it has completely melted.
  5. Move to a bowl and garnish with extra brown sugar before serving.

Maple Peanut Butter Oatmeal Bread

Maple Peanut Butter Quickbread

Do you know what November is? Besides depressingly cold. It’s national peanut butter month! And to stir things up, the National Peanut Board invited bloggers to come up with a new peanut butter recipe to post and spread the love.

At this point, there are few recipes that I haven’t made with peanut butter. It’s something I eat daily—usually in the morning with oatmeal and a sweetener like maple syrup. But oatmeal can be messy and hard to have on the go, so there had to be an easy, portable way to have that delicious flavor combination.

Vote_For_Me

For my entry I made a peanut butter quick bread sweetened with maple syrup. It’s healthy and amazingly delicious warmed up on a cold November morning.

To vote in the recipe, you can go to the Peanut Board’s Facebook page after 12pm on November 1st and use the contest’s tab app to vote before November 30th. Besides a prize for the winning blogger, they’re giving away 15 peanut butter prize packs with $25 gift cards to voters, so vote!

Maple Peanut Butter Oatmeal Bread

Prep time: 10 minutes

Cook time: 50 minutes

Ingredients(Makes one loaf):

  • 2 1/4 cups all-purpose flour or gluten-free all purpose flour
  • 1 1/2 cups rolled oats
  • 3/4 cup maple syrup
  • 1 cup peanut butter, gently melted
  • 1/2 cup vegetable oil
  • 4 eggs
  • 1/4 cup water
  • 1 Tablespoon vanilla extract
  • 1/2 Tablespoon cinnamon
  • 1 teaspoon baking powder
  • 1/4 teaspoon salt

Maple Peanut Butter Quickbread Loaf

Method:

  1. Preheat your oven to 350 degrees.
  2. In a large bowl mix together the oats and flour.
  3. Add in the syrup, peanut butter, oil, eggs, and water and beat well.
  4. Add in the rest of the ingredients and continue mixing until it forms a batter.
  5. Lightly grease a 9-inch loaf pan with oil.
  6. Pour the batter into the pan and sprinkle some extra oats on the top.
  7. Bake for 50 minutes or until the bread rises and sets.
  8. Remove from the oven and let cool before slicing. Store in a cool place when not enjoying.

Maple Peanut Butter Quickbread Loaf 2

Be sure to check out the other bloggers’ recipes as well! Jennifer, Laurie, Nick, Tina, and Rachel all cooked up something delicious, too.

Healthy Black Bean Quesadilla

October 13th 003

The saddest thing about moving to a new city besides leaving behind friends and family is always leaving behind good restaurants. There are always a few dished you just can’t find anywhere else and you don’t know what to do about it.

Last time I was in Providence I had huevos rancheros with a black bean quesadilla, ancho-chili sauce and home fries for brunch. It was delicious and something I probably won’t find anytime soon, so this has been the closest I’ve come to tasting it again. If you’re staying in on a weekend morning and need something to hit the spot this might be as good as you’ll get without ordering takeout.

October 13th 010

This recipe for quesadillas is a little different from what you’d normally get since it uses corn tortillas instead of flour ones keeping it gluten-free. The ingredients are also a little healthier than others; for a more traditional recipe use twice as much cheese and half as much beans.

Black Bean Corn Quesadilla

Prep time: 5 minutes

Cook time: 5 minutes

Ingredients(Makes 1 serving):

  • 2 corn tortillas
  • 1/2 cup black beans, drained and rinsed
  • 1/4 cup pepper jack cheese
  • Salsa
  • Sour cream
  • Guacamole

October 13th 007

Method:

  1. Heat a frying pan over medium heat.
  2. Warm the tortillas in the frying pan in a little oil to keep them from sticking.
  3. Move the tortillas to a plate.
  4. Heat the black beans in the pan with a little oil to take out some of the moisture. Season them with salt or spices if desired.
  5. Add the cheese in with the black beans and keep moving them to prevent them from sticking to the pan.
  6. When the cheese starts melting, move the black beans onto one of the tortillas. Place the other one on top.
  7. Serve with salsa, sour cream, guacamole, and any other toppings you’d like.

How To Make Perfect Home Fries

How To Make Perfect Home Fries

Well cooked home fries are one of my favorite foods. I always look for them on a menu when I’m out to eat(clearly I only choose very classy places that would serve home fries at 6pm); they beat plain old french fries any day.

Years of cooking these spuds have taught me that home fries are all about two things: Seasoning and cooking time. Salt, herbs, and onions all make for a really taste treat once the flavors are absorbed into the home fries. You also can’t rush perfection. The best way to get a golden, crispy outside and a soft starchy inside is to cook these low and slow, giving each side a chance to sizzle on the bottom of the pan.

How To Make Perfect Home Fries Cooking

You’ll definitely want to double or even triple the recipe if you’re cooking for a crowd because these’ll fly off the plate. Season them to taste as always; you can add any number of herbs and spices to make them spicy, garlicky, or even slightly sweet.

How To Make Perfect Home Fries

Prep time:  10 minutes

Cook time: 15 minutes

Ingredients:

  • 2 par-cooked medium Russet potatoes*
  • 2 Tablespoons chopped onion
  • 3 Tablespoons olive oil, divided
  • 1/2 teaspoon salt
  • Couple sprigs of rosemary
  • 1/4 teaspoon pepper

*I usually bake mine for 40 minutes, let them cool, and then keep them in the refrigerator to have on hand whenever I want to make these. You can also par-cook them in the microwave or by boiling them as long as they’re firm enough to slice when done.

How To Make Perfect Home Fries Potatoes

Method:

  1. Heat 1 Tablespoon of oil in a frying pan. Add in the onions and sauté them until they become translucent.
  2. Dice the potatoes into small bites, about 1/2-inch squares. Leave the skins on for a rustic look and texture.
  3. Add the potatoes into the pan with the onions along with the remaining 2 Tablespoons of oil and salt.
  4. Cook on medium heat, tossing the pan every couple of minutes to flip the potatoes. Cook for 10-15 minutes until most of the sides look browned and crispy and the oil has been soaked up.
  5. Finish by seasoning with pepper.
  6. Serve hot.

How To Make Perfect Home Fries Overhead 

Easy Broccoli Frittata

Easy Broccoli Frittata

On an average day I eat more eggs than anybody I know. I wish they were always this intricately flavored and delicious but more often than not they’re just scrambled. But once in a while—once in a while it’s refreshing to put time and thought into the simple egg and make something with a little more wow-factor for yourself or others.

The broccoli and herbs help to flavor the eggs and give a bit of texture, since frittatas don’t have a crust like quiches to give them a little crunch. This recipe is called easy because you can put it in the oven and forget about it until dinner. You can also make it at night and have it reheated the next morning for breakfast. It’s just easy and easy to love.

Easy Broccoli Frittata Overhead

I didn’t add any cheese to mine but it would definitely boost the flavor. If you’re thinking about it, I’d recommend 4oz of a sharp cheddar grated finely and added into the batter before baking. Otherwise if you’re making this for a crowd you can leave the cheese out and have some freshly grated cheese to serve on the side.

Easy Broccoli Frittata

Prep time: 10 minutes

Cook time: 50 minutes

Ingredients(Makes 4-6 servings):

  • 1 dozen eggs
  • 1 1/2 cups steamed broccoli
  • 1/4 cup + 1 Tablespoon milk(eyeball it)
  • 1 Tablespoon herb mix(use whichever’s your favorite)
  • 1/2 teaspoon onion powder
  • 1/2 teaspoon salt(reduce if using cheese)
  • 1/4 teaspoon garlic powder(optional)
  • 4oz sharp cheddar(optional)
  • Butter for greasing

Easy Broccoli Frittata Potatoes

Method:

  1. Preheat your oven to 350 degrees.
  2. Crack all of the eggs into a large bowl making sure not to get any shells into the batter.
  3. Add in the milk, herbs, seasonings and cheese if using and whisk until the eggs are a pale yellow.
  4. Grease an 8-inch baking pan on the bottom and around the sides.
  5. Pour the egg batter into the baking pan.
  6. Add the steamed broccoli evenly around the pan and gently press it into the batter with a fork to cover the tops of the florets.
  7. Bake for 40-50 minutes until the sides turn golden brown and the center is firm. Remove from the oven and let stand at room temperature for about 10 minutes to cool before serving.

Easy Broccoli Frittata Serving

Gluten-Free Pumpkin Bread

Gluten-Free Pumpkin Bread

I usually keep things very organized. I’m a serial to-do list maker and planner. But sometimes my pantry can get a little bit hectic; I’ll throw an ingredient in there and not see it for another 5 months.

When I moved 2 weeks ago I found 3 cans of pumpkin that never got baked into a pie, custard or pudding. I know it’s not at all the season for pumpkin desserts but there are some things I can’t turn down and a good slice of pumpkin bread is one of those.

Gluten-Free Pumpkin Bread Batter

My one warning with this recipe(and most gluten-free recipes for that matter) would be not to taste the batter. The batter will taste terrible because raw chickpea flour and coconut flour have weird tastes to them. However, once fully cooked, the funny flavor goes away and all you’ll be able to taste is spices and pumpkin.

Gluten-Free Pumpkin Bread

Prep time: 15 minutes

Cook time: 60 minutes

Ingredients(Makes 1 loaf):

  • 1 1/2 cups chickpea flour
  • 6 Tablespoons coconut flour
  • 3/4 cup cane sugar
  • 1/4 cup brown sugar
  • 3/4 cup pumpkin puree
  • 4 eggs
  • 6 Tablespoons oil
  • 1/2 cup water
  • 1 1/2 teaspoons pumpkin pie spice
  • 1 teaspoon vanilla extract
  • 3/4 teaspoon baking soda
  • 2 Tablespoons brown sugar for topping

Gluten-Free Pumpkin Bread Pumpkin

Method:

  1. Preheat your oven to 350 degrees.
  2. In a large bowl sift together the chickpea flour and coconut flour and set aside.
  3. In a separate bowl beat together the remaining ingredients until well mixed.
  4. Combine the wet and dry ingredients and beat together. Slowly incorporate the water while beating until all of the ingredients are mixed together.
  5. Grease the bottom and sides of a 8-inch loaf pan.
  6. Pour the batter into the loaf pan and shake it gently to level the top.
  7. Sprinkle the remaining brown sugar on top of the batter in a thin layer.
  8. Bake for 60 minutes or until the center of the loaf is baked through.
  9. Remove from the oven and let cool completely before slicing.

Gluten-Free Pumpkin Bread Ingredients