

I’m a candy addict. I like having a little after every meal; it just leaves a better taste in your mouth than pasta sauce or vegetables ever could. That’s probably why I’ve blogged this recipe 2 or 3 times in the past couple of years. But it’s so good I have to post it again.
I’ll admit I love the store-bought, corn syrup laden candy you get at grocery stores and movie theaters. Now and again though it’s fun to make your own. And it can be a great way to impress your family and friends.

I’d recommend looking for dark chocolate chips for this recipe; the bitterness of the chocolate is a nice contrast to the minty sweet filling. You can use butter in place of the coconut oil if that’s what you have on hand.
Homemade Peppermint Patties
Prep time: 30 minutes
Cook time: 0 minutes
Ingredients(Makes 24 patties):
- 2 1/4 cup powdered sugar, sifted
- 1 1/2 Tablespoons agave nectar(or any liquid sweetener)
- 1 1/2 Tablespoons water
- 1 Tablespoon coconut oil, softened or melted
- 1 teaspoon peppermint extract
- 1 bag(12oz) bittersweet or semisweet chocolate chips

Method:
- In a large bowl, mix the powdered sugar, agave nectar, coconut oil, peppermint extract, and water. Continue mixing with your hands until it comes together and forms a dough ball.
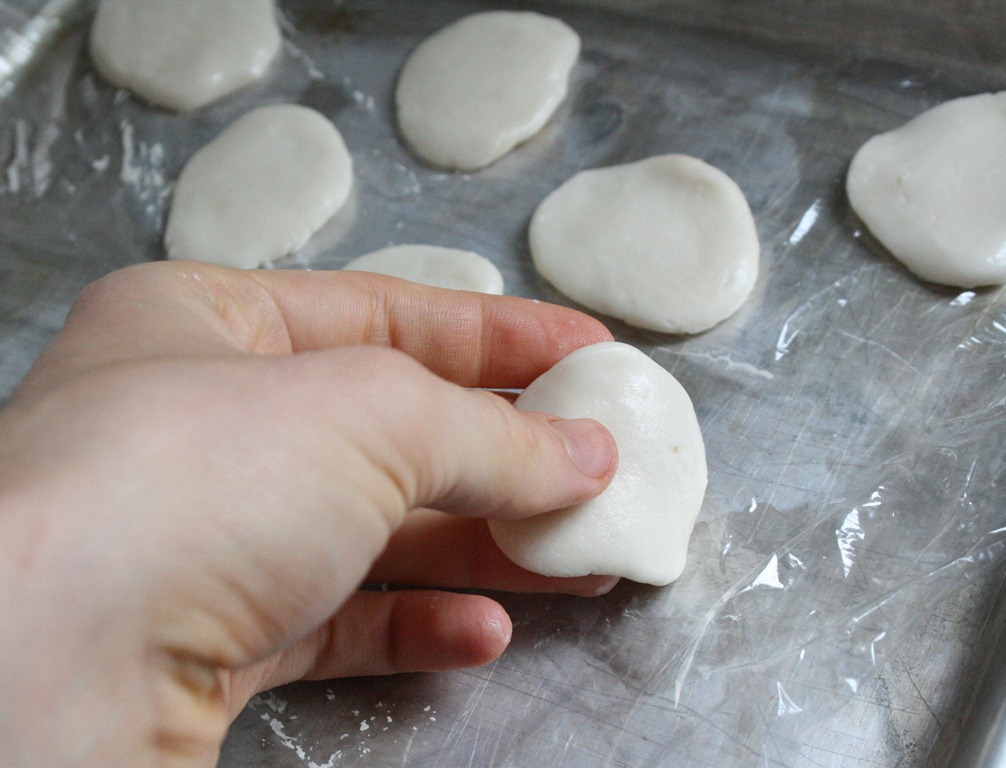
- Take off chunks of filling from the dough ball and roll them into 3/4-inch balls. Press the balls down in between your hands and form patties.
- Lay the patties out on a baking tray on a non-stick surface and refrigerate or freeze for 20 minutes until firm
- Melt the chocolate in a microwave or over a double-boiler. Line a baking tray with parchment paper.
- Dip the frozen filling into the melted chocolate with a fork until the top and bottom are covered. Wipe off any excess chocolate from the bottom and lay it on the lined baking tray.
- Refrigerate the patties for 10 minutes before removing them from the paper. Keep refrigerated when not eating.


This is it.
If I stopped blogging tomorrow and this was the last recipe I ever posted, I’d be more than happy with that.
It’s no secret I’m a Reese’s lover. This bark was bound to happen. And it’s one of my favorites—Scratch that. It is my favorite.
The sweet Reese’s pieces, dark chocolate, and smooth peanut butter cups go perfectly with a little crunch from the Reese’s puffs. You’d be hard-pressed to be disappointed with a bite of this bark.

You can use regular-sized Reese’s cups, Reese’s fun-sized candies, or even Reese’s miniatures for the peanut butter cups—whichever you have on hand.
Reese’s is in no way affiliated with this blog post; I’m just a lover.
Reese’s Lover’s Bark
Prep time: 10 minutes
Cook time: 0 minutes
Ingredients(Makes 16-20 servings):

Method:
- In a microwave safe bowl, melt the chocolate chips until they are smooth and liquid.
- Spread the chocolate out into a thin layer on a non-stick surface such as wax paper.
- One at a time or all together, sprinkle the Reese’s toppings evenly over the melted chocolate.
- Gently press the toppings into the chocolate to make sure as many as possible stick into the bark.
- Refrigerate for 20-30 minutes until the chocolate is cold and set.
- Break the bark into pieces with a knife or your hands while still cold. Keep refrigerated until ready to eat.


On a trip to New York a couple weeks ago, I had an hour to kill in Times Square. It’s probably no surprise I made a beeline for the M&M store and then quickly followed over to the Hershey’s store. Anywhere that sells that much chocolate should be a tourist destination in itself.
I still had chocolate on the brain after getting home from that trip and had to make this fudge. Surprisingly I hadn’t made microwave fudge in about a year so this was long overdue. Adding a little bit of Reese’s peanut butter cups was the perfect touch to these; if anything deserves a pairing with chocolate it’s peanut butter.

I used dark chocolate chips which made the fudge a little less sweet but gave a good contrast to the peanut butter cups. Instead of the fun-sized Reese’s cups you could use full-sized ones cut into more pieces or the new unwrapped miniatures.
Easy Reese’s Fudge
Prep time: 15 minutes
Cook time: 0 minutes
Ingredients(Makes about 20 servings):
- 1 10oz bag chocolate chips
- 1 4oz stick unsalted butter
- 1/2 cup powdered sugar
- 1/4 cup milk
- 10 fun-sized Reese’s, chopped into fourths

Method:
- Melt together the chocolate chips and butter in a bowl.
- In a separate bowl, mix together the milk and powdered sugar until the sugar dissolves.
- Mix the milk in with the melted chocolate and butter and beat until smooth.
- Pour the hot fudge into a greased 8-inch loaf pan. You can add wax paper as a liner to make the removal and clean up easier.
- Sprinkle the chopped up Reese’s on top of the fudge and press it in gently with your hand.
- Refrigerate the fudge until it hardens, about 2 hours.
- With a sharp knife, slice the fudge into 1-inch squares. Keep it in the refrigerator when not enjoying.


Cashews and chocolate are an underappreciated combination.
Peanuts and chocolate have Reese’s. Almonds and chocolate have Trader Joe’s chocolate covered almonds. Hazelnuts and chocolate have Nutella. When will cashews get their moment to shine?
Until they do, we’ll all have to settle for homemade, which really isn’t so bad once you taste it. The cashews have a nutty, roasted flavor that perfectly mixes with the cocoa powder’s bitterness. If you have powdered vanilla, it’s a great way to add another depth of flavor. Starting the day off with a spoonful of this on toast or oatmeal will certainly keep you happy and healthy.

You can use roasted or unroasted cashews for this recipe, whole or halves and pieces. Since you’re pureeing them into a butter anyway, I would recommend choosing whichever is cheapest at the store.
Chocolate Cashew Butter
Prep time: 15 minutes
Cook time: 0 minutes
Ingredients(Makes 16 ounces):
- 3 1/2 cups unsalted cashews
- 1 Tablespoon oil
- 1/4 cup cocoa powder
- 5 Tablespoons sugar
- 1/4 teaspoon salt
- 1/2 teaspoon vanilla powder(optional)

Method:
- Combine the cashews and oil in a food processor or high-speed blender and puree according to the manufacturer’s directions until the cashews make a smooth butter.
- Add in the cocoa powder, sugar, vanilla and salt and blend until its mixed.
- Move to a sealable container and store at room temperature when not eating.


If there’s one thing I could make with my eyes closed, it’s brownies. I think my 6th sense is knowing when brownies are done in the oven without a timer. I can tell this is another brownie recipe I’ll come back to time and time again.
One commenter mentioned that she uses oat flour in recipes that call for almond flour regularly and I wanted to try that for myself with my almond flour brownies recipe. Almond flour is a great gluten and grain-free baking flour but I don’t always keep it handy.
This recipe is basically the same as for almond flour brownies except with a little bit of water added to account for the grains. The brownies came out perfectly moist and chewy. I think the grains made them taste a little bit more like regular brownies than their almond counterpart. They were also slightly cakier than the almond flour brownies but still completely enjoyable for fudgy brownie lovers. Overall these were definitely a winner.

You don’t need to go out and buy a bag of oat flour for this recipe; you can make 3/4 cup oat flour by grinding 1 cup of rolled oats in a food processor or high-speed blender until it’s finely ground. If it’s big enough, you can even use the processor as a mixing bowl and blend the ingredients right in there instead of dirtying more dishes.
Oat Flour Brownies
Prep time: 15 minutes
Cook time: 30 minutes
Ingredients(Makes 1 8 x 8 pan):
- 3/4 cup oat flour
- 1/4 teaspoon salt
- 2 tablespoons unsweetened cocoa powder
- 1/2 teaspoon baking powder
- 3/4 cup sugar
- 3 large eggs
- 1 teaspoon vanilla
- 1 teaspoon instant coffee granules(optional)
- 1/2 cup butter
- 7oz semisweet or bittersweet baking chocolate, divided OR 3/4 cup chocolate chips
- 1/4 cup water

Method:
- Preheat your oven to 350 degrees.
- Mix together the oat flour, salt, cocoa powder, and baking powder and set aside.
- In a separate bowl, melt together 4 ounces of chocolate or a scant 1/2 cup chocolate chips with the butter.
- While the chocolate is melting, beat together the eggs, sugar, vanilla, water, and coffee granules if using.
- Slowly pour the melted chocolate and butter into the egg/sugar mixture while whisking until fully incorporated. Don’t go too fast so that the raw eggs don’t cook upon contact.
- Add the chocolate mixture in with the dry ingredients and mix completely.
- Pour the batter in a greased 8 x 8 pan.
- Sprinkle the top with the remaining chocolate and gently press it into the batter.
- Bake for 30 minutes or until a toothpick poked into the center comes out clean. Let these cool completely before cutting in.


It’s been a busy month. This blog(and cooking anything without a microwave in general) have taken a bit of a back seat. Hopefully someday soon I’ll have a more regular schedule and school off my shoulders but right now sporadic will have to do.
Thankfully you can make some pretty great things with a microwave and 5 minutes. I forgot about this recipe for almost a year and just thought of it again when I made a run to a mini-mart to stock up on chocolate and Reese’s cups. They’re probably much cheaper and more delicious than Reese’s cups. So far they’ve made a great study snack and given me something to stress eat at 2am.

This recipe is the same as the original post. I tried making it with cane sugar instead of powdered sugar because that’s what I had and—while still delicious—I think the powdered sugar has a much better texture to it. I would also try adding chopped salted peanuts on top of the chocolate if you like a little crunch.
Chocolate Peanut Butter Bars(adapted from Oh Baby Bars)
Prep time: 15 minutes
Cook time: 0 minutes
Ingredients(Makes about 24 servings):
- 3/4 cup peanut butter, runny or no-stir
- 7 Tablespoons butter, divided
- 1 1/2 cups powdered sugar
- 10oz semi-sweet chocolate chips

Method:
- In a large bowl, melt 6 tablespoons of butter along with the peanut butter until completely liquid.
- Add the powdered sugar into the peanut butter and butter mixture and beat until completely incorporated. Press the peanut butter mixture into a loaf pan or a 9 x 9 pan for smaller portions.
- Melt the chocolate chips and remaining tablespoon of butter together and mix. Pour this over the peanut butter layer.
- Refrigerate until the chocolate has set. Cut at room temperature into 1 x 1 square servings.


I always grab bananas at the store to throw in smoothies or have for breakfast. This week I guess I forgot to eat them because they were brown and mushy before I knew it. I’d much rather life hand me brown bananas than lemons because bananas are a lot more fun to bake with. I couldn’t decide on making banana blondies or banana bread and ended up settling for something in between.
I intended these to be a healthy afternoon snack, but then covering them in chocolate and peanut butter seemed a lot more fun. They actually aren’t bad for you with their whole grains, fiber, natural sugars and a little bit of healthy fats. The squares are definitely sweet enough on their own—adding a drizzle on top just makes them that much better.

The topping I used was just a chocolate ganache made with 1/4 cup chocolate chips, 2 Tablespoons of maple syrup, and a Tablespoon of water and a peanut butter sauce made with 2 Tablespoons peanut butter, 2 Tablespoons of maple syrup, and a Tablespoon of water all mixed and drizzled on top. This would also be really delicious with a vanilla or peanut butter buttercream.
Whole Grain Banana Cake Squares
Prep time: 10 minutes
Cook time: 30 minutes
Ingredients(Makes one 8 x 8 pan):
- 1 cup(2 large) mashed bananas
- 1/2 cup sugar
- 1/4 cup peanut butter
- 1/4 cup vegetable oil
- 2 eggs
- 1 teaspoon vanilla extract
- 1/2 cup(80g) brown rice flour
- 1/2 cup rolled oats
- 1/2 teaspoon baking soda

Method:
- Preheat your oven to 350 degrees and grease an 8 x 8 baking pan.
- In a large bowl, beat together the mashed banana, sugar, peanut butter, oil, eggs, and vanilla.
- Add in the brown rice flour, oats, and baking soda and mix well.
- Pour the batter into the pan.
- Bake for 25-30 minutes until the center has set.
- Remove and let cool. Cover with frosting, ganache, or leave plan to serve.


Surprisingly for all the sweet teeth I have and my love of chocolate I’ve never been a fan of the fancy drinks at Starbucks. I love the occasional bitterness of black coffee but more often than not I’ll choose green or herbal tea, and if you try swirling chocolate syrup and whipped cream into your green tea you’ll get a few odd looks.
Chocolate covered coffee beans and the like, however, are a different story. They’re right up there with chocolate covered almonds, chocolate covered raisins, and chocolate covered everything else. I’ve never found chocolate covered hazelnuts but something tells me if I did I’d love them, too.

This trail mix hits just about every note that a good cup of coffee should. It has bitterness from the coffee beans, sweetness from the white chocolate and raisins, and a rich nuttiness from the hazelnuts and almonds. I think that hazelnuts pair great with chocolate and coffee but if you find yourself lacking them you can easily double the almonds in the recipe.
Hazelnut Mocha Trail Mix
Prep time: 5 minutes
Cook time: 0 minutes
Ingredients(Makes 3 cups):
- 3/4 cup hazelnuts
- 3/4 cup roasted almonds
- 1/2 cup raisins
- 1/2 cup chocolate covered coffee beans
- 1/2 cup white chocolate chips

Method:
- In a large bowl, combine all of the ingredients and mix well.
- Store at room temperature when not enjoying.


A lot of the time when it comes to food blogging there’s usually a pressure to make everything homemade. Homemade cake. Homemade frosting. Homemade powdered sugar. Homemade butter. Everything.
This recipe has just about nothing homemade. If you want to make your own Nutella and brownies from scratch that’s fine; invite me over when you do. But if you’re in a rush or just alone on a Friday night and feel like making brownies this is probably a better choice because it’s more convenient and you can eat Nutella off of a spoon while you’re waiting for the brownies to cook.

You can use any brownie mix for this recipe as long as it’s for an 8 x 8 baking pan. I used the gluten-free kind pictured below and they came out delicious. Ignore the suggested egg and oil mix-ins and use the amounts listed below.
Easy Nutella Brownies
Prep time: 10 minutes
Cook time: 25 minutes
Ingredients(Makes one 8 x 8 pan):
- 1 16oz brownie mix
- 1 egg
- 1/2 cup Nutella
- 1/4 cup cooking oil
- 1/4 cup water

Method:
- Preheat your oven to 350 degrees.
- In a large bowl, combine all of the ingredients and mix well. If the batter is too thick, add an extra 1/4 cup of water to thin it to a brownie batter consistency.
- Grease an 8 x 8 baking pan.
- Pour the batter into the pan and spread it into an even layer.
- Bake for 25-30 minutes until the center of the brownies has set.
- Remove from the oven and let the brownies cool before cutting.

Frosting choice should be obvious.

Spring is usually the end of hot chocolate and Bailey’s on the rocks, but with the weather we’ve been having this week I think it’s perfectly alright to keep those on the table for a little while longer.
I wanted to make these truffles for a friend and also as an excuse to pick up discounted Irish cream the day after St. Patrick’s day. The alcohol gives them a special warming kick that’s undeniably good. Since I was running low on cocoa powder, I used hot chocolate mix to dust them instead; I think they turned out a lot better than usual because they don’t have that bitter bite that cocoa powder tends to give.

I used American Heritage chocolate drink mix for the coating which was rich and flavorful. I wouldn’t recommend using a mix that is overly processed or full of chemicals. You could also mix 6 Tablespoons of sugar and 2 Tablespoons of cocoa powder for a nearly identical coating.
Bailey’s Hot Chocolate Truffles
Prep time: 25 minutes
Cook time: 0 minutes
Ingredients:
- 1 cup(8.5oz) semi-sweet chocolate chips
- 6 Tablespoons Irish cream
- 2 Tablespoons butter
- 1/2 cup powdered hot chocolate mix*
*See paragraph above

Method:
- Melt the chocolate chips and butter together in a microwave or over a double boiler.
- Mix the Irish cream into the melted chocolate until it’s smooth and shiny.
- Refrigerate or freeze the chocolate until it’s semi-soft and doesn’t stick to your hands. You want it to be a little colder than you think it should be since your hands will warm it over time.
- Pour the hot chocolate mix into a small bowl or onto a small plate.
- With a melon-baller or a spoon, carve out pieces of chocolate about 1-inch in width. Roll the chocolate into as round a ball as you can and drop it into the hot chocolate mix.
- Roll the ball around in the hot chocolate mix until the sides are all covered and move it to an air-tight container.
- Refrigerate the truffles for 30 minutes for the right consistency before eating. Keep them refrigerated when not enjoying.


