When you live in the city, it’s sometimes hard to tell exactly what season it is. That’s what Starbucks limited edition drinks are for.
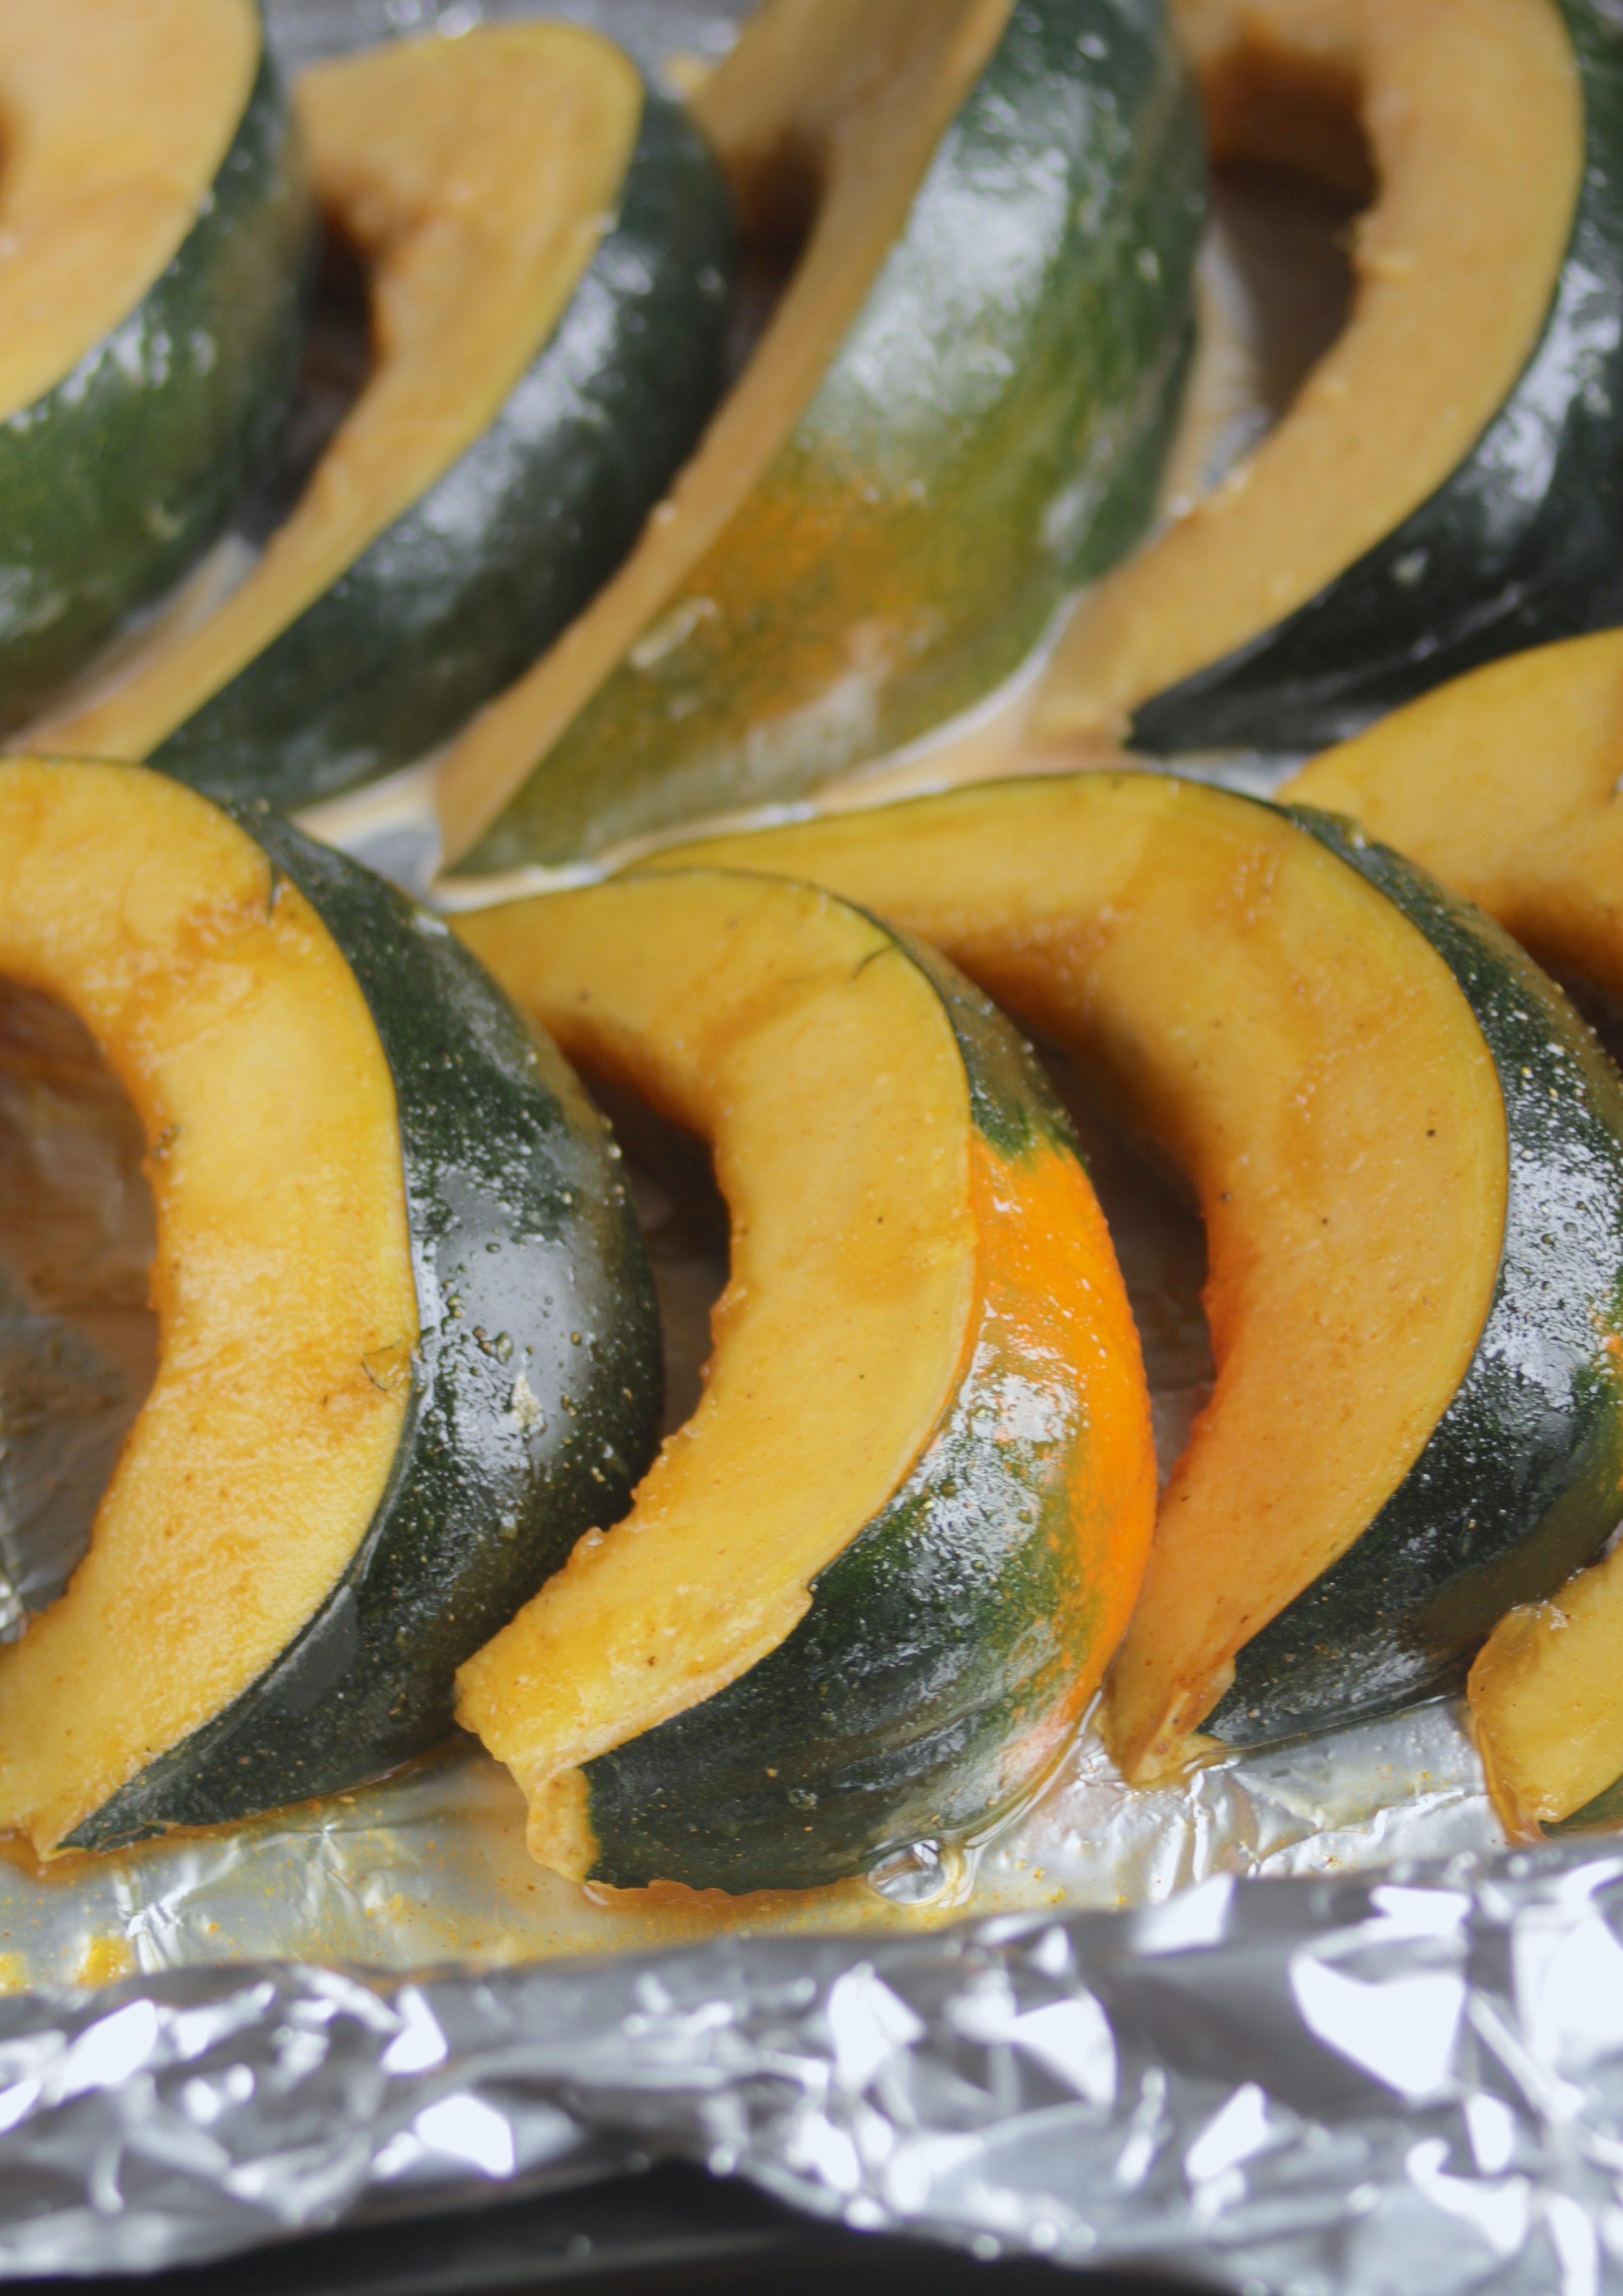
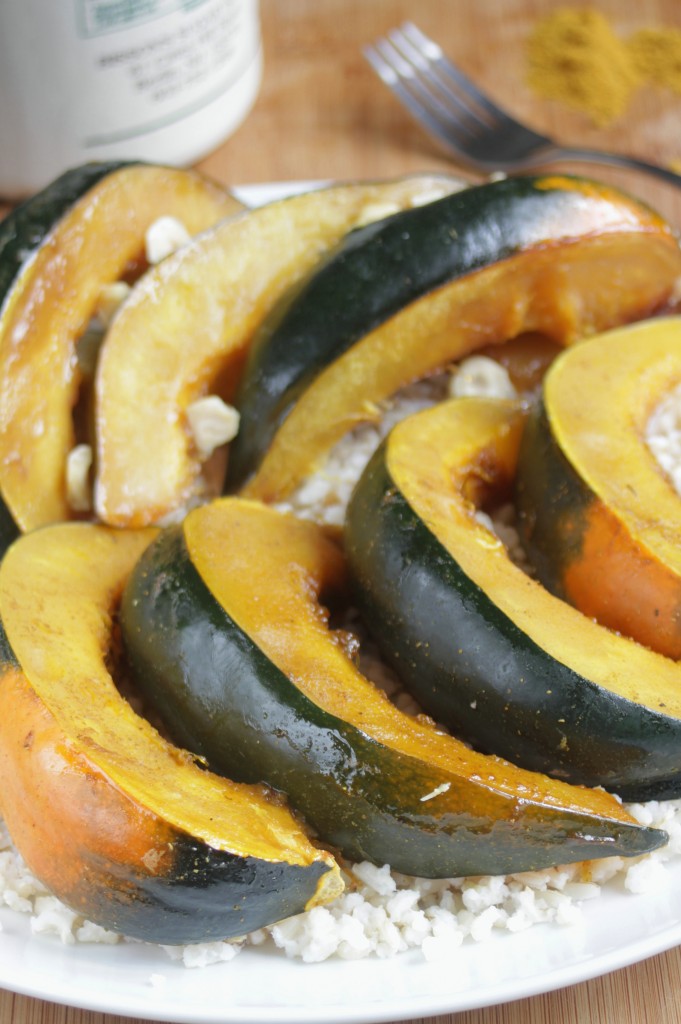
After I saw it was pumpkin spice latte season already, I knew it was time to start digging up old squash recipes. This recipe I’ve posted an annoying amount of times but still come back to again and again.
It’s one that I always make because I know how easy and delicious it is. Using curry powder to flavor the squash adds an untraditional kick that keeps the squash anything but boring. Still it’s familiar enough that semi-picky eaters will enjoy.

You can really use this coating on any type but I prefer acorn the best for this since I think it has the mildest flavor. Butternut and winter squash tends to be sweeter on their own.
Maple-Curry Acorn Squash
Prep time: 5 minutes
Cook time: 45 minutes
Ingredients(Makes 4 servings):
- 1 Large acorn squash
- 3 Tablespoons maple syrup
- 1 Tablespoon curry powder
- 1/2 teaspoon salt*
*omit if your curry powder is already salted.
Method:
- Preheat your oven to 375 degrees and line a baking tray
- Cut the squash in half to remove all the seeds. Once de-seeded, cut along the ridges into thin wedges.
- In a large bowl, toss the wedges with the maple syrup, curry powder, and salt so that the squash is evenly coated.
- Lay the squash out on the baking tray and roast for 45 minutes or until fork tender.
- Remove from the oven and serve hot.
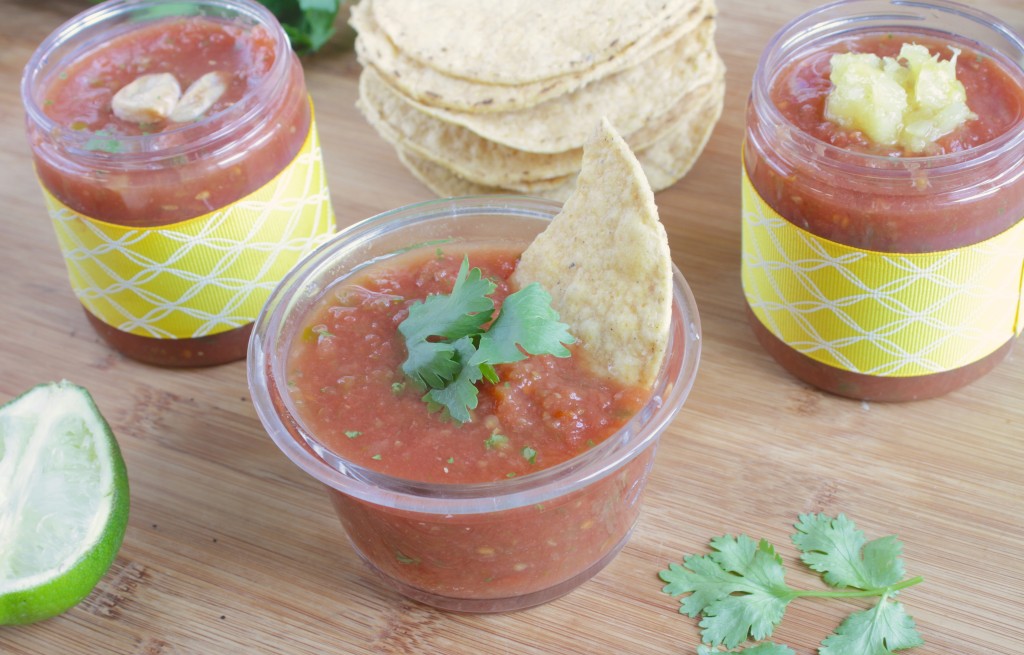
Salsa is by far my favorite condiment. I average between 1-2 jars a week from my everyday lunch and working it in to dinner some nights. I always used to think jarred salsa was “good enough” until I made my own and now I’m hooked.
Last week I shared my 2nd recipe on Life by Dailyburn, an easy 5-minute blender salsa recipe that you can make 3 ways. I pretty much insist that you not just look at it but make it, too. It’s about as easy as can be and well-worth the effort. Serve it to some guests and they’ll think you stole it right out of a Mexican restaurant’s kitchen.
Check out the recipe, give it a try, and tell me what you think!
As of this month, I’ve been living in NYC for over a year. I no longer feel like a lost tourist trying to work their way to the Empire State Building, but rather I can work my way around a subway, hail a cab, and order take-out like a pro.
Over the last year I’ve tried different restaurants for breakfast, lunch, and dinner across Queens and Manhattan. Some I didn’t care for and others I make a point to eat at whenever I can. Even in a big city like NYC, gluten-free options can be limited at times. But if you save these 5 restaurants on your phone it doesn’t have to be.
Whatever cuisine I’m in the mood for, I know one of these restaurants has it and does a phenomenal job at making their food delicious and gluten-free.
El Centro – I’m a huge Mexican food fan and there are tons of great options in the city(and also plenty of Chipotles I’ve been to, too). El Centro is my favorite of them all for something delicious and a little sophisticated. The whole menu isn’t gluten-free but you won’t be left without options. I’m a big fan of their chilaquiles!
Risotteria – So few places do gluten-free Italian food as well as risotteria. For starters, you get gluten-free breadsticks at every table. Their menu is a good mix of risottos(duh), pizza, paninis, and more. Best of all, they sell their own desserts and gluten-free flour mixes so if you loved anything you can get the ingredients to make it at home.
Pie By The Pound – While Risotteria has great Italian food, for pizza I’d always go to Pie By The Pound. It’s definitely on the pricey side but everything’s made fresh to order and the gluten-free dough is as light and crispy as their regular. They also have an endless list of delicious toppings. It’s not on their menu but if you just can’t decide you can ask them to do half & half toppings. There’s even a 10% gluten-free discount card for regulars.
Lilli and Loo/Lili57 – Asian cuisine is tough to find when you’re on a gluten-free diet. It’s even tougher to find a place that makes it as good as their regular menu. Lilli and Loo is great at that. They have a good mix of Thai, Japanese, and Chinese items. Their express location, Lili57, has mostly the same menu and is great if you’re in the heart of town and want something quick or takeout.
Tu-lu’s Gluten-free Bakery – If, after all of these meals, you want a good old-fashioned bakery where you can buy a chewy chocolate chip cookie the size of your face or a rich chocolate cake with buttercream, I’d recommend stopping at Tu-lu’s bakery. They do a great job of creating classic bakery desserts for a gluten-free appetite and always have a good selection available.

The internet is a crazy awesome place because it’s full of resources for any life you want to live, whether it’s gluten-free recipes, vegetarian restaurant hot spots, of just a chocolate-filled life.
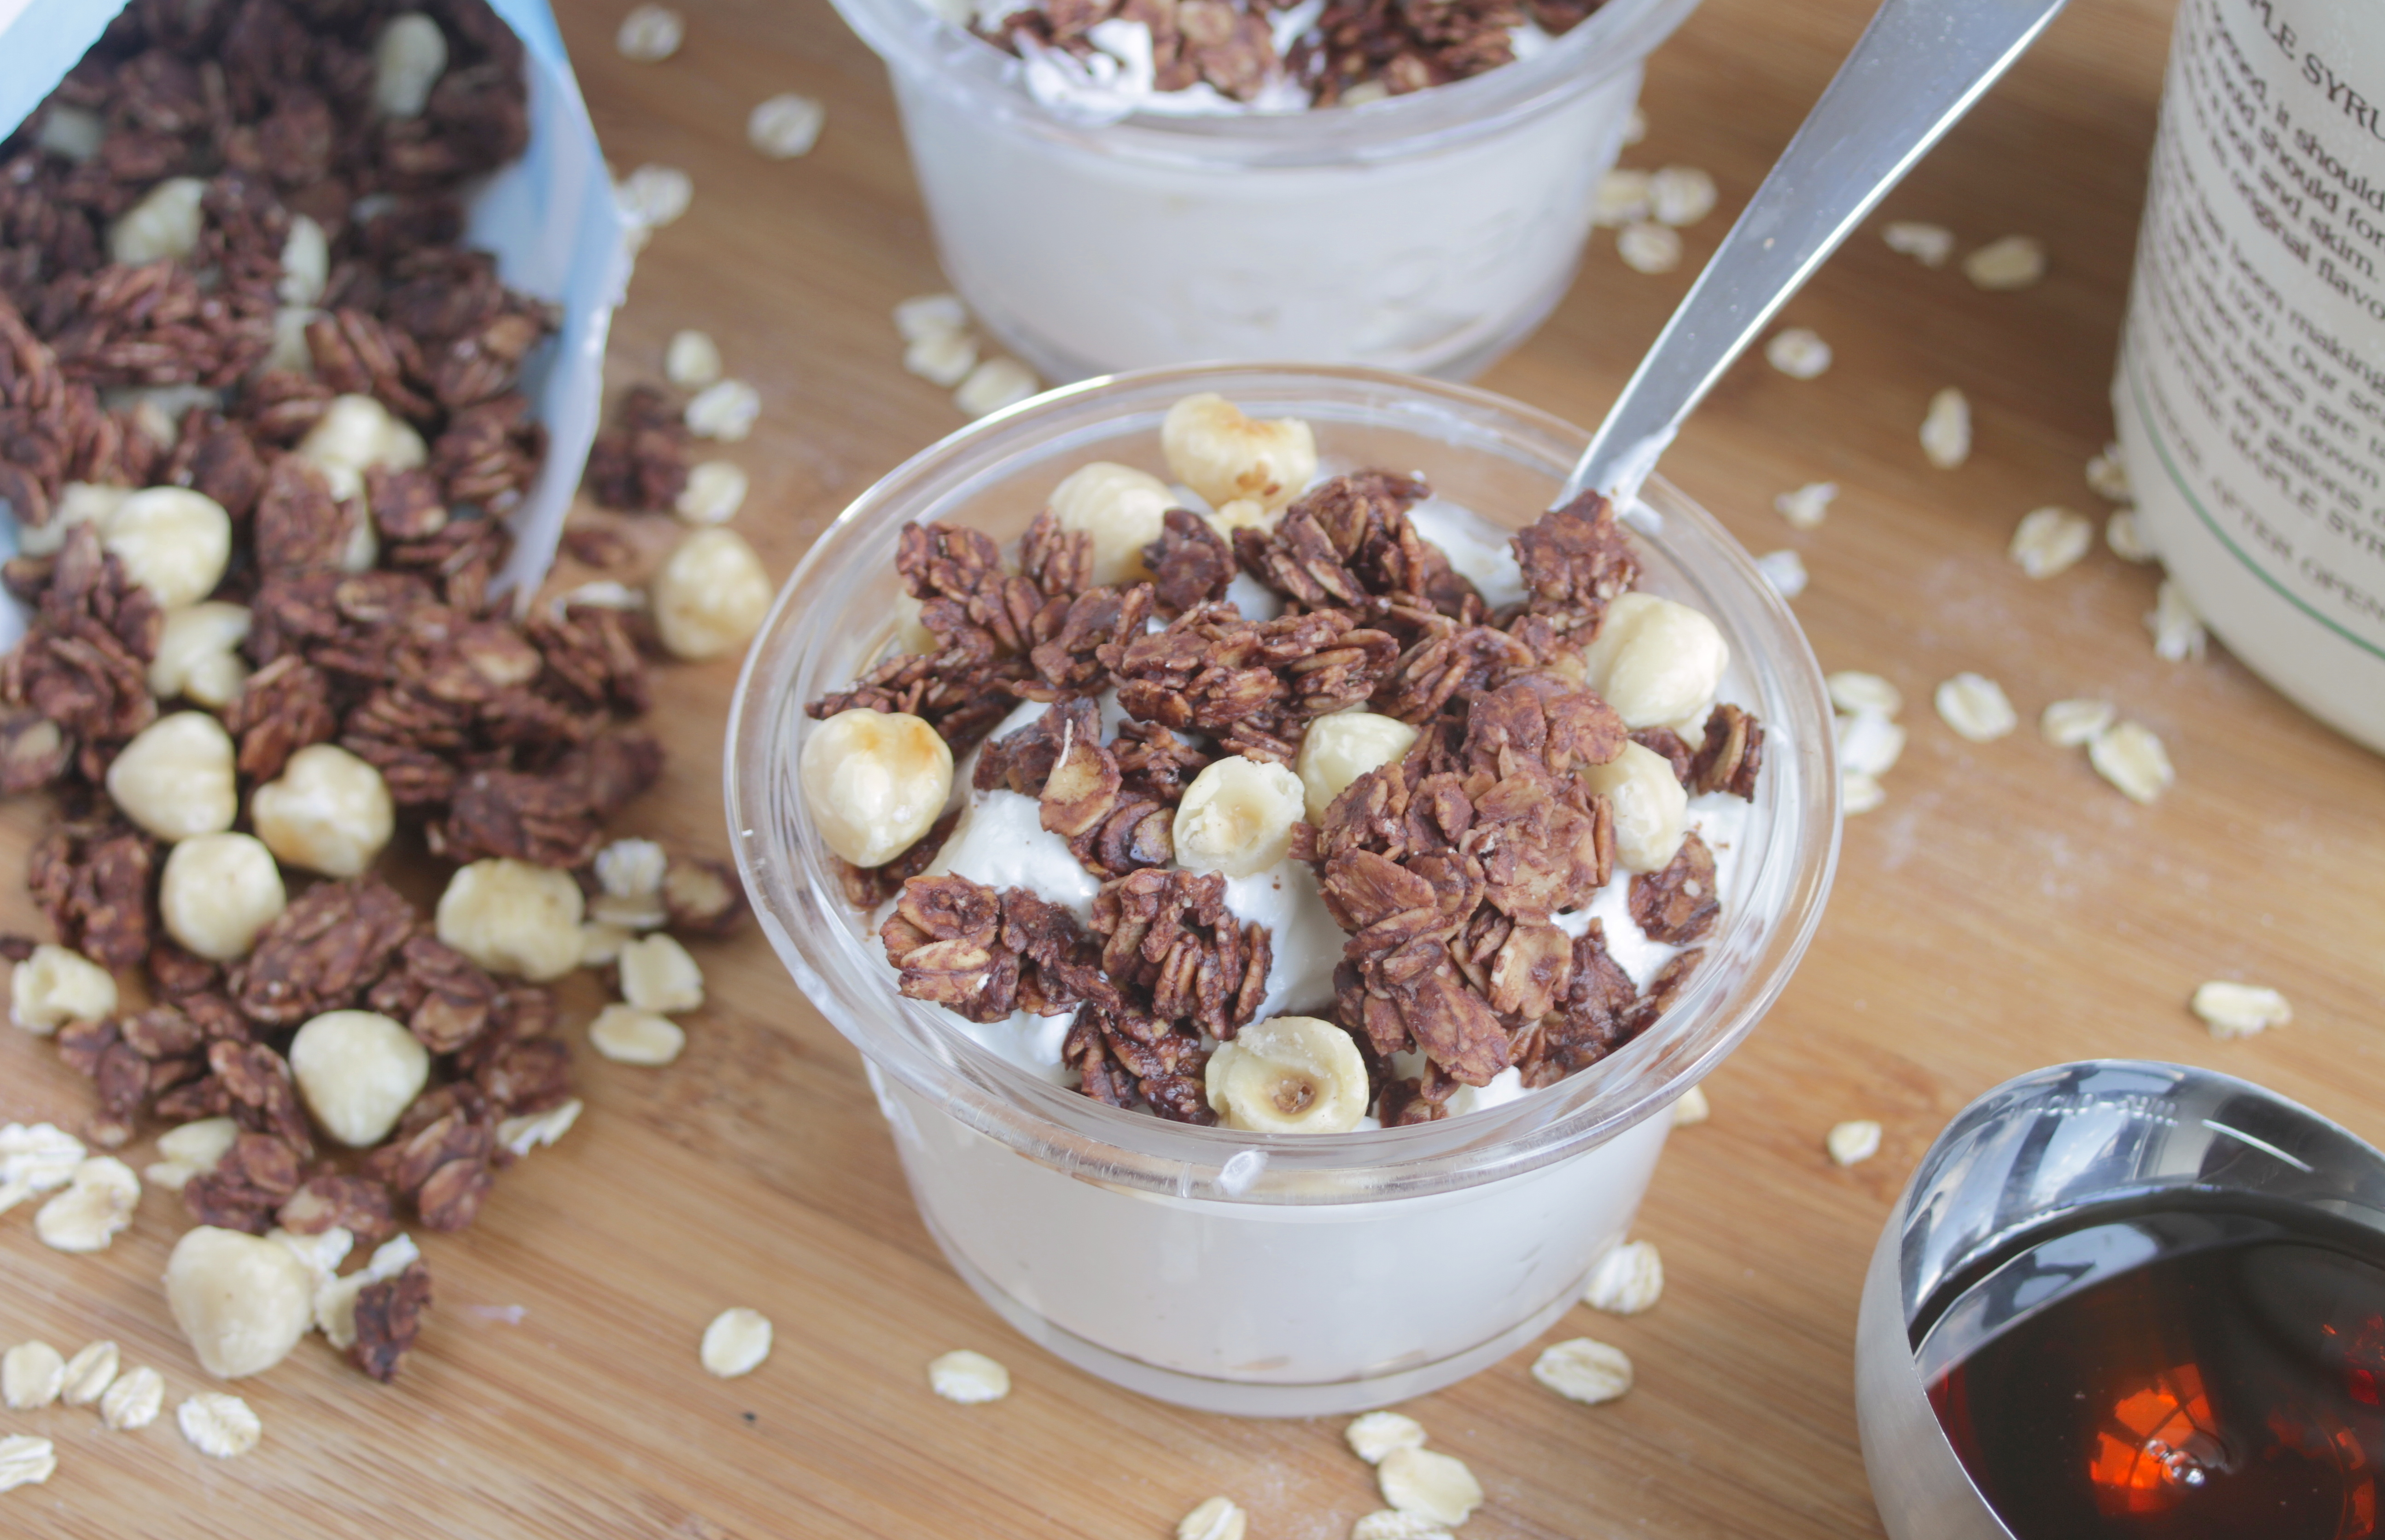
I’m excited that Dailyburn‘s blog Life By Dailyburn asked me to be a recipe contributor for their site. They’re an amazing resource for anyone looking to be healthier and get whipped into shape.
The first recipe I made for them will hopefully pique your interest. If you want to cut out sugar in the morning but still eat flavorful food making your own is a must. This cocoa hazelnut granola recipe only uses maple syrup for sweetness to keep the flavor but ditch the processed sugars. It also tastes great and can save you money–what’s not to love?
And if you’re also looking for a healthier life and haven’t yet, follow them on Facebook and Pinterest for some daily inspirations to eat great and workout.
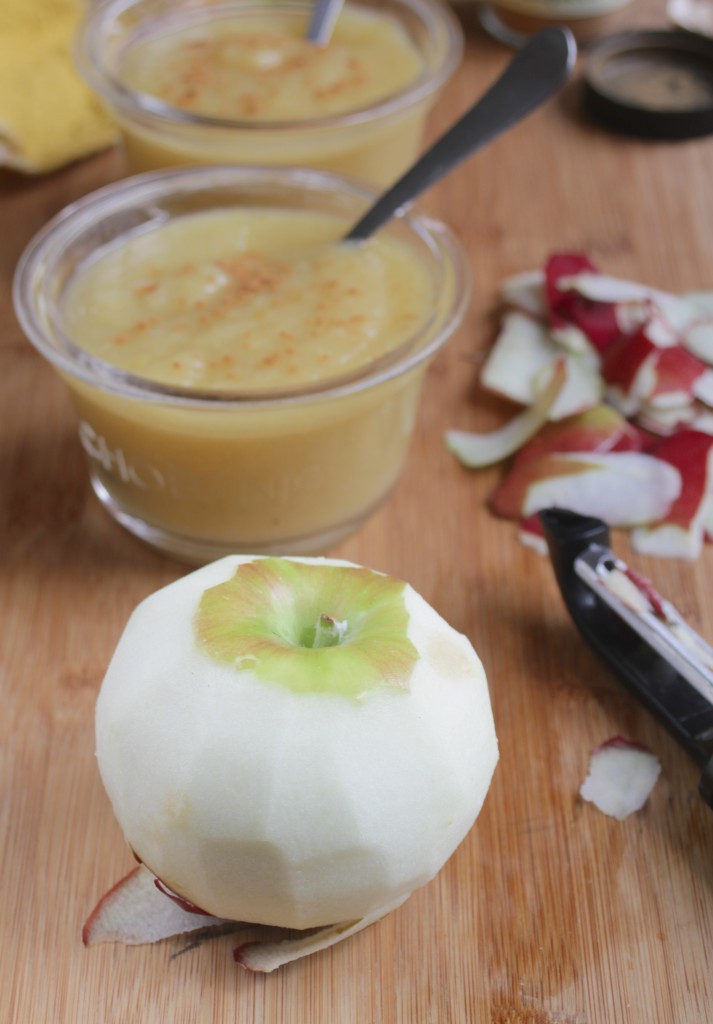
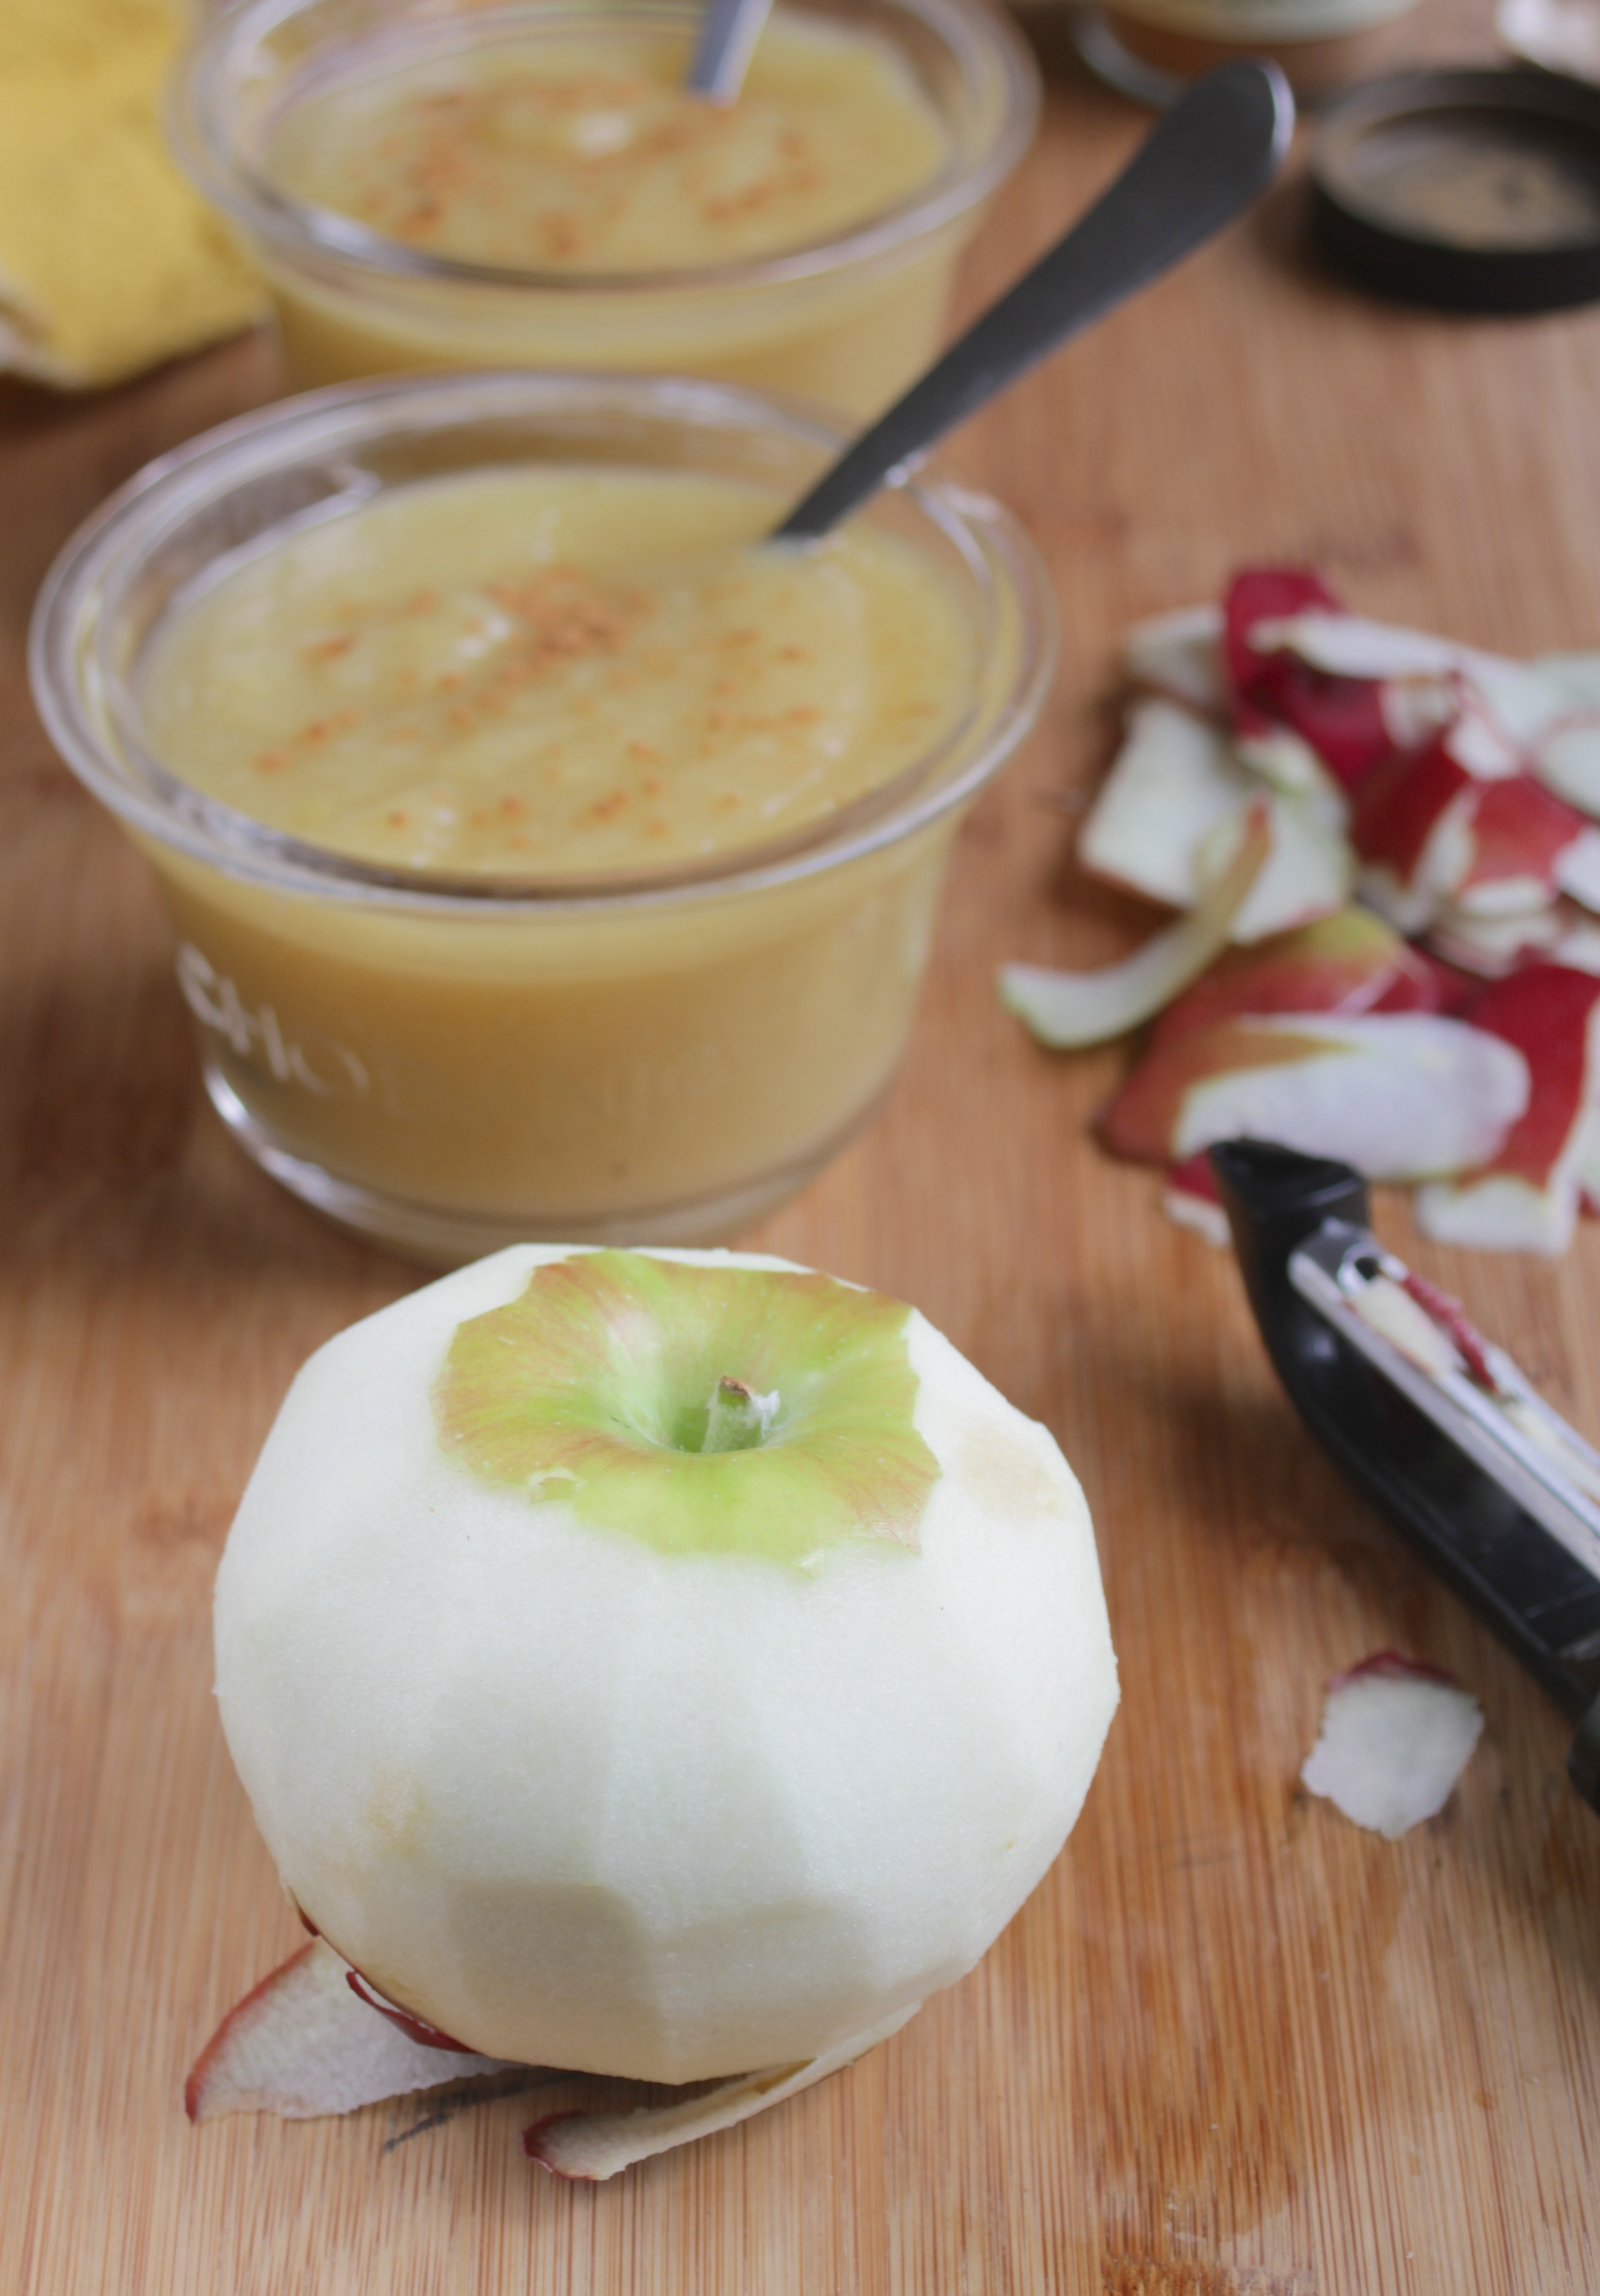
I’ve eaten more applesauce over the last weekend than I probably had over the last decade. If there was a bright side to getting my wisdom teeth taken out Friday, it was rediscovering how good applesauce can be(and mashed potatoes but I already knew that).
Before my surgery I bought a jar of applesauce–that was gone by the second day. By the third day I had a bunch of recently picked peaches I couldn’t bite into to save my life. Making them into more applesauce was a no-brainer.
This recipe has a lot less added sugars than it looks at first when you consider most of it gets poured out with the water. The final recipe has a much lower sweetness than the store-bought kind which the fresh, natural flavors make up for.
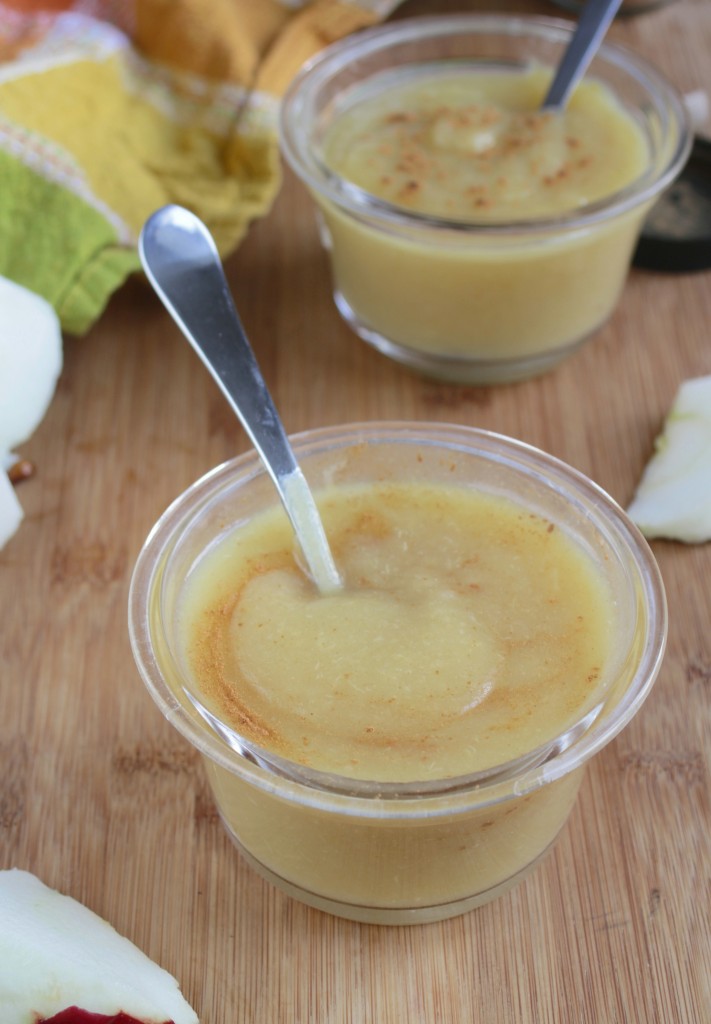
The peaches in this aren’t an overwhelming flavor. If you want more of a peachiness to this, I’d recommend replacing a few more of the apples with peaches and making sure they’re slightly over ripened. You can also use the same recipe with no peaches and have a great, basic applesauce.
Homemade Peach Applesauce
Prep time: 10 minutes
Cook time: 15 minutes
Ingredients(Makes 6 servings):
- 5 Macintosh apples, cored and peeled
- 4 medium sized peaches, pitted and peeled
- Water
- 1 cup sugar
- 1 Tablespoon honey
- 3/4 teaspoon cinnamon
- 1/4 teaspoon nutmeg
Method:
- Add all of the apples and peaches into a large boiling pot that has a lid to it.
- Cover with just enough water that the fruit begins to float.
- Add in the sugar and stir gently.
- Boil the fruit and water on high heat until the apples turn slightly brown and are tender to touch(about 15 minutes)
- Drain as much of the water from the pot as you can.
- Put the fruit into a high-speed blender. Add in the honey, cinnamon, and nutmeg.
- Pulse until the sauce is smooth.
- Remove from the blender and let cool before serving. Store in an airtight container in the refrigerator for up to a week.

It’s almost Labor Day, which means Summer’s almost over, which is pretty darn depressing.
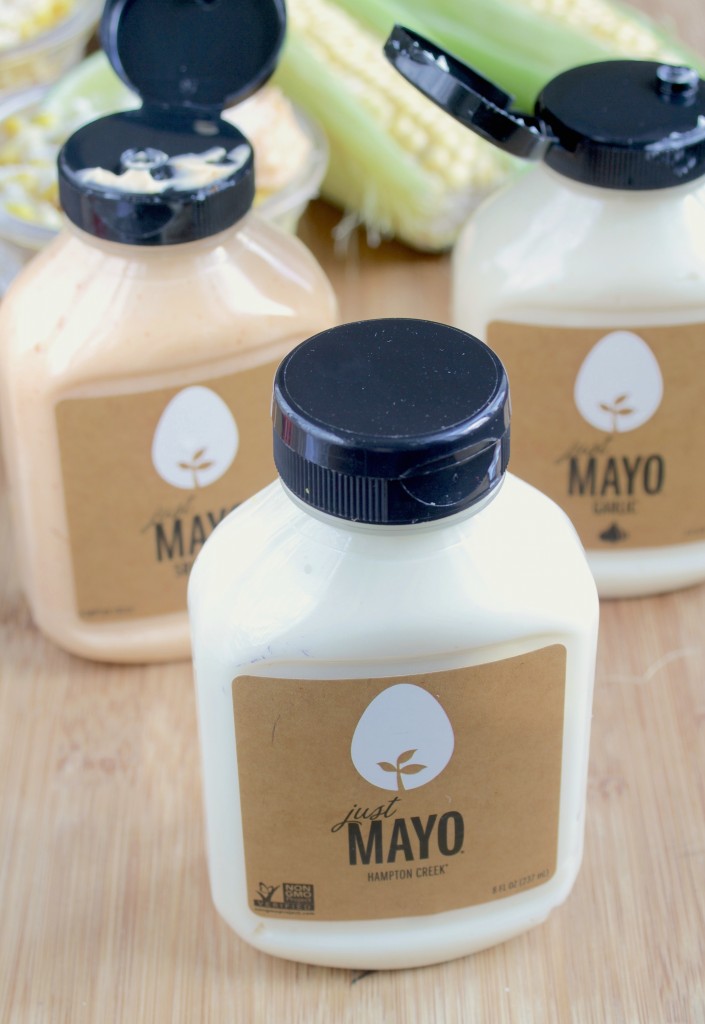
Luckily, I got to try the Just Mayo line from Hampton Creek for one last taste of Summer and a lift in spirit.
For my whole life I didn’t think I liked mayo up until a couple of years ago when I actually tried it and–surprise, surprise–got hooked on the savory spread. I loved all of the Hampton Creek flavors, but the sriracha was by far my favorite even though I don’t like regular sriracha. It’s just the right amount of spice and cooling creaminess.
The garlic came in a close second when I made a killer potato salad for a camping trip with it that got eaten up almost immediately. Overall I love that these get a ton of flavor from a few simple ingredients.
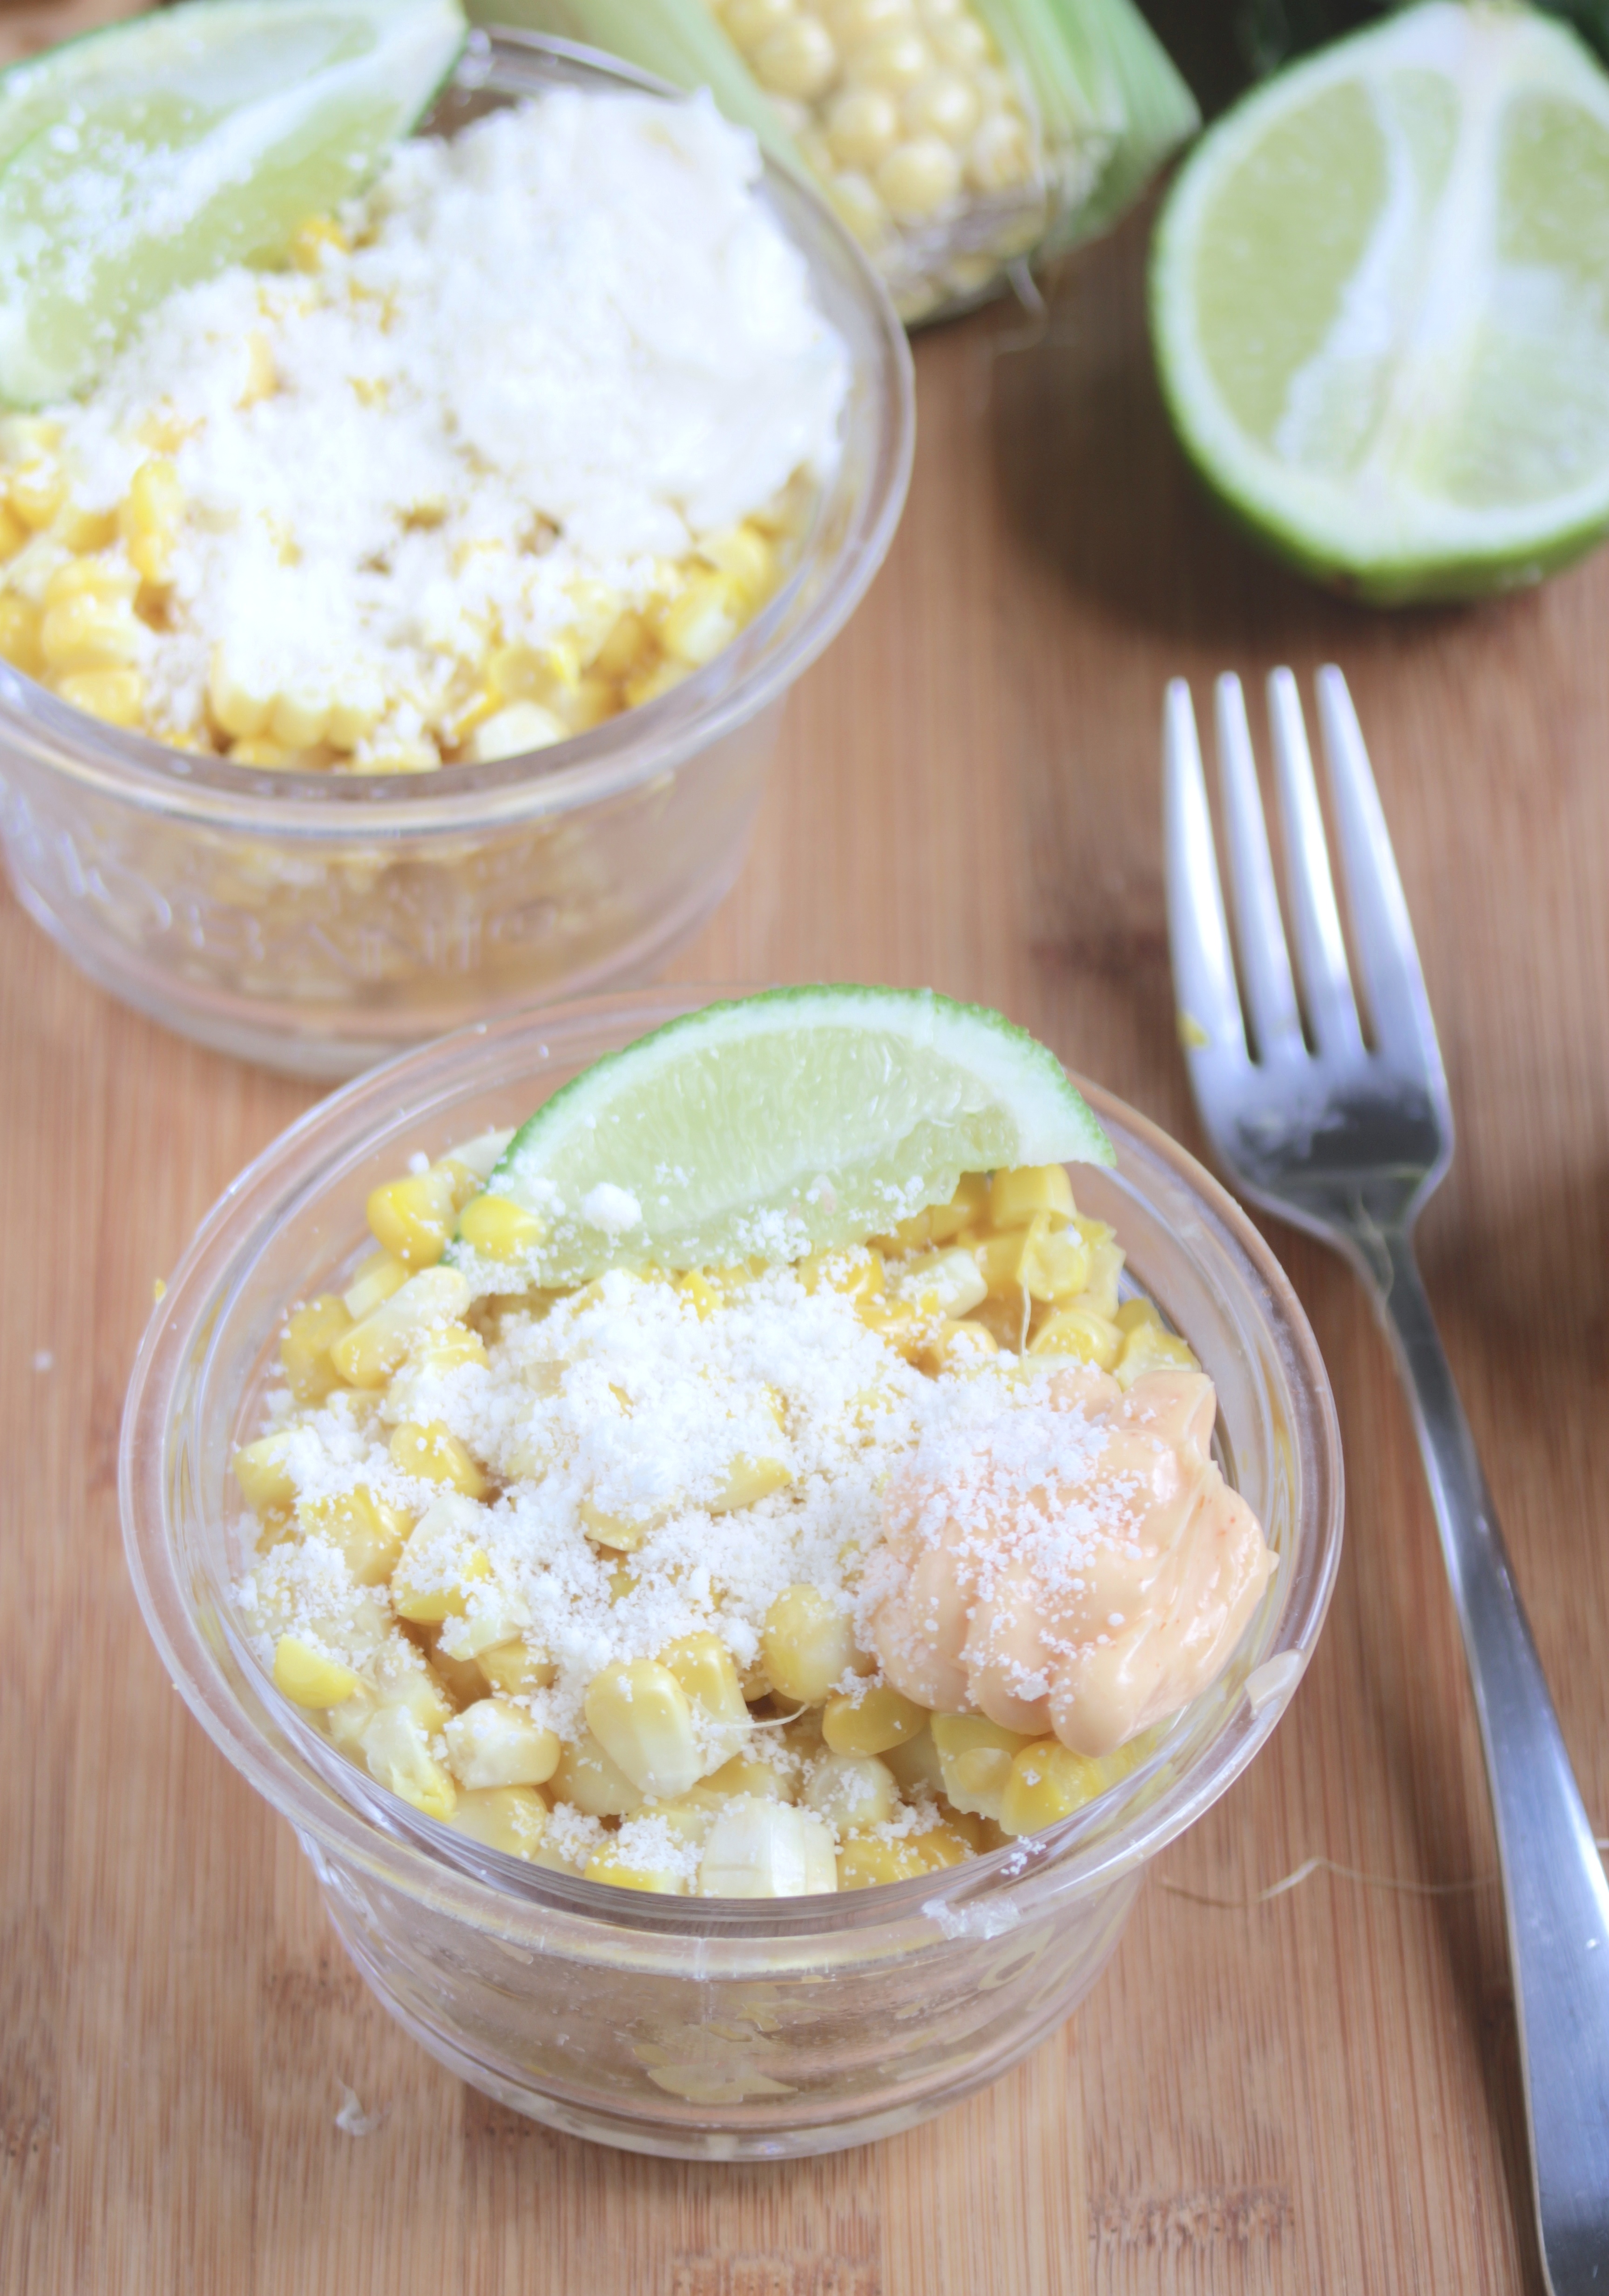
I had an amazing corn salad in the city with chipotle mayo, parmesan, and smoky spices. I knew I wanted to try it out myself because it highlighted the flavors of the ingredients with true simplicity. I’m sure you’ll eat more corn and mayo over Labor Day weekend but be sure to sneak this recipe in, too.

You can really prepare the corn for this anyway you want(you can even use frozen–just don’t admit to it). I roasted it since that’s easiest to do in a small NYC apartment but grilling would add a great smoky flavor.
Easy Corn Esquites
Prep time: 5 minutes
Cook time: 30 minutes
Ingredients(Makes 2 servings):
- 2 corn cobs, washed and cleaned
- 2 Tablespoons oil
- 1/4 teaspoon salt
- 2 teaspoons lime juice
- 1/4 teaspoon chili powder
- 3 Tablespoons parmesan
- 2 Tablespoons spicy mayo
- 2 lime wedges for garnish
Method:
- Preheat your oven to 350 degrees.
- Lightly grease the corn with the oil.
- Roast for 30 minutes until the corn turns golden.
- After the corn’s cooled slightly, separate it from the cob with a sharp knife.
- In a large bowl mix together the corn, salt, lime juice, and chili powder.
- Scoop evenly into two small bowls. Sprinkle the parmesan and a dollop of mayo on top. Serve with a lime wedge at room temperature or slightly warmer.
Giveaway!
Want to try some of every flavor? Tell me what mayo-centric recipe you would make with it. Including what flavor/recipe you would use is optional but encouraged. I’ll pick a winner at random next Tuesday, the 2nd, right after Labor Day. Good luck!

Brunch is the best meal there is; the competition’s not even close. You can go sweet or you can go savory(you can even go both!). It can be at 10am or 3pm. And even when it’s at 10am it’s always acceptable to have alcohol. What could be better?
My favorite items on any brunch menu are the different roasted vegetables(and home fries, but that’s a given). They’re something that you have to put time into but end up being well worth the effort.
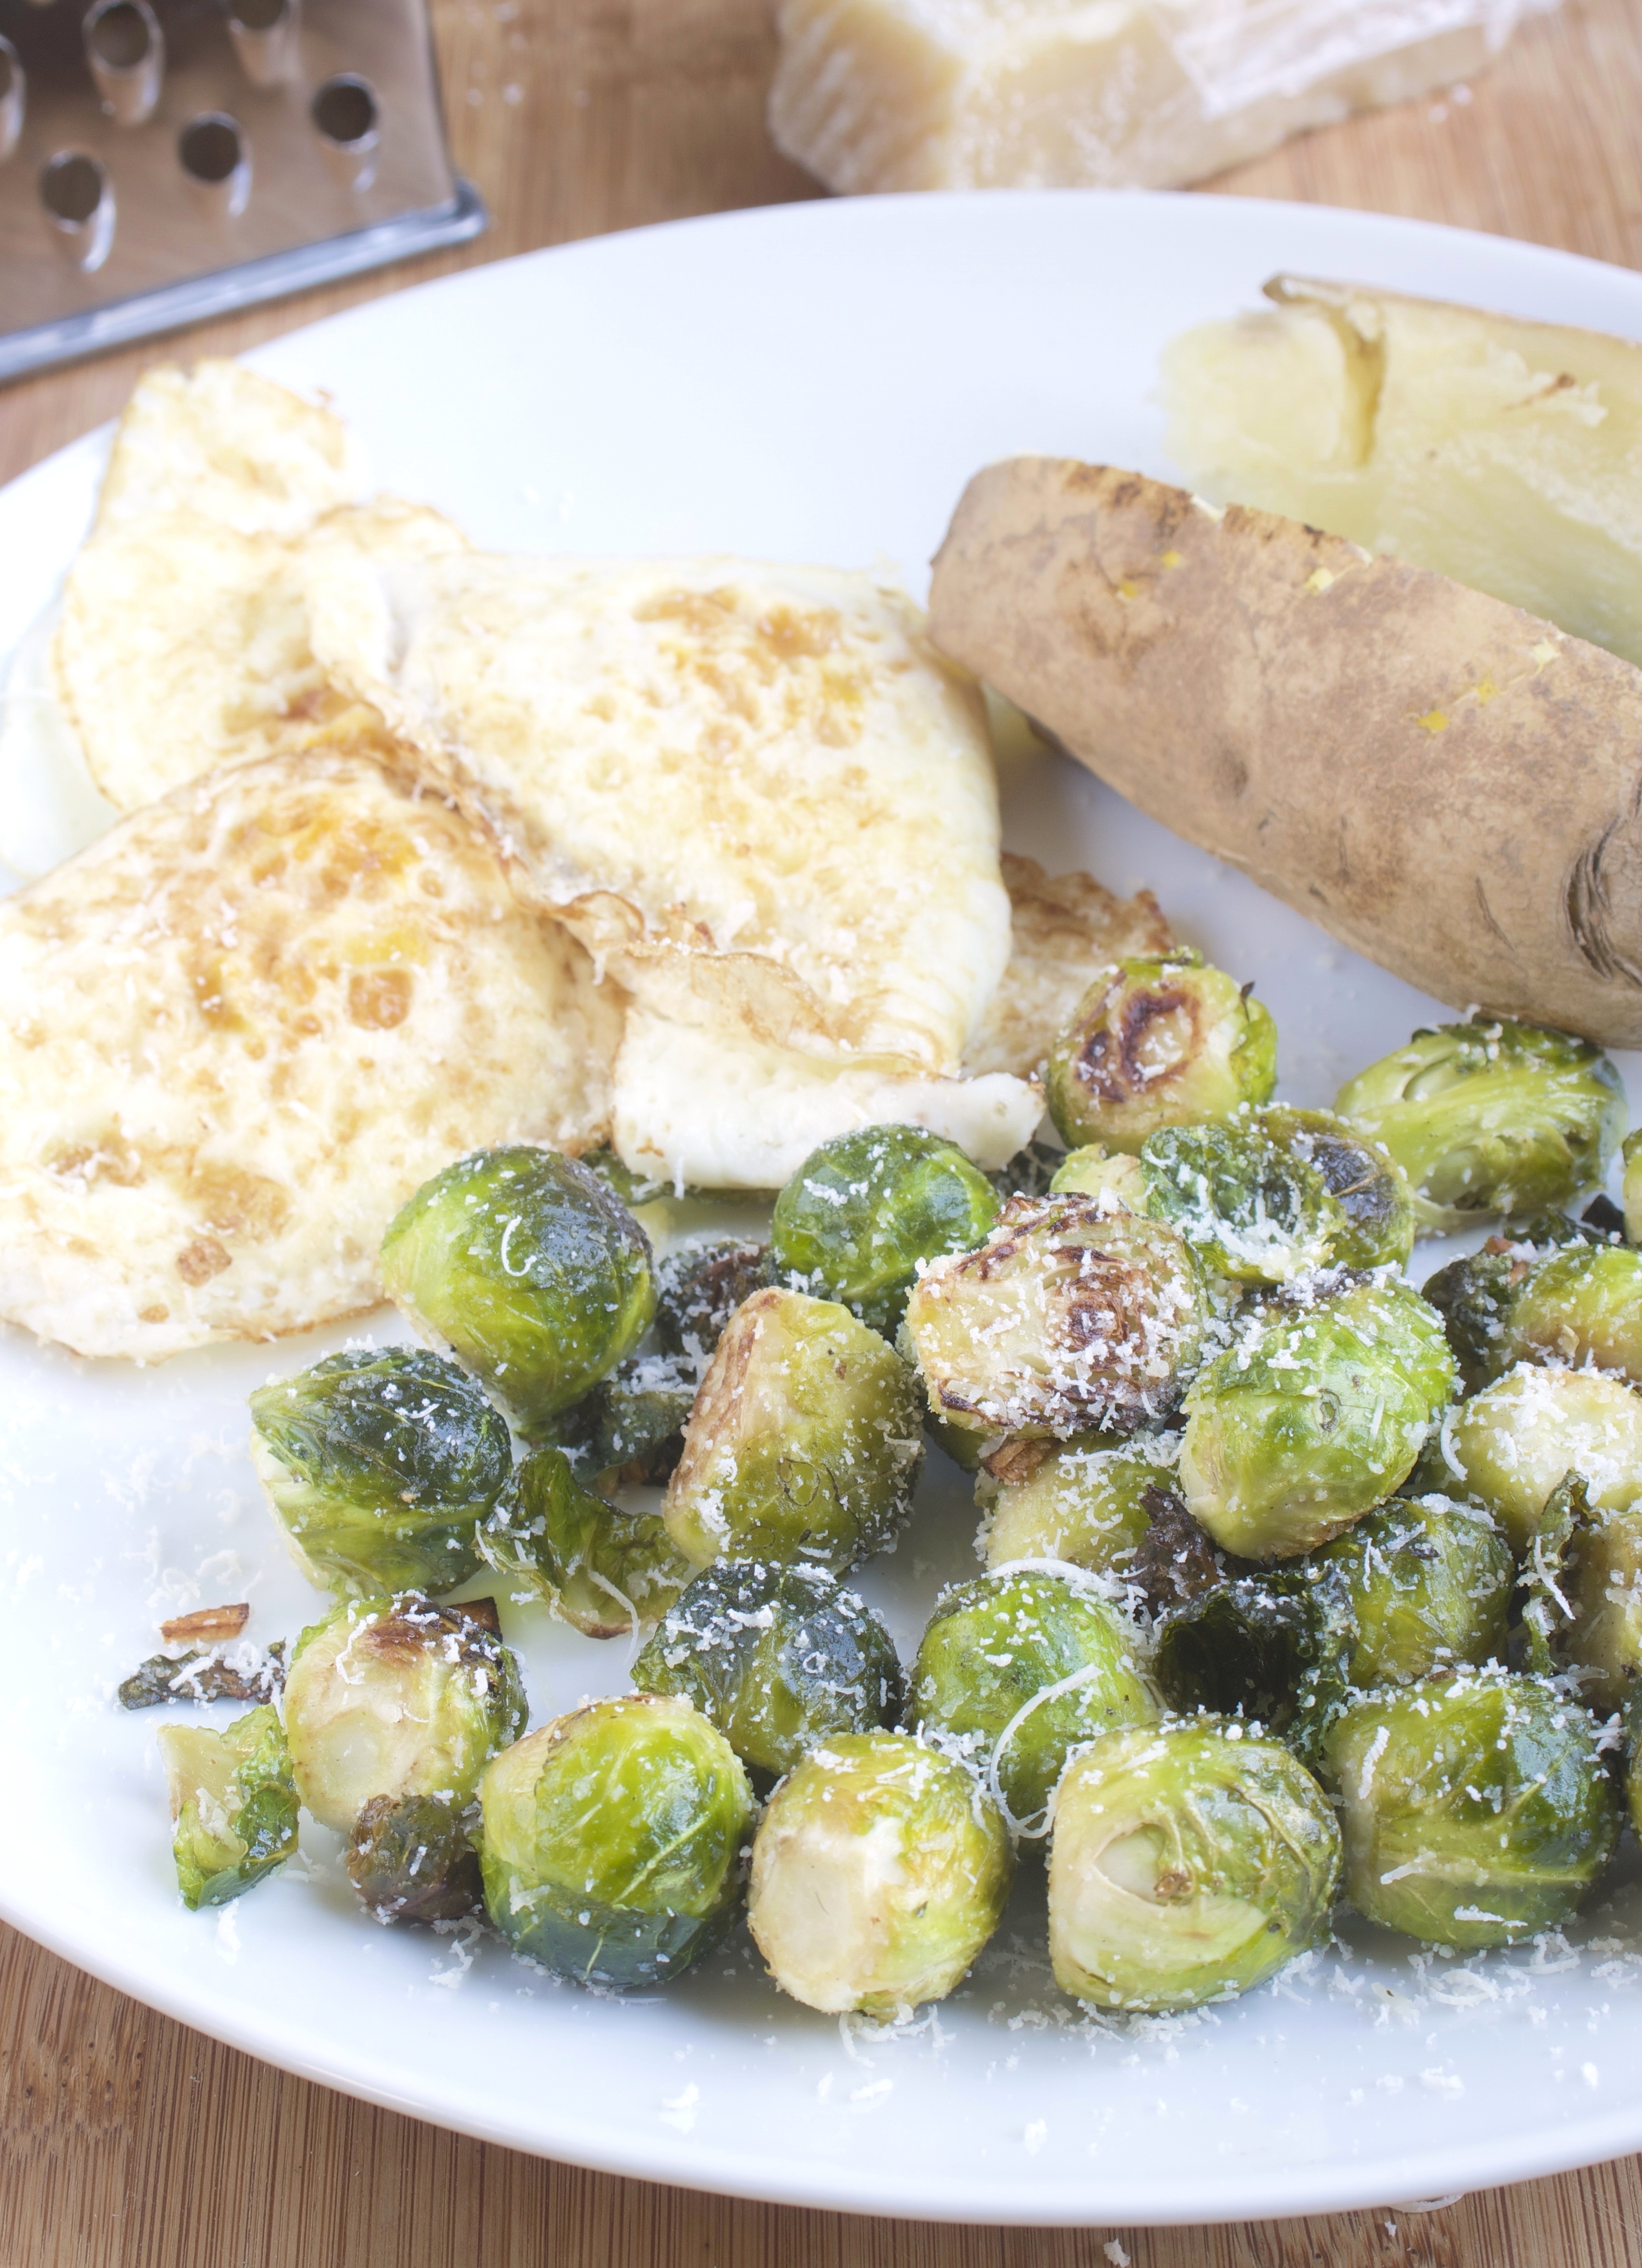
If you want to wake up with savory food, these brussels sprouts are perfect for you. They’re just the right amount of crispy, satisfying, and seasoning to wake you up. Combine them with a runny yolk from a fried egg and they’re that much better.
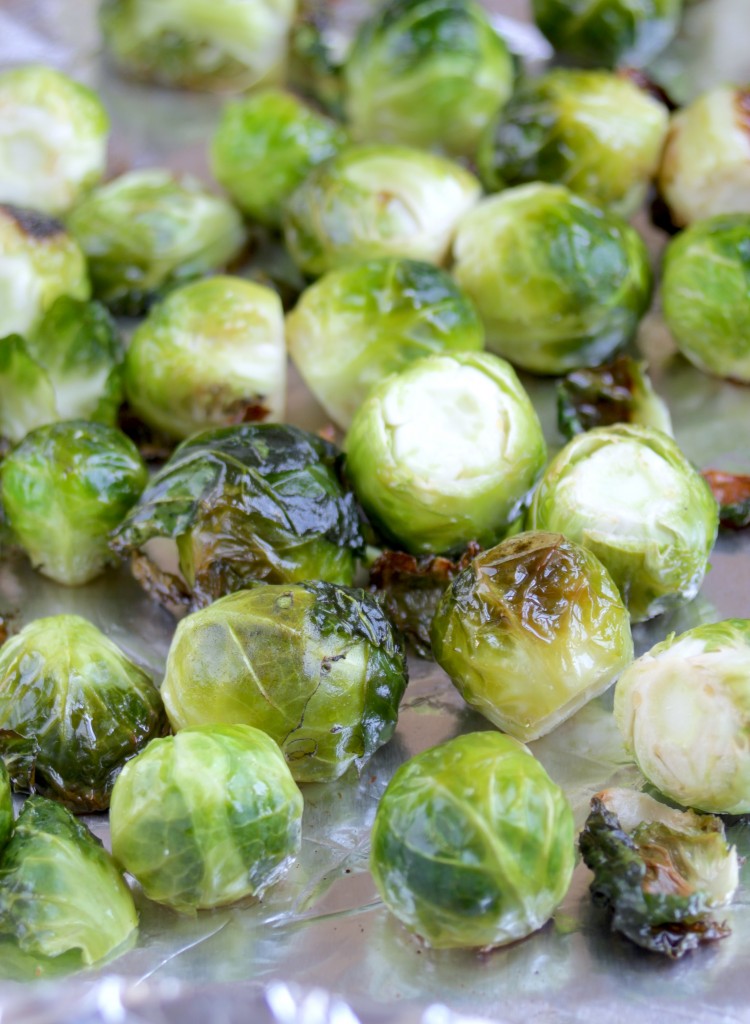
Roasted Garlic Parmesan Brussel Sprouts
Prep time: 10 minutes
Cook time: 35 minutes
Ingredients(Makes 2 servings):
- 1 1/2 cups brussels sprouts, trimmed and washed
- 1/4 teaspoon salt
- 3 Tablespoons olive oil, divided
- 1 large garlic clove, diced
- 3 Tablespoons parmesan
Method:
- Preheat your oven to 350 degrees.
- Toss the brussels sprouts, salt, and 2 Tablespoons of oil together.
- Lay the brussels out on a non-stick baking try and roast until slightly crispy(about 30 minutes for small-medium brussels)
- Heat the remaining Tablespoon oil in a pan over low heat.
- Toast the garlic until browning.
- Add in the brussels sprouts and toss until well mixed and they’re cooked in the oil.
- Remove from the heat. Sprinkle the parmesan over and toss until well-mixed.
- Serve hot.

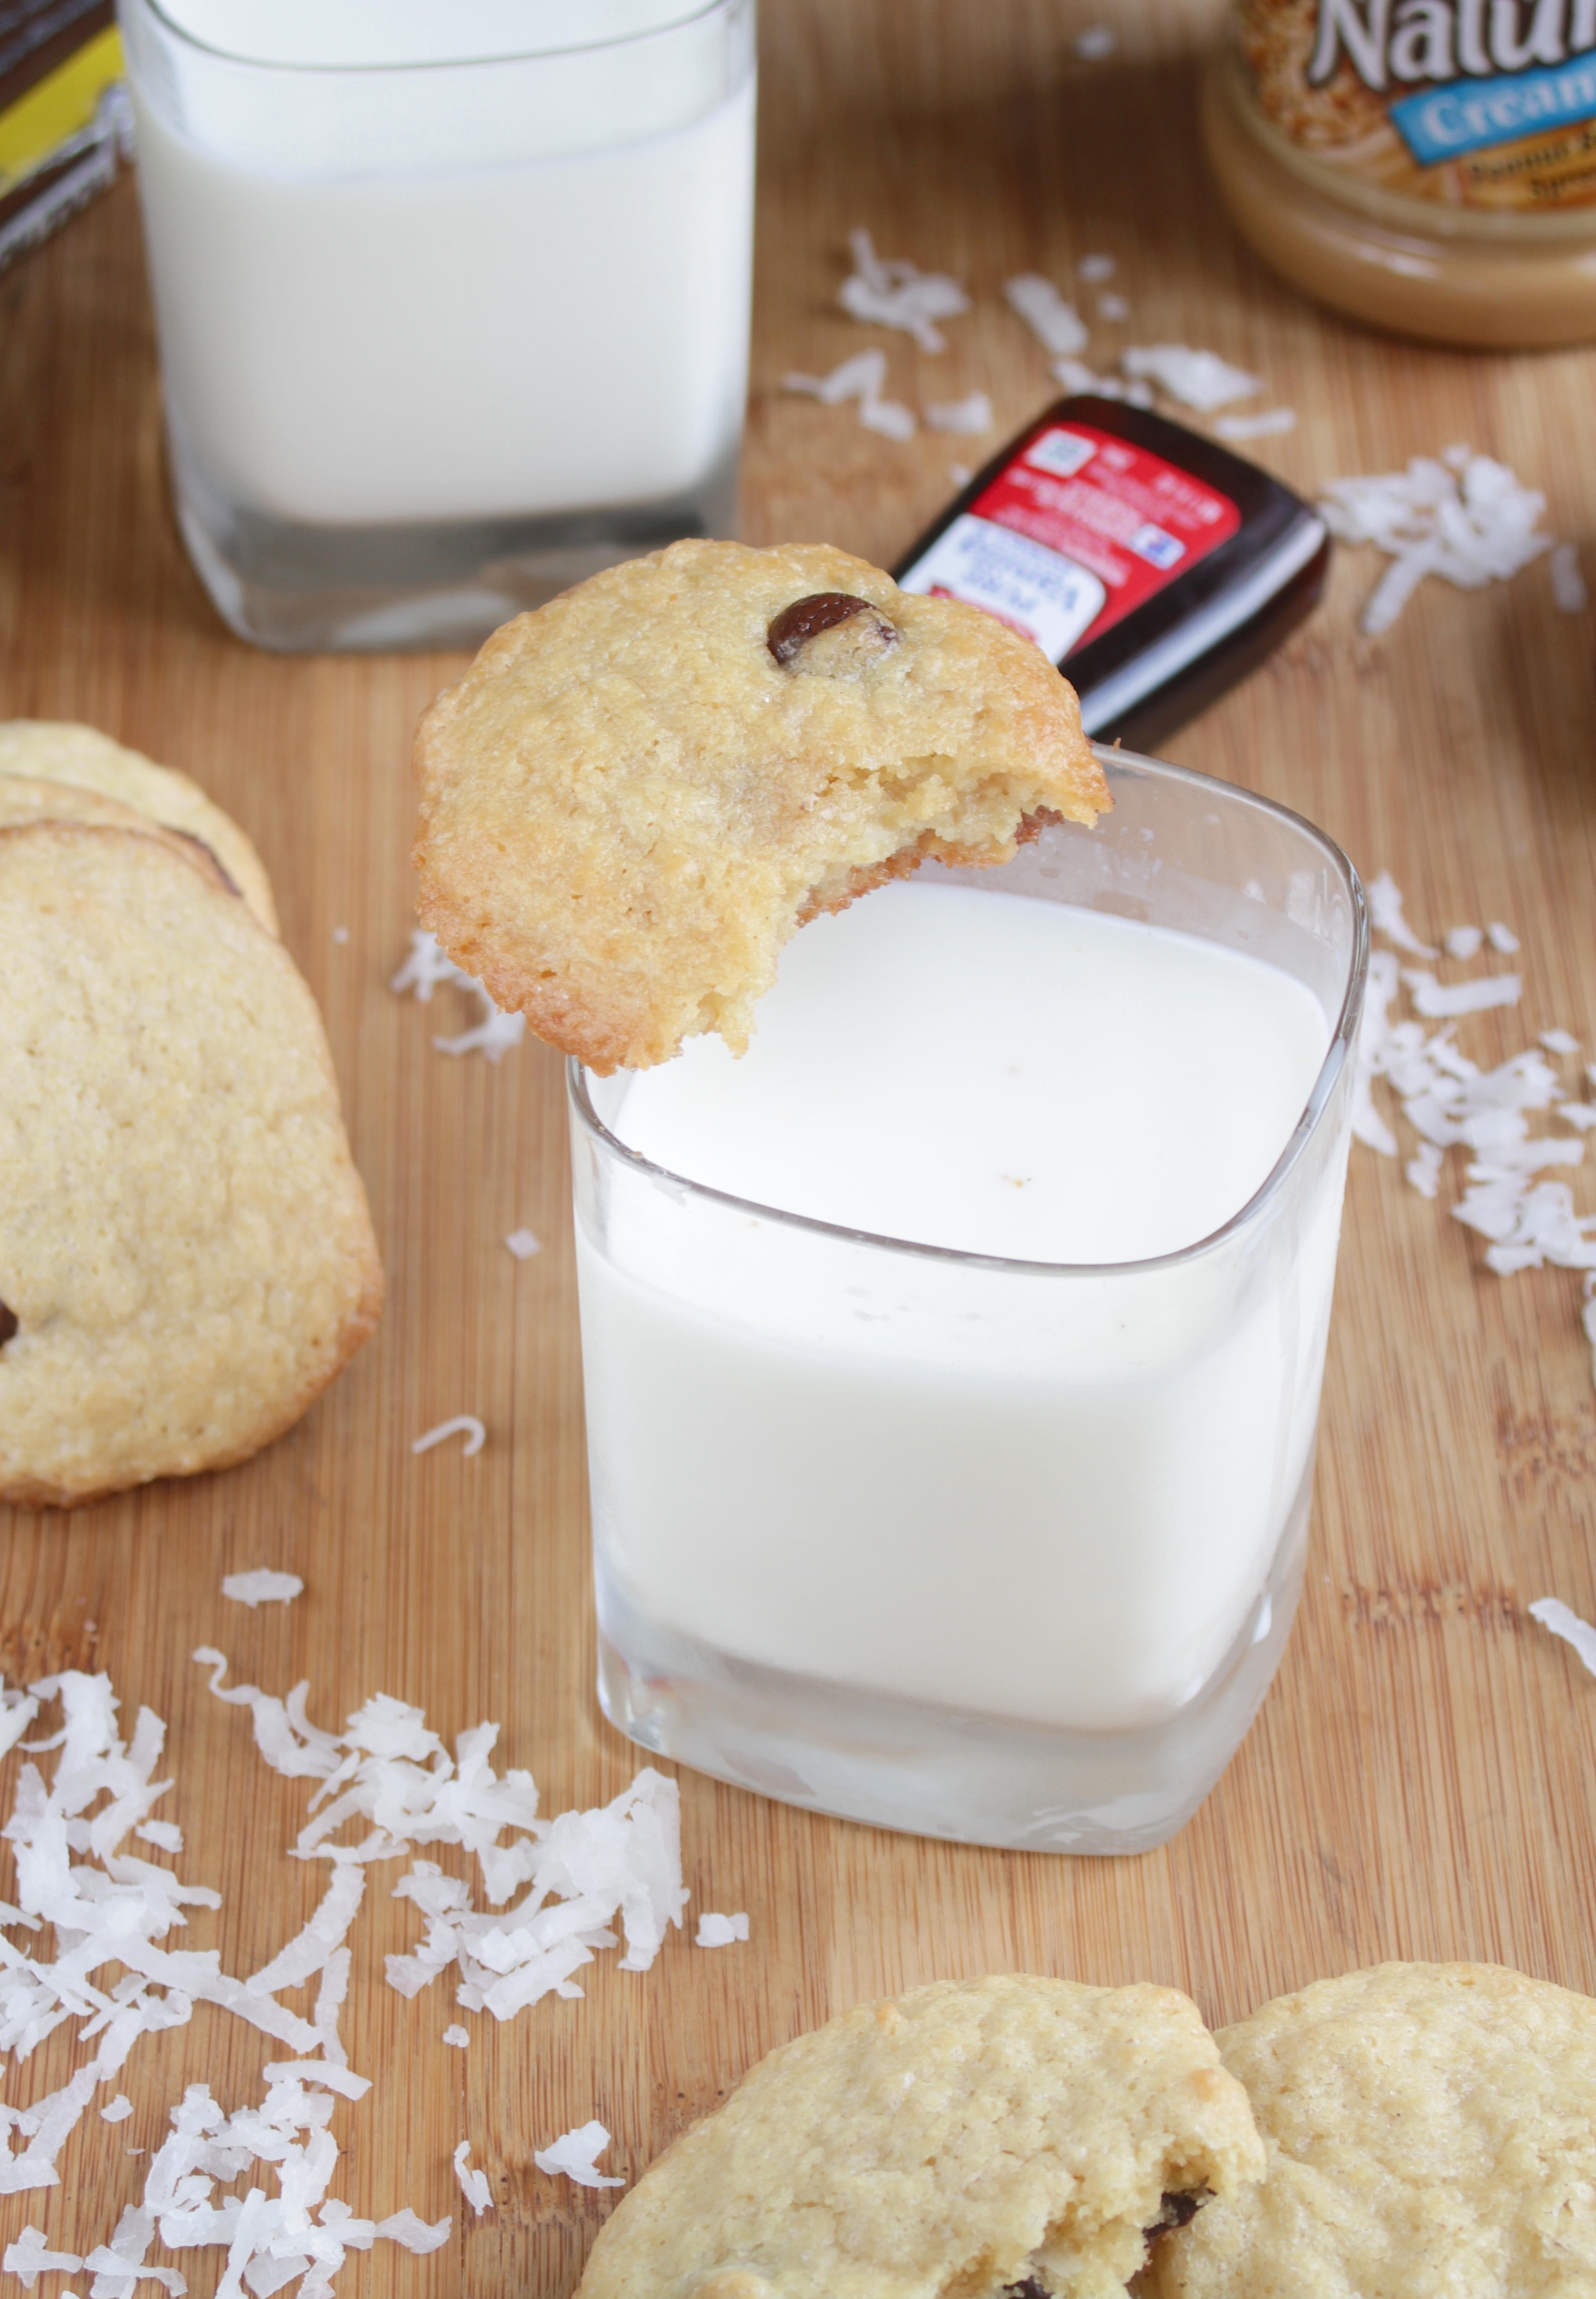
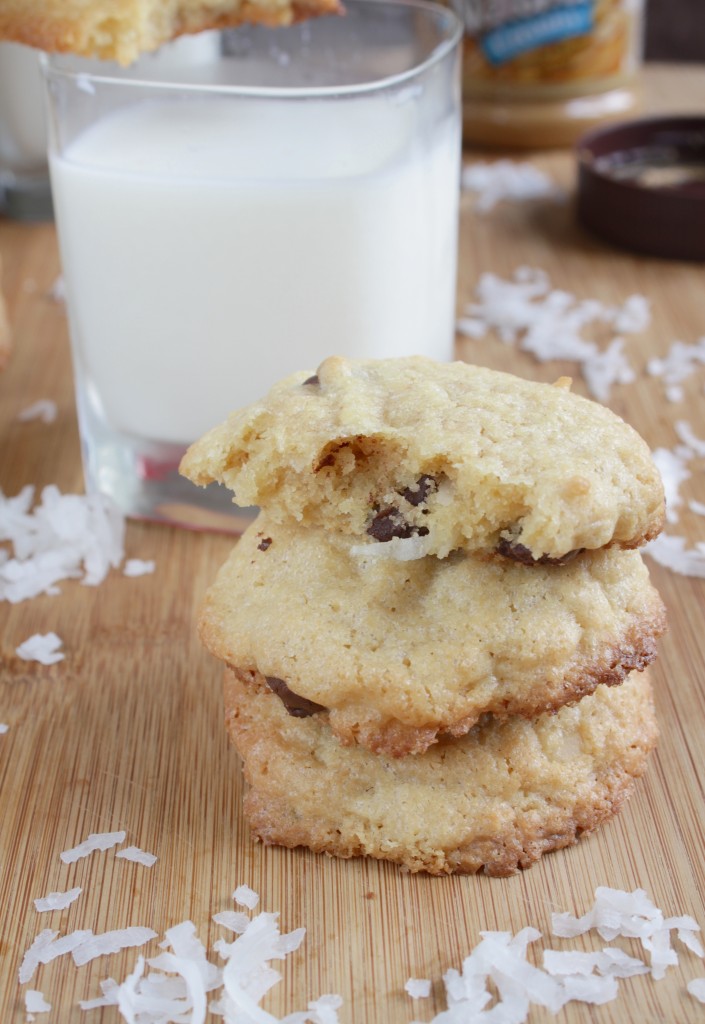
Chocolate chip cookies can be as polarizing as politics. Some like chewy while others like crisp. Should they have nuts in them? Are raisins even a question? Everyone has an opinion.
After Pinterest did a Q&A with me my coworkers were interested to try something gluten-free. One of them asked me if I knew any good cookie recipes for his cousin and it seemed like as good a place to start as any.
Lucky for me, when I brought them into work they didn’t stir up any chewy vs. crispy debates and they were all gone by lunch time–a success! They’re more chewy than crispy, not too sweet, and just rich enough to hit all the right notes. It’s hard to argue with chocolate chips and shredded coconut.
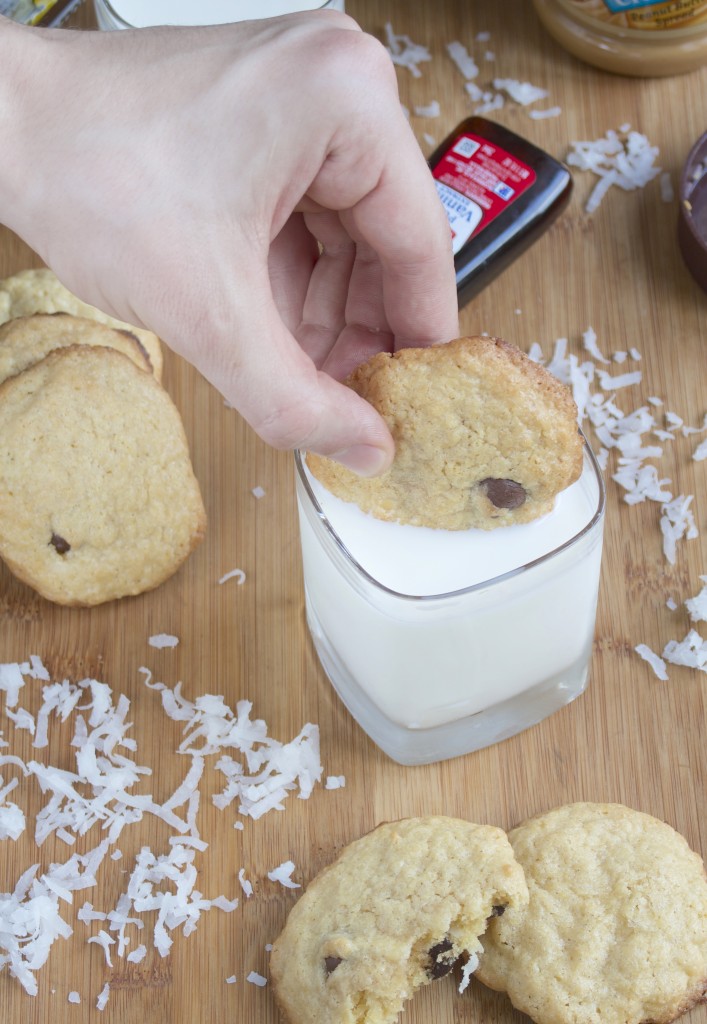
Probably the best thing to keep on hand for gluten-free baking is a bag of gluten-free all purpose flour you can use in recipes without having to mix ten different flours you’re not familiar with. I like Bob’s Red Mill’s but there are tons of different brands out there; try them out and find your favorite.
Gluten-Free Coconut Chocolate Chip Cookies
Prep time: 15 minutes
Cook time: 10 minutes
Ingredients(Makes 2 dozen cookies):
- 1 1/2 cup gluten-free all purpose flour
- 1/4 teaspoon salt
- 1/2 teaspoon baking powder
- 3/4 cup sugar
- 2 large eggs
- 1 teaspoon vanilla
- 1/2 cup butter, melted
- 1/4 cup peanut butter
- 1/2 cup sweetened shredded coconut
- 1/2 cup chocolate chips
Method:
- In a large bowl, mix together your flour, salt, baking powder, and sugar.
- Add in the eggs, vanilla, peanut butter and melted butter and mix.
- Add in the shredded coconut and chocolate chips and continue mixing until it forms a thick dough. If your dough is too dry add milk by the tablespoon until it’s just wet enough to stick together.
- Put the dough in your refrigerator and preheat your oven to 375 degrees.
- After 15 minutes of chilling, roll the dough into 1-inch balls.
- Put the doughballs onto a non-stick baking tray and bake for 10-12 minutes until the edges brown.
- Remove from the oven and let sit for 20 minutes before trying to move.
- Store in an airtight container at room temperature.
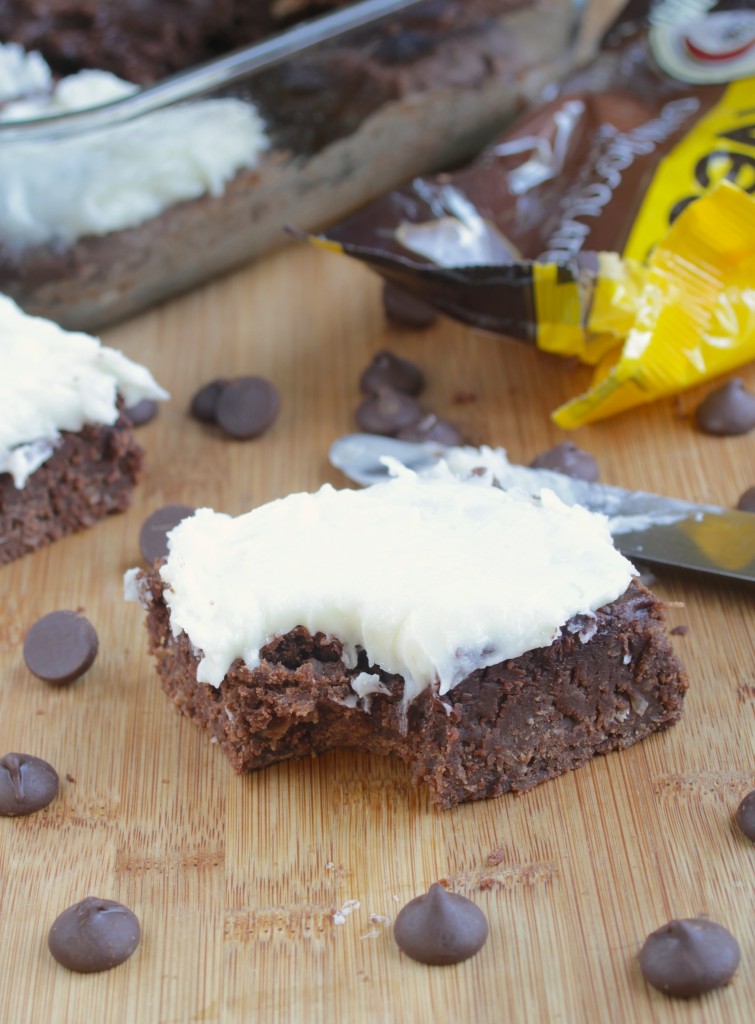
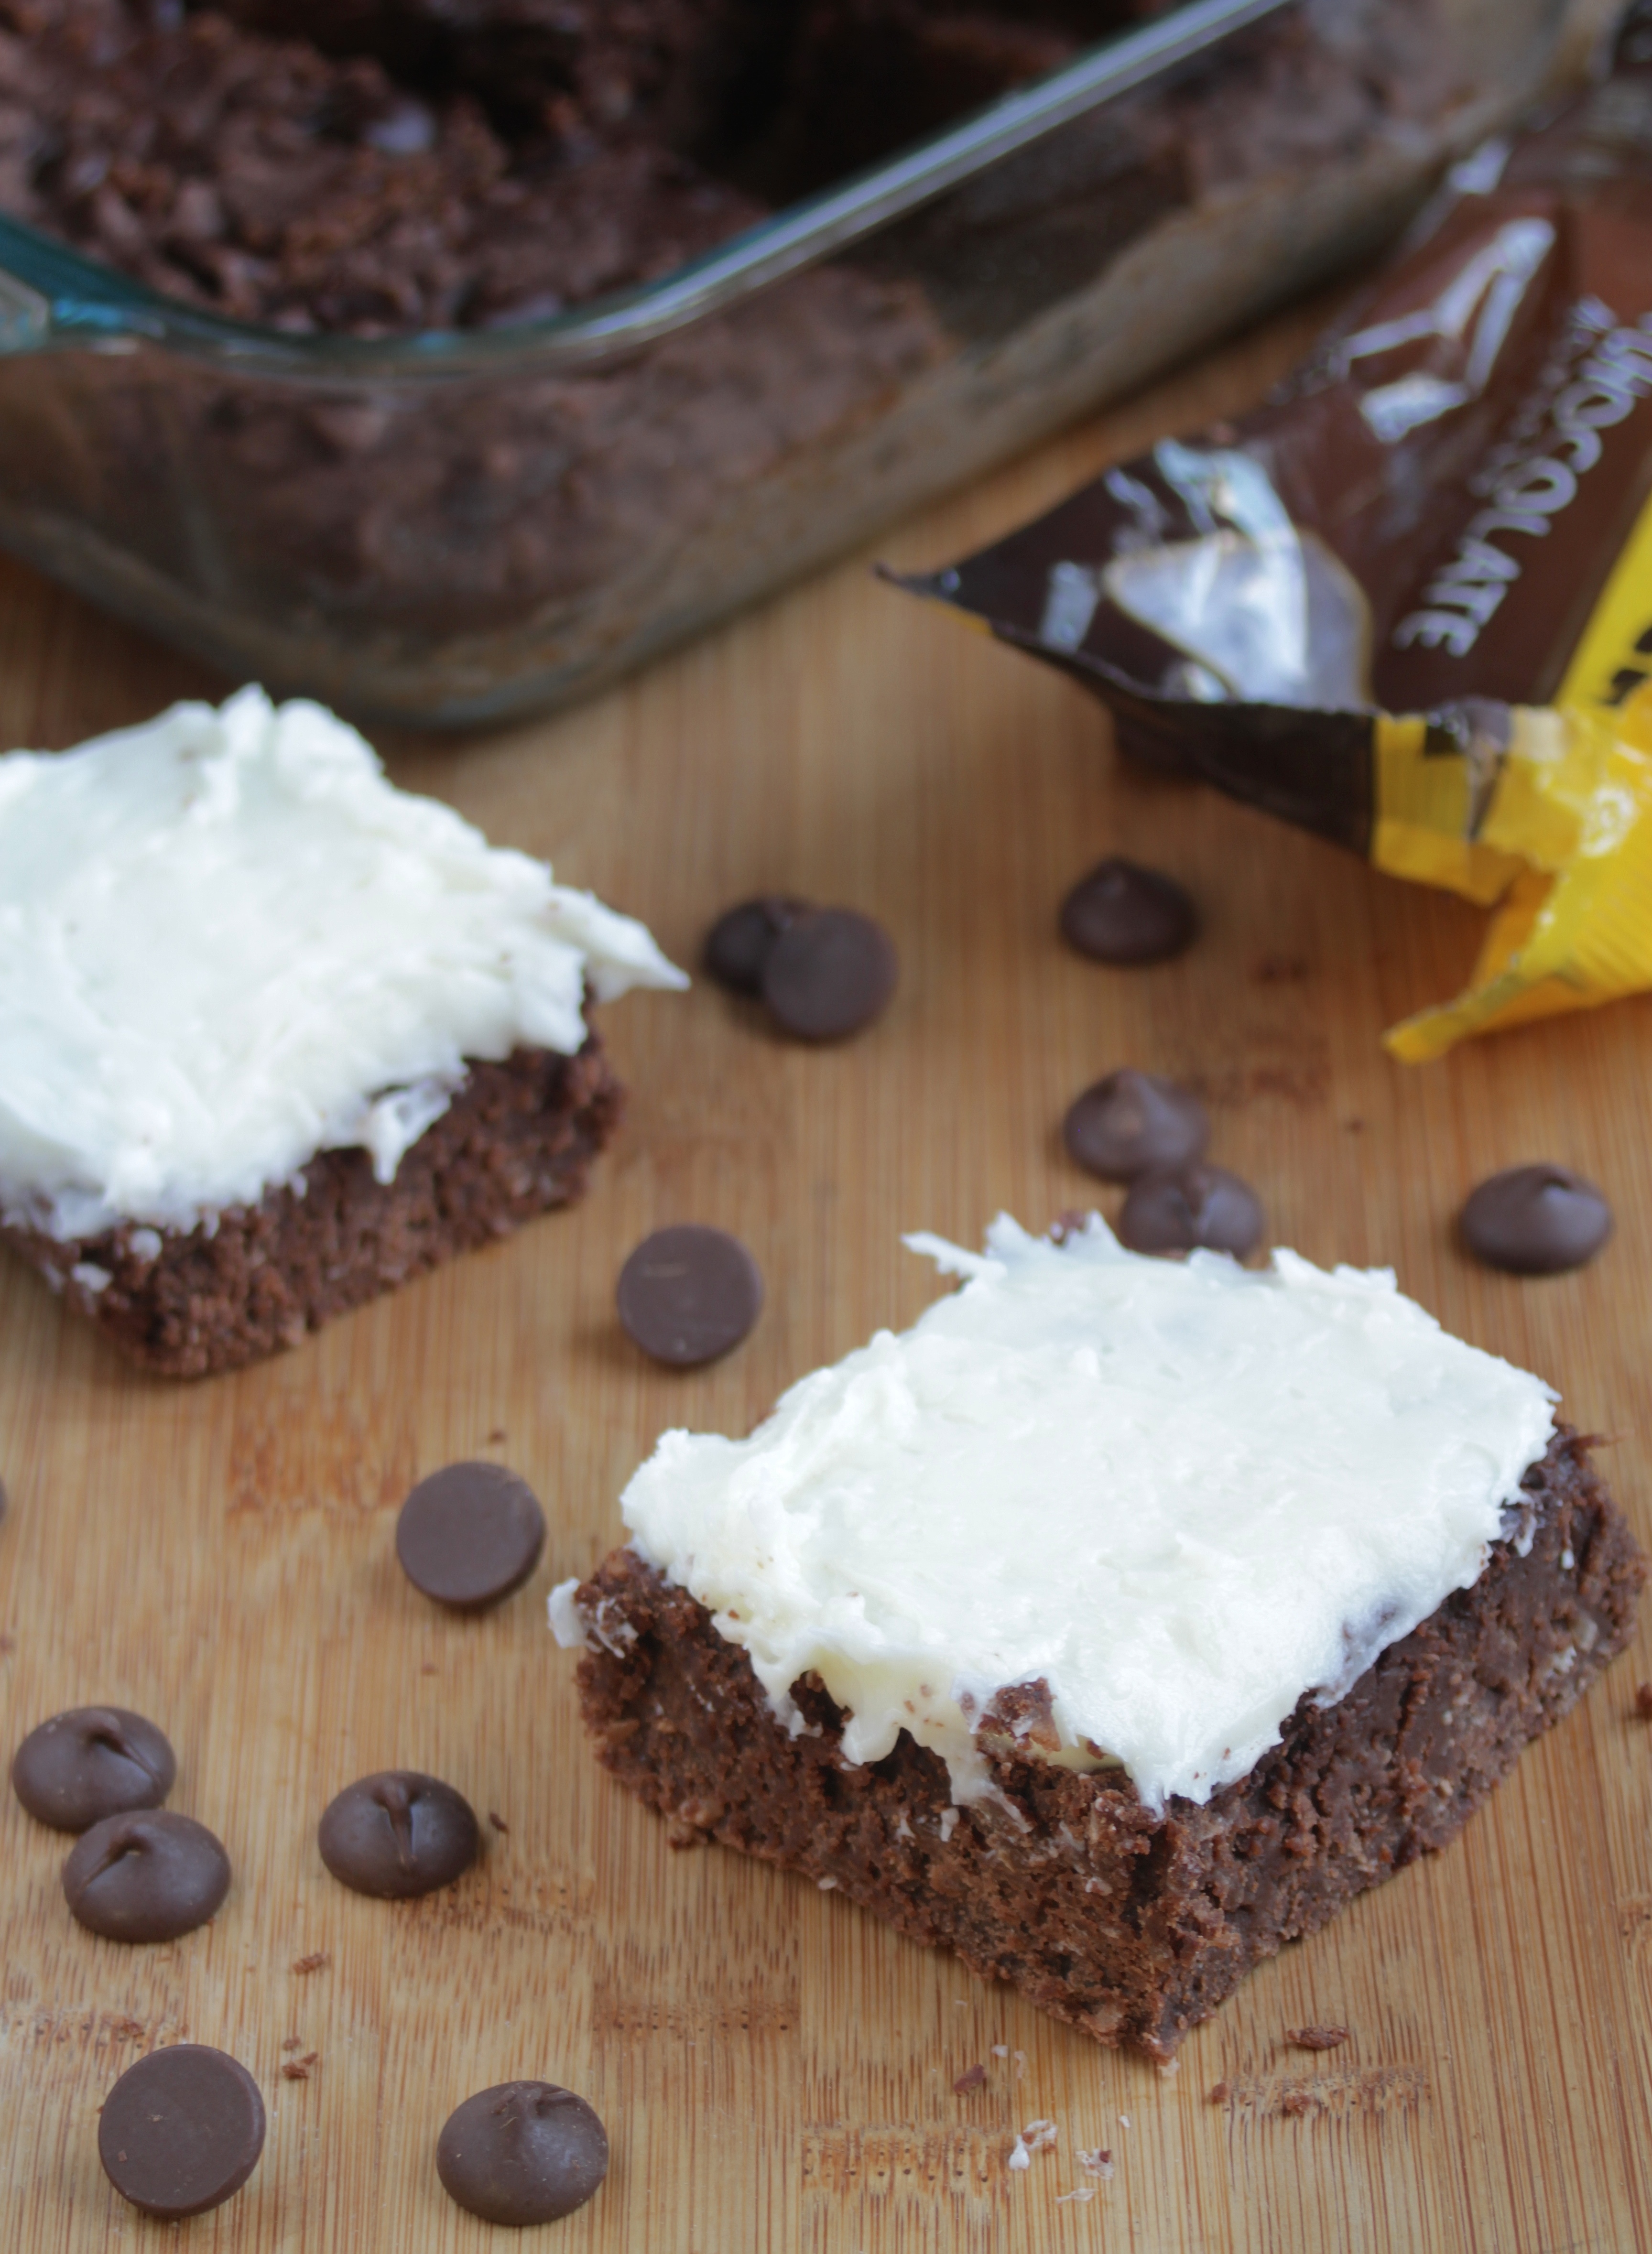
I’ll look for excuses to make frosting, and they’re not that hard to find.
Cakes are great to make and frost when there’s a birthday, a party, or… a birthday party. But when it’s the weekend and you just want something sweet and fast for me, myself, and I, frosted brownies are the best way to go.
My favorite brownie recipes are always on the traditional side. Forget about expensive olive oil and pine nuts; sweetened shredded coconut is in every grocery store and adds just as interesting a flavor and richness. Finish with some good vanilla and you’re good to go.

What makes these brownies special besides the shredded coconut and spoon-licking frosting? Absolutely nothing, so if you want to use a quick gluten-free or regular boxed brownie recipe and fancy it up with shredded coconut and this frosting recipe, go right ahead–everyone will be too busy eating to mind.
Gluten-Free Coconut Brownies
Prep time: 15 minutes
Cook time: 30 minutes
Ingredients(Makes 1 8 x 8 pan):
- 3/4 cup oat flour
- 1/4 teaspoon salt
- 2 tablespoons unsweetened cocoa powder
- 1/2 teaspoon baking powder
- 1/2 cup sugar
- 1/2 cup sweetened shredded coconut
- 2 large eggs
- 1 teaspoon vanilla
- 1/2 cup butter
- 7 oz bittersweet baking chocolate, divided OR 3/4 cup chocolate chips
- 1/4 cup water
For the frosting
- 1/2 cup butter, room temperature
- 2 1/4 cups powdered sugar
- 1 Tablespoon milk
- 1/4 cup sweetened shredded coconut
Method:
- Preheat your oven to 350 degrees.
- Mix together the oat flour, salt, cocoa powder, and baking powder and set aside.
- In a separate bowl, melt together 4 ounces of chocolate or a scant 1/2 cup chocolate chips with the butter.
- While the chocolate is melting, beat together the eggs, sugar, shredded coconut, vanilla, and water.
- Slowly pour the melted chocolate and butter into the egg/sugar mixture while whisking until fully incorporated. Don’t go too fast so that the raw eggs don’t cook upon contact.
- Add the chocolate mixture in with the dry ingredients and mix completely.
- Pour the batter in a greased 8 x 8 pan.
- Sprinkle the top with the remaining chocolate and gently press it into the batter.
- Bake for 30 minutes or until a toothpick poked into the center comes out clean. Let these cool completely before frosting.
- With a beater, beat together the butter, sugar, and coconut until smooth.
- Spread gently and generously over the pan of brownies.
- Slice the brownies into even squares and serve within a couple days of baking.

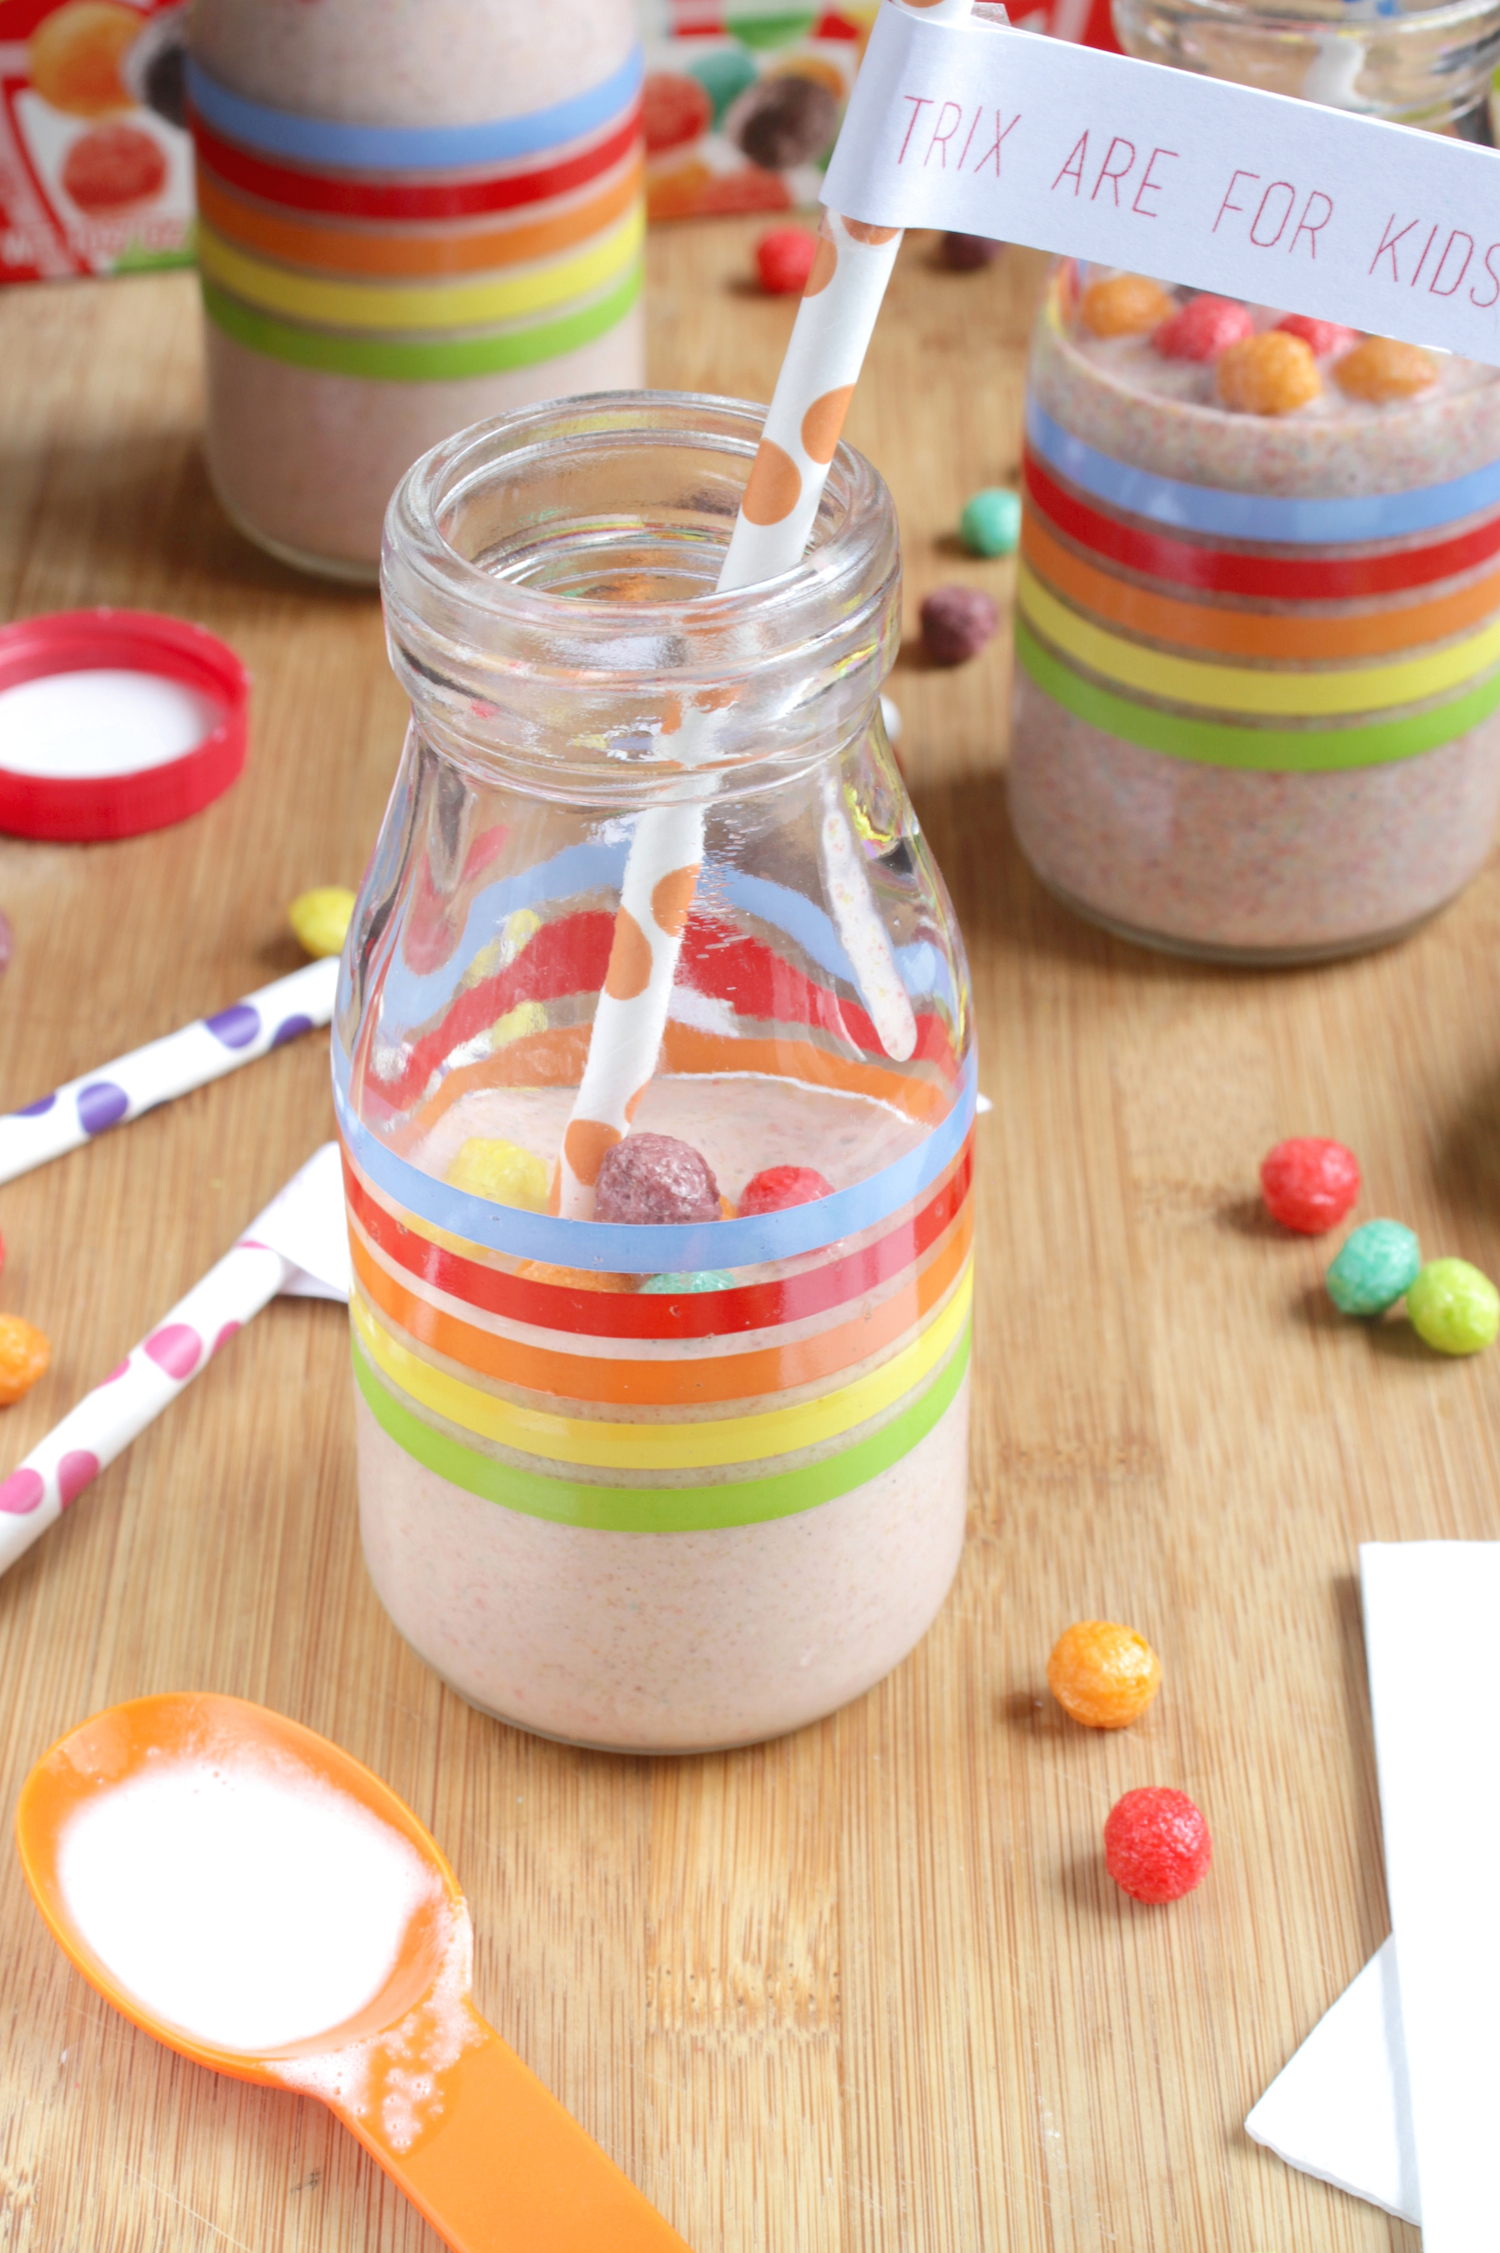
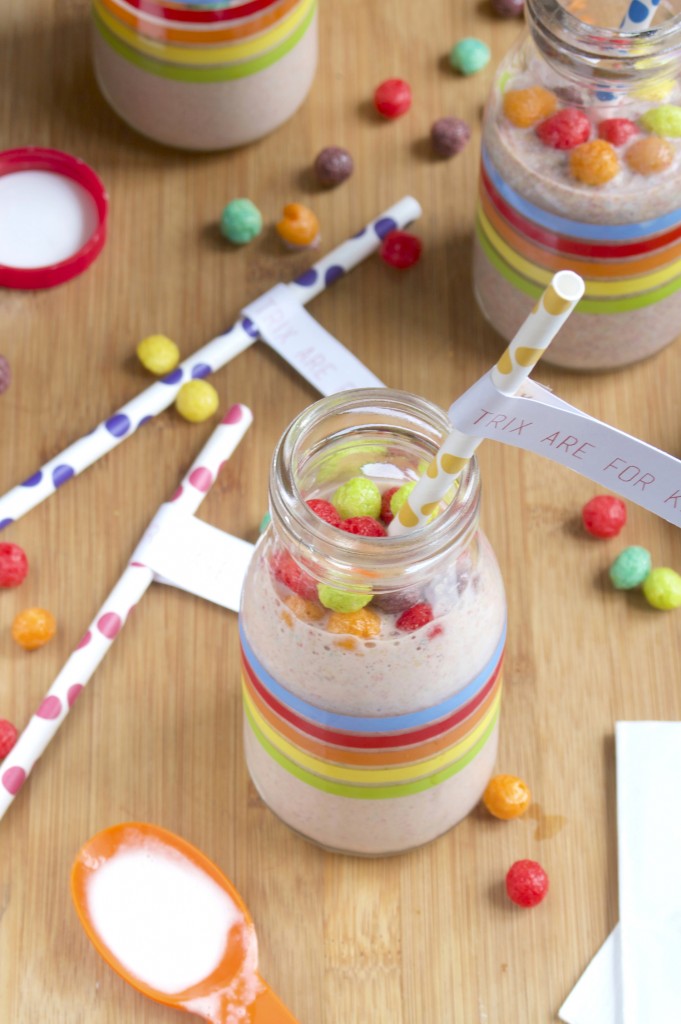
If you’ve ever had a bowl of cereal, you probably know the best part is the last bit of milk at the bottom(unless the only cereal you’ve ever had is Bran Flakes or Fiber One but that’s a different problem).
General Mills sent me some of their new Trix cereal to try out which was given a makeover for it’s 60th birthday (!!) to be fruitier than the old recipe. (Spoiler alert: No fruit shapes anymore; all of the pieces are circles) I can’t say I’m a Trix aficionado and remember what the old recipe tasted like but these are definitely fruity and delicious–by far the best lazy-night dinner I have in my cupboard when I get home past 8pm.
Living in NYC there’s no shortage of inspiration for out-of-the-box recipes whether it’s a cronut or a frozen hot chocolate. I’ve heard people rave about the cereal-milk from Momofuku’s and thought it was the perfect grown-up way to enjoy a kids’ favorite cereal.

This is just a variation on your standard 2:1 ratio milkshake. Add extra milk or ice cream to make it smoother or thicker.
You can really customize a recipe like this with any cereal–it’s a blank canvas! If Trix aren’t your thing, try Lucky Charms or even Reese’s Puffs with a chocolate peanut butter ice cream.
Trix Cereal-Milk Milkshake
Prep time: 10 minutes
Cook time: 0 minutes
Ingredients(Makes 2 servings):
Method:
-
Combine the Trix cereal and milk in a blender or food processor and mix until the Trix has fully dissolved into the milk. The milk should be smooth and darker in color.
-
Add in the ice cream and process until creamy.
-
Pour out evenly into two glasses.
-
Garnish with a little more Trix and enjoy with a straw or spoon.