

Fudge is the perfect dessert. It’s rich; it’s chocolate; everybody loves it. I also believe fudge is what makes a house a home. All that being true, I’ve never made fudge over the stovetop. Why bother when you can make it in a microwave? It’s so simple, too. This recipe has never failed me. You’re only ever 4 ingredients away from homey fudge.
Microwave Fudge
Ingredients(Makes 16 servings):
- 1 cup(8.5oz) of chocolate chips
- 1 stick(4oz) of butter(or Earth Balance)
- 1/2 cup powdered sugar
- 1/4 cup cream(or non-dairy substitute)
- handful of chocolate chips(optional)
- 1/4 cup crushed walnuts(optional)

Melt together the chocolate chips and butter. Sift in the powdered sugar and pour in the cream. Mix until completely homogenized.

If you want to include any toppings, drop them on top and push them in gently.

Put this in the refrigerator for a few hours to harden. Cut cold and serve at room temperature.

I had never tried this recipe with chocolate chips before. “What’s the point?” I thought. But the whole chocolate chips add a great crunch in the fudge that really stands out. Dare I say it’s my favorite batch ever? Yeah, it’s that good.


This is less of a recipe and more of a “You should eat this now” advisory. I never thought chocolate and ginger paired so well together until I ate a Green & Black’s chocolate bar with ginger bits inside. It was mind-blowing. These are just the right balance of sweetness and spice to make you want another. And as you’ll read, it’s quite a healthy treat, too!

Ginger is something of a superfood. It’s been a ancient Chinese remedy for everything including nausea, diarrhea, the common cold, congestion, upset stomach, high-cholesterol, and heart disease. And of course, like all of my term papers, my facts are from Wikipedia. Basically, we should be eating much more of it, and with antioxidant-rich dark chocolate, for our health.
Chocolate-Covered Ginger
Ingredients:
- 6oz chocolate chips
- 1/2lb candied ginger
Melt the chocolate over a double broiler or in a microwave safe bowl. Lay out a piece of parchment paper on the table where the ginger can cool

One by one, dip the ginger into the chocolate, leaving a little uncovered at the top so people can see what it is.

Shake off the excess chocolate and gently place it on the parchment paper to dry.

Either let the chocolate cool at room temperature or move this on a tray to the refrigerator to harden quicker.

I think it says something that I’ve had this candied ginger for almost a year and hardly touched it, and then I covered it in chocolate and half is gone in 2 days. Next time I make these I might add a little chili powder into the chocolate to give it a kick.

Happy Valentine’s Day! I like a good pun, so making date bars for Valentine’s Day was a no-brainer. Dates are nature’s candy(or is that beets?) and their flavor is as sweet as the sweetest valentine. I’ve also been wanting to make these for a while and being out of cocoa powder seemed like a sign. I love the flavor of almonds in the shortbread crust; if I made these again I’d definitely add nuts on top for a more intense flavor.
Almond Butter Date Bars
Ingredient:
- 1 cup dates, diced
- 1/4 brown sugar
- 3/4 cup water
- 3/4 almond butter
- 1/2 cup sugar
- 1 cup all-purpose flour(I used gluten-free)
- 1 egg
- 1/2 teaspoon baking powder
- 1/4 teaspoon salt
- 3/4 teaspoon cinnamon
- coconut flakes(optional)
- chopped nuts(optional)
Preheat your oven to 350 degrees.

To make the filling, combine the dates, brown sugar, and water in a sauce pan. Boil until the water has evaporated and the dates are soft and mushy. Add more water if necessary.

In a separate bowl, combine the almond butter, sugar, flour, salt, baking powder, cinnamon, and egg and mix until it makes a coarse and crumbly dough.

Press 2/3rds of the dough into a greased 8×8 baking pan.

Spread on the filling mixture in an even coating.

Sprinkle on the remaining dough in crumbs. Mix in any nuts or coconut if using.
Bake for 25-30 minutes until the topping starts to brown.

These were soft and crumbly, and definitely sweet enough with the date filling. The cinnamon added a good earthiness to balance the almond butter. Like I said, if I made these again I’d add coconut and hazelnuts on top. Maybe next Valentine’s Day; nuts are great on Valentine’s Day(I told you I liked puns).


Now this is a chocolaty recipe for Valentine’s Day.
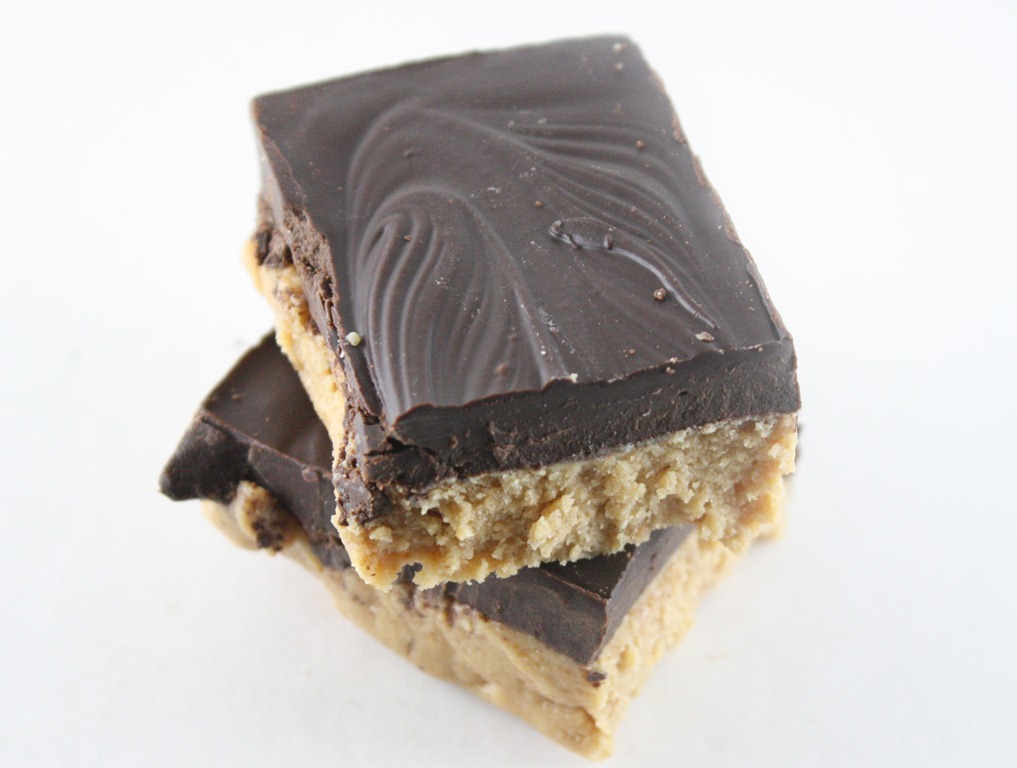
I’ve been wanting to make Jenna’s Oh Baby Bars(again) for a while now when I remembered the jar of chocolate peanut butter I just made. Oh yes; it was meant to be. These are a layer of firm, sweet chocolate peanut topped with a soft chocolate coating. What more can I say? Give these as a gift on Valentine’s Day along with bigger pants.
Double Chocolate Oh Baby Bars(adapted from this recipe)
Ingredients(makes 16 squares):

Mix together the chocolate peanut butter, melted butter, and powdered sugar until it’s a homogenous dough.

Press the mixture into an even layer in an 8×8 baking pan. Don’t worry if there’s some bumps or texture to the top because it won’t be noticeable at the end.

Melt the chocolate and remaining tablespoon of butter and mix until it’s smooth and creamy. Pour the melted chocolate over the dough and spread it into an even layer.
Allow the pan to chill in the refrigerator until it’s firm enough to cut into squares. Serve at room temperature for the best texture.

These are so good that they’re not going to last until Valentine’s Day. I might have eaten those 3 within 3 hours. Don’t judge; you’d do the same. The chocolate flavor is extremely song but there’s no lacking of peanut butter flavor, either. Next time I might add a sprinkling of sea salt to the top to round it off.

Yum.
Today is the first day of February, the time to (hopefully) start enjoying the outside more by cleaning off the swing set, taking out bicycles, and ignoring that little thing called Valentine’s Day. What better way to celebrate a new month than with brownies?

When I ran yearbook bake sales in high school, the one food that went without exception were brownies made from a box. People just like them. Once you get to a certain level of cooking/baking, serving a box mix feels like a stab through the heart. Instead, we make recipes that rival boxed brownies. These are just as sugary and fudgy as the ones you get from a Duncan Hines or Betty Crocker mix. They’re also the same that I used in my grasshopper brownies but the recipe is good enough that it needs its own post. I mean, don’t they just look that good?
Better-Than-Boxed Brownies
Ingredients(Makes 16 2’-inch brownies):
- 1 1/4 cup flour(I used gluten-free all-purpose flour)
- 1/3 cup cocoa powder
- 3/4 cup sugar
- 1/4 teaspoon baking powder
- 1/4 teaspoon salt
- 1 teaspoon vanilla extract
- 4oz(1/2 cup) semi-sweet chocolate or chocolate chips
- 1/4 cup cooking oil
- 1/4 cup water
- 1 egg

Preheat an oven to 350 degrees. Melt the chocolate and mixing it with the cooking oil. Next mix in the water, sugar, extract, salt, and cocoa powder. Sift in the flour and baking powder and mix until just combined.
Grease an 8×8 baking pan and pour in the batter. Cook for 25 minutes until the center is just cooked. Wait until they have cooled to cut.

Giveaway
The people at CSN Stores have offered one US/Canadian reader a $35 gift certificate to any of their online stores. There are 3 simple ways to enter; please leave a separate comment for each one.
1. What’s your favorite childhood dessert? or what dessert are you looking forward to eating this month?
2. Follow me on Twitter(or just say if you already do)
3. Like me on Facebook(or just say if you already do)
This giveaway ended February 5th

There is so much right about these it’s hard to know where to begin. Honey butter is a sweet and rich condiment made of 1 part honey to 1 part butter. It’s a great thing to spread on toast, in sandwiches—wherever! It only seemed natural that this would make an excellent blondie, and with chocolate chips(because what do those not make better?). The flavor of honey butter shines through more as an aftertaste. I would have liked these to be a little fudgier but if you like your brownies more cakey then these are for you.
Honey Butter Blondies
Ingredients:
- 1/2 cup honey
- 1/2 cup(1 stick) butter(or Earth Balance) at room temperature
- 1/4 cup sugar
- 1 egg
- 1 teaspoon vanilla extract
- 1/4 teaspoon salt
- 1/2 teaspoon baking powder
- 1/4 teaspoon baking soda
- 1 1/2 cups all-purpose flour(I used Bob’s Red Mill’s gluten-free)
- 1/3 cup chocolate or white chocolate chips.

Preheat an oven to 350 degrees. Start by creaming together your butter, sugar, and honey until it’s nice and smooth without any clumps. Add in the egg, extract, salt, baking soda, and baking powder and beat lightly.

Sift in the flour and mix again until the batter is even. Lastly, fold in the chocolate chips gently.

Press the batter into a greased 8×8 baking pan and bake for 30-35 minutes, until the center has set. Cool completely before cutting in and serving.

The top looked burnt but it wasn’t at all; I can only assume the ingredients cook to be that deep brown color. It actually smelled a lot like graham crackers baking!

I ate mine hot out of the oven and it was amazing. The only thing that could have made it better would have been a pat of honey butter on top. Technically, these were honey margarine blondies since I made mine with Earth Balance, but that doesn’t sound nearly as appealing so we’ll just stick with honey butter.

These are my new favorite brownies. They’re also probably the most fattening/sugary brownies I’ve ever made. Coincidence? I think not.
I’ve been wanting to make grasshopper brownies for the past few months. If you don’t know what those are, they’re a layer of brownies topped with a peppermint filling and a chocolate top. Delicious, no? These are so sweet and rich and they absolutely melt in your mouth. I couldn’t praise these enough. It’s like a peppermint patty in brownie form. Just don’t think about how many calories in them and enjoy.
Grasshopper Brownies
Ingredients(Makes 16 servings):
-
1 1/4 cup flour(I used gluten-free all-purpose flour)
-
1/3 cup cocoa powder
-
3/4 cup sugar
-
1/2 teaspoon baking powder
-
1/4 teaspoon baking soda
-
1/4 teaspoon salt
-
4oz(1/2 cup) chocolate chips
-
1/4 cup cooking oil
-
1/4 cup water
-
1 egg
Preheat an oven to 350 degrees. Start by sifting together the first 6 ingredients. Melt down the 4 ounces of chocolate and mix this with the cooking oil. Add that to the flour mixture along with the water and egg and mix to form the batter. Grease an 8×8 cooking pan and spread the batter in. Bake for 25 minutes and let this cool completely.

To make the filling, melt a stick of butter, pour in the peppermint extract and sift in the powdered sugar. This will form a loose filling. Spread it over the cooled brownies in as even a layer as you can.
Tip: If you’re having trouble with the peppermint mixture sticking when spreading, put a piece of saran wrap between your hands and the filling and use that to press the filling down.

Lastly, melt 8 ounces of chocolate with a tablespoon of butter and spread this out evenly on top of the peppermint layer. Take care to move quickly and gently so that the peppermint layer and the chocolate don’t get mixed together. Let the top harden completely before cutting into these with a sharp knife.

You can really use any brownie recipe for the bottom; I just included that one for convenience sake(it also makes incredibly moist brownies which is never a bad thing). I wasn’t crazy about the filling as I was making it, but combined with the chocolate and brownies it’s just rich enough not to get lost in the experience. Yes, experience, because these brownies are better than any trip to Disney World.

Remember when I made cupcakes and was too lazy to frost them? Well, 6 days later it snowed again and I had nothing but time.
At first I was going to try a chocolate buttercream but to get chocolate to be the right temperature seemed like more work than reward. Also, I was on a coffee kick and decided to split the difference and settle on mocha. Who doesn’t love mocha lattes and mocha cappuccinos? It’s an excuse to have chocolate in the morning. This frosting is just as rich and pairs perfectly with any chocolate cake recipe.
Mocha Buttercream
Ingredients:
- 1 stick of butter(or Earth Balance) at room temperature
- 3 cups of powdered sugar, divided
- 2 tablespoons warm water + 2 teaspoons instant coffee granules(you could substitute with 2 tablespoons of strongly brewed coffee)
- 2 tablespoons cocoa powder

Cream together the stick of butter with 1 cup of powdered sugar.
Once the mixture is homogenous, mix in the coffee, cocoa powder, and 1 more cup of powdered sugar and beat again.
After that has come together, sift in the last bit of powdered sugar and beat until the buttercream is smooth and there are no lumps.

Let’s address some elephants in the room:
1) I’m completely aware of what color the frosting is and what it looks like. You don’t have to tell me because I’m not blind. In fact, I was the one licking it off my fingers, so clearly the flavor trumps the appearance.
2) I know I can’t pipe frosting to save my life. My favorite Charmed one was Piper; I loved Billie Piper as Rose in Doctor Who; I, on the other hand, am no piper. You can hire me to bake your birthday cake but God help us all if you want me to decorate it.

I will, however, garnish with some espresso chocolate bark because that’s how I roll.

For the past 2 months I’ve been telling myself I would make peanut butter cups but never got around to it because of how much work it feels like(how lazy is that?); truthfully, I’m fine with dipping a piece of chocolate in a jar of peanut butter and leaving it at that. But after seeing these bars on Michelle’s blog I remembered I had bookmarked Jenna’s Oh Baby Bars. Now these are simple enough I could do.
My only problem was that the recipe seemed to call for no-stir peanut butter and the only one I had enough of was a runny, natural-style peanut butter. I adjusted the ingredients and proportions a tad to account for this and then went from there. All I can say about this is “Oh baby” and that Jenna is a genius for this recipe.
Ingredients I used(Made 10 thick bars):
- 1/2 cup + 2 tablespoons natural peanut butter
- 1 1/4 cups powdered sugar
- 1/4 cup brown sugar
- 1/4 cup + 1 tablespoon Earth Balance margarine
- 2 Tablespoons coconut oil
- 10oz semi-sweet dark chocolate chips

Instead of blending the ingredients at room temperature, I melted 1/4 cup of Earth Balance and the coconut oil together first. Then I stirred in both of the sugars and lastly the peanut butter.

Once that was homogenous, I spread it out in a large loaf pan and dropped it on the counter a few times to level it out. Of course, I taste tested what was left in the mixing bowl and it was perfect.

Then I melted the chocolate with the remaining tablespoon of margarine in my microwave and spread it out on top of the peanut butter layer.

And then I pretended I was a chocolatier(I’m not going to say this is my dream job, but if it’s what the fates handed me I would not complain and just eat chocolate) and gave it a fancy swirl top.
When that was done, I threw this in the refrigerator to harden and after an hour or so began to cut squares.

In terms of flavor, these are absolutely delicious. Texturally, the bottom layer was a little soft; next time(and there will be a next time) I’d probably reduce the margarine by 2 tablespoons and replace that with coconut oil. Or if I’m being a better planner I’d just buy no-stir peanut butter like the original recipe uses.

Screw Folgers, eating this is the best part of waking up:

One of my favorite things to snack on lately have been chocolate covered coffee beans. It’s coffee, it’s chocolate—what’s not to love? I though about how I could make an at-home version for less that’s just as good and settled on this bark recipe. I couldn’t help myself from eating it piece by piece as I was making it; I’m still a little buzzed from all that dessert. Best of all, it’s 3 simple ingredients! Yes, 3! I urge you to make this for the coffee addict in your life; they’ll love you until they crash.
Espresso Chocolate Bark
Ingredients:
-
1 bag(12oz) semi-sweet chocolate chips
-
1/2 cup whole coffee beans(most grocery stores let you buy these in bulk)
-
2 tablespoons coarse cane sugar
Melt down the chocolate chips and lay a piece of parchment paper on a baking tray. Spread out the chocolate to be about 1/2 an inch thick. Sprinkle on the coffee beans evenly and press them into the hot chocolate gently.

Lightly sprinkle a layer of sugar over the chocolate while it is still melted. don’t worry about even layering since most of it will shake off when it’s dried. Just make sure to cover all of the chocolate.

You can either let the chocolate harden at room temperature or speed the process up by putting it in a refrigerator. When it’s hardened tilt the large piece of chocolate to shake off all the excess sugar. Break the chocolate into single-sized chunks.

These are just as good as any chocolate covered coffee beans. I wanted to try them with a darker chocolate but after tasting how bitter the coffee beans make the semi-sweet chocolate I think any darker would be hard to eat. The sprinkle of sugar adds a great texture to contrast with the crunchy beans. Now you can have your coffee and eat it, too.


