
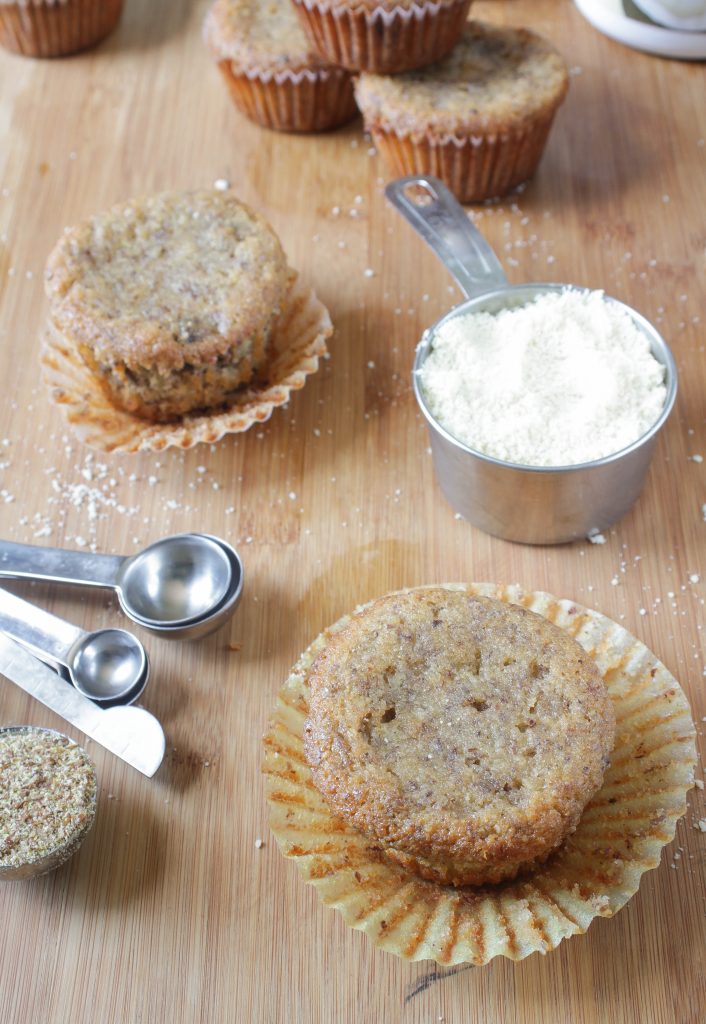
This month Stonyfield asked their Clean Plate Club to get creative with yogurt and some unconventional ingredients. We got some Barlean‘s items included coconut oil and ground flaxseeds. As a gluten-free baker, I like incorporating nut flour in place of regular flour when possible because it’s not just adding structure, it’s adding nutrients.
I decided to make these healthy muffins as a grab-and-go breakfast for the week. They didn’t rise very much while in the oven which worried me a little. Still, they had the best texture of a gluten-free muffin I’ve ever had–moist and dense but not too thick or chewy.
While they were undoubtedly best straight from the oven, the flax and coconut oil kept the muffins from drying out even days later. And since it’s full of nuts and seeds instead of grains, it felt like a better breakfast, too.

In order to make these muffins a little healthier, try swapping out the chocolate chips for chopped walnuts or pecans. You could switch out the french vanilla yogurt for plain yogurt to cut out some of the sugar, but be sure to add a little vanilla extract if you do.
Hearty Grain-Free Chocolate Chip Muffins
Prep time: 15 minutes
Cook time: 30 minutes
Ingredients(Makes 12 muffins):
Method:
- Preheat your oven to 350 degrees.
- In a small bowl, mix the Forti-Flax and water and set aside.
- In a large bowl, combine the almond flour, sugar, baking powder, and cinnamon and mix until even.
- Add in the yogurt, maple syrup, eggs, and flax mixture and stir until it forms a thick batter.
- Lastly, add in the culinary coconut oil and mix until it’s fully emulsified in the batter.
- Evenly pour out the batter between 12 lined muffin wells.
- Bake for 30 minutes or until the top of the muffins are firm.

I’m not sure how I’d live if I were allergic to nuts. Peanuts, coconuts, almonds, cashews, pistachios—all of them; they’ve become a staple in my diet without gluten or meat. And don’t even get me started on all of the amazing things you can bake with almond flour…
Thankfully, I’m not, so I can go on making granola chockfull of all sorts of nuts packed with protein, fiber, and healthy fats. I’m not one to always use coconut oil(mostly because of the price), but I love how aromatic it is when I do. You can smell all the flavors in this granola as it bakes, from the earthy cinnamon and vanilla to the fruity coconut.

Toasting the nuts adds a much more vibrant flavor to them. The easiest way to do this is in a large frying pan over low to medium heat. It’s easier and more consistent than throwing the nuts into the oven; just be sure to pay close attention to them as they will burn quickly.
Coconut Almond Granola
Prep time: 10 minutes
Cook time: 35 minutes
Ingredients(Makes about 3 cups):
- 2 1/4 cups gluten-free oats
- 1/3 cup liquid sweetener
- 2 Tablespoons coconut oil, melted
- 1/4 teaspoon cinnamon
- 1/2 teaspoon vanilla
- 1/4 teaspoon salt
- 1/4 cup shredded coconut
- 1/4 cup sliced almonds
- 1/4 cup chocolate chips(optional)
- 1/4 cup dried cherries(optional)

Method:
- Preheat your oven to 350 degrees.
- Mix together the oats, sweetener, coconut oil, cinnamon, vanilla, and salt in a large bowl.
- Lay the oats out in a 1/2-inch thick layer on a lined baking tray.
- Bake for 30-35 minutes, breaking up the oats every 10 minutes or so, until they’re toasted and golden. Remove from the oven and let cool.
- While the granola is baking, toast the coconut and almonds together in a large frying pan. Make sure to stop once they’re aromatic and golden and take care not to burn them.
- Toss the toasted coconut and almonds in with the granola. Toss in the cherries and chocolate chips as well if using, but make sure that the granola and nuts are completely cool before adding in the chocolate chips or else they’ll melt on touch.
- Store in an air-tight container for up to 2-3 weeks

I said that the cherries and chocolate chips were optional but… they’re really not optional; you’re only cheating yourself if you leave them out. Between the rich toasted nuts and sweet fruit and chocolate, I’m always going back for more.

From time to time I like to make “chocolate” with coconut oil, agave, and cocoa powder to keep in the refrigerator for a snack. It’s tasty and I can almost tell myself it’s healthy because I made it from scratch instead of peeling off a wrapper and eating a whole Hershey’s bar.
The last time I went to make it, I remembered about the flavored agave nectar I picked up a while back and had yet to use. Have you seen these? They’re popping up more and more places; I think I found mine at Ocean State Job Lot or Market Basket but now even Whole Foods is making their own store brand flavored sweeteners.

And then I remembered the best dessert ever and decided why make chocolate when you can make ganache? Adding a little almond butter into chocolate prevents the coconut oil from fully hardening and gives it a nice, soft, fudgy texture.
If you don’t want to buy specialty flavored agave, you can substitute that for 6 Tablespoons of plain agave and 2 Tablespoons of seedless raspberry jam. If you want to keep this fully raw, you can use 2 Tablespoons of raspberry puree instead. I haven’t tried either of these yet but I’m fairly confident they’d work, albeit with a slightly less intense flavor.
Raw Chocolate Raspberry Ganache
Prep time: 10 minutes
Cook time: 0 minutes(allow 30 minutes to harden)
Ingredients(Makes 36 1-inch squares):
- 1/2 cup coconut oil, melted
- 1/2 cup raspberry agave nectar
- 1/2 cup + 2 Tablespoons cocoa powder
- 1 1/2 Tablespoons creamy almond butter

- Mix the coconut oil and agave nectar together.
- Slowly incorporate the cocoa powder until it’s completely mixed in, too.
- Lastly, add in the almond butter and mix to completion.
- Pour the ganache into a 6×6 pan.
- Refrigerate for 10 minutes until it’s semi-soft. While it’s still soft, cut the ganache into 1-inch squares. Then continue to refrigerate for another 20-30 minutes until it’s completely cooled.

I just put this into a pan and let it harden and have been eating it like a fudge, but you could make a crust and use it as the filling for a chocolate torte, or even use it as a filling for some chocolate wafers and make sandwich cookies. There’s really no way this wouldn’t taste good.

Happy New Year! I wanted to get the year off to a sweet start, so here’s the dessert I made for Christmas, which just happened to turn out to be one of my favorite desserts ever.
As soon as I saw this recipe, I knew I wanted to make it. I love things that are salty and sweet and pecans are never a bad thing either; add chocolate and you have to have a winning dessert.

I actually think it’s easier to make raw tortes and pies than cooked ones; you don’t have to worry about cutting cold butter into the crust or cooking them in a water bath. This recipe comes together extremely quickly and is full of flavor.
I used maple syrup because I had plenty on hand. To make this fully raw, use agave nectar or raw honey.
Raw Salted Caramel Chocolate Pecan Torte
Prep time: 15 minutes
Cook time: 0 minutes
Ingredients(Makes 1 torte):
For the crust:
- 6oz(about 1 1/2 cups) dates
- 6oz(1 1/2 cups) pecans
For the caramel:
- 2oz dates
- 6 Tablespoons maple syrup or other liquid sweetener
- 1/2 teaspoon coarse salt
For the filling:
- 1/2 cup cocoa powder
- 1/4 cup coconut oil, melted
- 1/2 cup maple syrup or other liquid sweetener
- Sea salt and pecans for garnish

Method:
- To make the crust, pulse the dates and pecans in a food processor until it forms a dough ball. If after a while the dough hasn’t come together, add water by the tablespoon slowly until it does.
- Grease a 9-inch pan lightly with coconut oil. Press the dough into the pan and spread it out evenly into a pie crust shape, raising it at the side. Make sure there are no holes in the bottom.
- Make the caramel by blending together the maple syrup and dates in a food processor until smooth and golden in color. Once it’s blended into a sauce, add in the sea salt and mix gently.
- Pour the caramel in a thin layer on top of the bottom of the crust, spreading it out evenly.
- To make the filling, blend the melted coconut oil, cocoa powder, and maple syrup in a food processor until it’s uniformly mixed.
- Carefully cover the caramel layer with the chocolate layer. For me it was easiest to add a little bit of topping all around the pie and lightly blending the top together with a soft spatula.
- Garnish the top with pecans and sea salt if desired.
- Refrigerate your torte until the filling sets. Remove it from the refrigerator about 10-15 minutes before cutting and serving. Personally I liked this when it was still slightly chilled but you can also eat it at room temperature.

I would have liked to have gotten better pictures of this but it was too good not to just dig into. It may not be one of the prettiest desserts, but it’s by far one of the tastiest I’ve made in a long time. I can’t wait to make this again.

If you’ve been following this blog for any length of time you’d know I’m obsessed with the raw chocolate ganache torte(pictures here) from Wildflour bakery. Time and time again I’ve tried to make my own, but it just never comes out as good as there’s.
Until now.

I can honestly say this is one of the best things I’ve ever eaten. The raw chocolate taste so much more intense than anything that comes in a wrapper. And the crust and filling blend seamlessly together for a smooth, nutty bite. It’s perhaps my favorite recipe to share and I hope becomes this site’s most popular, because it truly deserves the attention.
You can use any nut butter in place of the almond butter. Just don’t leave it out. It helps to lower the solidity temperature of the coconut oil so that the dessert is easily cut through straight from the refrigerator.
Raw Chocolate Ganache Tortes(adapted from this recipe and inspired by Wildflour)
Prep time: 15 minutes
(Un)cook time: 2 hours
Ingredients(Makes 8 small tortes):
For the crust:
- 6 Tablespoons almond flour
- 1/4 cup cocoa powder
- 2 Tablespoons coconut oil, softened or melted
- 2 Tablespoons agave nectar
For the filling:
- 1/2 cup cocoa powder + more for dusting
- 1/4 cup coconut oil, melted completely
- 7 Tablespoons agave nectar
- 2 Tablespoons almond butter

Method:
- Combine all of the crust ingredients and mix until a uniform dough forms.
- Press the dough in an even layer into the bottom of a small loaf pan. Alternatively, you could make these in a muffin tin and have them be round.
- For the filling, beat together all of the ingredients until it makes a soft ganache.
- Pour the ganache over the crust base. Refrigerate for 2 hours.
- Sift extra cocoa powder over the torte. Cut with a sharp knife into 8 equal-sized tortes.

I will never pay for another raw chocolate ganache torte again. I will, however, still pay for their carrot cake truffles, chocolate pound cake, raw macaroons, raw cheesecake, raw oreos and rum balls, so I wouldn’t worry about them losing much business.

I’d say I’m an adventurous eater and an adventurous cook. I’ll try anything once… except for deep frying, because we really don’t need to get the fire department involved.
For a long time I had never had a plantain. They just seemed… odd.

I mean, look at that—isn’t that kind of creepy? But also familiar looking. It took a freelance job to lure me outside of my comfort zone and try a plantain for the first time. And you know what? It wasn’t bad; in fact, it was good. The flavor was surprisingly sweet compared to what I expected. In fact it was cloyingly sweet, more like an apple than a banana. But the savory oil helped to balance out the flavors. Since then I’ve bought plantains and made them for myself a few times and I can’t figure out for the life of me why more cultures haven’t tapped into this delicious starch.
How To Fry Plantains
You’ll need(for 4 side servings)…
- 2 plantains
- 1 Tablespoon coconut oil*
*or other neutral oil.

Method:
- Peel the plantains and slice them on a bias.
- Heat the oil in a large frying pan over medium heat.
- Fry the plantains in the oil, turning every minute or so to brown each side.
- When browned all around, remove from the heat, drain from the oil, and serve hot.

I really like the subtle flavor of coconut with the plantains for a true tropical flavor. If you’re serving this as a dessert, sprinkle a couple tablespoons of brown sugar into the pan towards the end of cooking.
Have you ever tried a plantain? If not, would you try one now?

Reading food blogs constantly sets of food cravings. I could be eating a perfectly healthy lunch or breakfast when all of a sudden a giant slice of German chocolate cake pops up on the screen and I get one of those I-need-chocolate-right-this-moment feelings. They’re awful. I’m sorry even to add to that.
When Caroline posted these cheesecake bars, it set off a craving just like that. Before I knew it I had already begun laying out the ingredients to make a version of them that day. These might be marginally better for you, but they’re still definitely a rich treat. The crust is an almond cookie base, the filling a cashew cream “cheese”, and chocolate a soft coconut oil ganache. All together it makes the perfect blend on richness and sweetness.
Chocolate Cheesecake Bars
Ingredients:
For the crust:
-
1 1/2 cups almonds
-
2 Tablespoons almond butter
-
1/4 cup cocoa powder
-
2 Tablespoons coconut oil
-
2 Tablespoons agave nectar
For the filling:
-
2 1/2 cups cashews, soaked for 3-4 hours
-
2 Tablespoons coconut oil
-
5 Tablespoons agave nectar
-
1 teaspoon vanilla extract or 1 vanilla bean
-
1 teaspoon nutritional yeast*
-
1 teaspoon lemon juice*
*These ingredients aren’t entirely necessary but they will add a more authentic tang to the filling to simulate real cream cheese.
For the ganache:
-
1/4 cup cocoa powder
-
1/3 cup agave nectar
-
1/4 cup coconut oil

Method:
-
Combine all of the ingredients for the crust together in a food processor and blend until it forms a clumpy dough.
-
Press the dough flat into an 8×8 pan.
-
Make the filling by blending all of the ingredients in a food processor until smooth.
-
Spread the filling out across the top of the crust into an even layer.
-
Make the ganache by melting the coconut oil and mixing it with the cocoa powder and agave nectar.
-
Pour the ganache on top of the cheesecake filling and spread until smooth.
-
Refrigerate for 2 hours until the ganache and filling have set. Cut into 16 squares and keep refrigerated until ready to serve.

The one thing I would do differently next time is add cacao nibs or raw almonds into the filling. The ganache on top is quite soft and doesn’t add the crunch factor I expected it to. Besides that, this is a knock-out dessert.

One of my favorite treats in the Summer when I was growing up was a Dairy Queen ice cream cone, specifically one dipped into cherry sauce that hardened up as soon as it hit the ice cream into a shell coating.
I have no idea how to make that.
But what I do know how to make is peanut butter magic shell, and that’s almost as good, especially with chocolate ice cream(or chocolate banana soft serve in this case).

Really, if you look up the ingredients in that cherry magic shell it’s about 20 things you can’t find in supermarkets and shouldn’t be putting into your body. This recipe has only 3 ingredients, all natural and easy to shop for. Let’s see Dairy Queen beat that.
Peanut Butter Magic Shell
Ingredients(For one bowl):
- 1 Tablespoon 100% peanut butter
- 1 Tablespoon liquid sweetener(maple syrup, agave, corn syrup, etc.)
- 1/2 Tablespoon coconut oil(preferably refined), melted or softened

Method:
- Mix together the peanut butter, sweetener, and oil into a thick, even sauce
- Pour the peanut butter sauce over plated ice cream. Wait a few moments for the sauce to harden before digging in.
This works best with ice cream straight from the freezer; if using softened ice cream or banana “soft serve”, the shell might not form immediately. Simply pour the sauce over the ice cream and refrigerate or freeze it for a few minutes until the shell has hardened

Now if you’ll excuse me, I have more eating to do.

Most of the time I like no fuss desserts: A bar piece of chocolate, 5 a spoonful of peanut butter, leftover frosting eaten with a spoon—you know, something simple. But once and a while I like making something unique with complimenting flavors and textures, the sort of thing you’d buy at a bakery. These were surprisingly simple for how impressive they came out. The cookie crust could be eaten on its own and really brings the dessert to a new level. It’s more rich than it is sweet. And since it’s raw and mini, you can eat about 5 and feel good about it, or at least think that.
Mini Raw Cheesecake With Chocolate Shortbread Crust
Ingredients(Makes 7 mini cheesecakes)
For the crust:
-
3 Tablespoons almond butter
-
3 Tablespoons coconut butter, semi-softened
-
1 Tablespoon agave nectar
-
3 Tablespoons cocoa powder
For the filling:

Line a cupcake tray with paper liners. Make the crust by mixing together all of the crust ingredients and separating it into 7 equal portions. Flatten each into a disk and place it into the bottom of the paper liners. Refrigerate the chocolate bases while making the filling.

To make the filling, drain the cashews from their water. Add all the ingredients into a food processor and blend until smooth.

Scoop the filling evenly into the paper liners and level each. Place them in the refrigerator to harden until ready to be served.

I think I’ll have another.

Question: How do you make coconut blondies even better? Answer: You give them an awesome and delicious frosting.
I know I said these are so good that they don’t need any frosting, but really, what doesn’t frosting make better? I was reading in this NY Times article on coconut oil that it makes a great, smooth vegan frosting so I wanted to try it out. If you don’t have coconut oil, room-temperature non-hydrogenated shortening would also work well in this recipe.
The flavor reminds me of a lemon slurpee or an Italian ice. It’s really sweet and refreshing. It goes perfectly with the coconut, but would also work with any vanilla cake. And it takes about a minute to come together! You can’t beat that.
Lemon Drop Frosting
Ingredients:
- 1/2 cup coconut oil
- 2 cups powdered sugar
- 2 Tablespoons lemon juice

Start by mixing room-temperature coconut oil and lemon juice. If your coconut oil is too hard to begin with, gently heat it to the point where it’s semi-soft.
Gently sift in the sugar and continue folding until the frosting starts to come together.

Once the mixture’s homogenous and starts sticking to itself, it’s done.

The frosting should be rather soft and easy to spread.

Don’t worry if you eat more than you frost with; that’s completely normal. It’s also completely normal to pick off the frosting with a fork and eat it after you’ve frosted the blondies. These things happen.


